Are you fed up with constantly losing track of your code changes? Do you find collaborating with a team on a coding project frustrating, constantly encountering conflicts and mix-ups? Look no further than Git – the ultimate solution to all your version control problems. Whether you are a seasoned developer or a beginner, Git is an open-source distributed version control system that allows teams to track code and work together in the same workspace without disrupting anyone's progress. Even a Software Testing Company can leverage Git to streamline collaboration and ensure seamless test management across teams.
It is used to:
- Control version of code.
- Keep tracking who made changes in the tracked code.
- To collaborate on code.
- Goals of Git: speed, data integrity, and support for distributed, non-linear workflows.
- GitHub is a UI-based hosting service of GIT with a source code management (SCM) system.
Distributed Version Control Systems:
Distributed version control systems contain multiple repositories or folders. Each user can make their own repository and working copy. Just committing to the changes will not give access to the other of your changes. This is because the commit will reflect the changes in the user’s local repository, and the user must push them to make them visible on the central repository. Also, they cannot get others’ changes unless they have pulled those changes into their own repository.
Users need 4 things to make their changes visible to others:
- You need to commit
- You need to push
- They need to pull
- They need to update
Purpose of Version Control:
- Multiple members can work on a project simultaneously/collaboratively. Anyone can work on and edit their own copy of the file, and it is up to the team to decide when to make changes.
- It also allows one person to use multiple computers for a project, so it is handy even if you are working alone.
- Shares the simultaneous work of a member of the team. In rare cases, when two people make conflicting changes to the same row of data, the control system needs human assistance to decide what to do.
- Version control provides access to older versions of a project. This is insurance against computer loss or data loss. If something goes wrong with the code, we can easily revert to the previous version. You can also undo certain changes without losing work. Easily track when, why, and who edited information.
Table of Contents
- GIT Install
- Initialize Git
- Add More than One File
- Git Commit without Stage
- Git Commit Log
- Git Branches
- New Git Branch
- Switching Between Branches
- Emergency Branch
- Merge Branches
- Deal with Merge Conflict
- Create a Repository on GitHub
- Edit Code in GitHub:
- Git Pull from GitHub
- Git Push to GitHub
- Git GitHub Branch
- Pulling a Branch from GitHub
- Push a Branch to GitHub
- Working using the GitHub Flow
- Git GitHub Pages
- Host Your Page on GitHub
- Create a New Repository
- Push Local Repository to GitHub Pages
- Check Out Your GitHub Page
- Conclusion
GIT Install
You can download Git from the official website
Using Git with Command Line:
To start using Git, we will first open our Command shell.

We can use Git bash, which is included in Git for the Windows system.
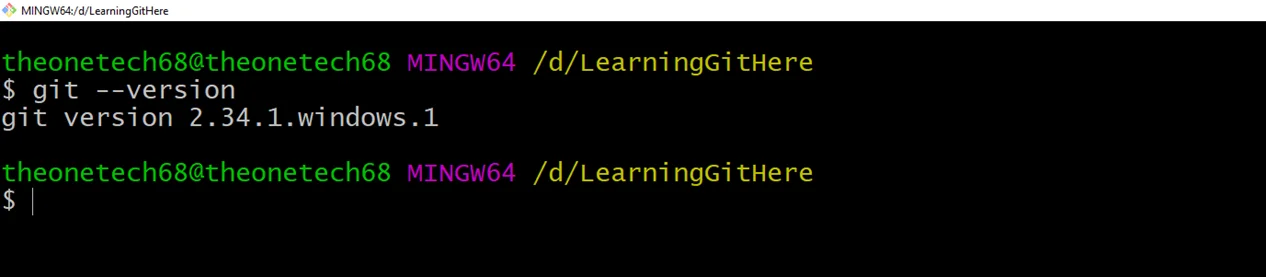
The first thing we need to do is to check if Git is properly installed:
Type the command in the Git bash window.
git --version
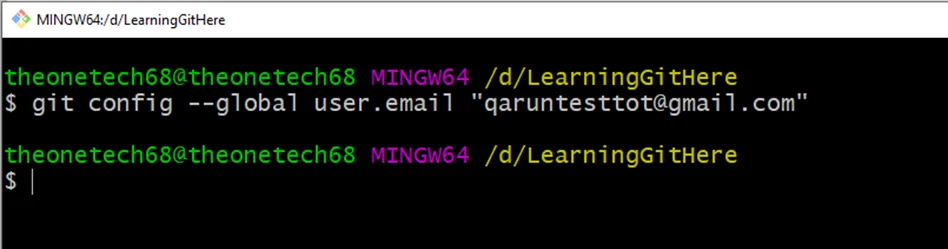
Configure Git
Now, we must configure ourselves to Git to know who you/we are. It is important for version control systems, as each Git commit uses this information.
We have to write the commands one by one
git config --global user.name "Your Name"
git config --global user.email "yourEmail@gmail.com"

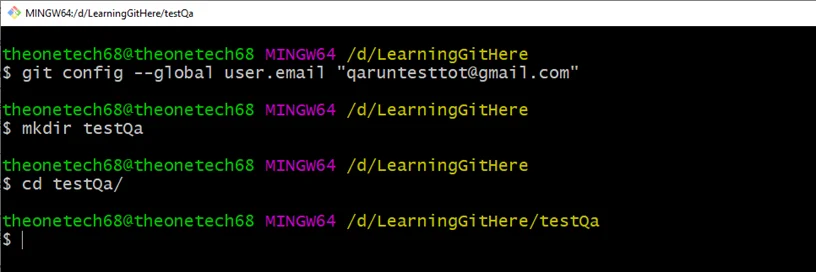
Creating Git Directory
Now, let us create a new directory for our project:'
type commands:
mkdir DirectoryName
cd DirectoryName
Initialize Git
Once you have navigated to the correct directory, you can initialize Git on that directory:
C:/Users/etc/.git/
git init
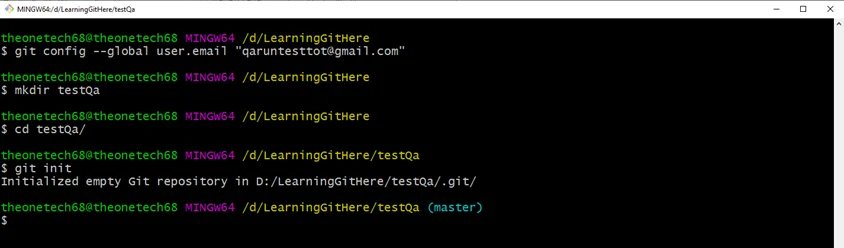
Congrats! We just created your first Git Repository!
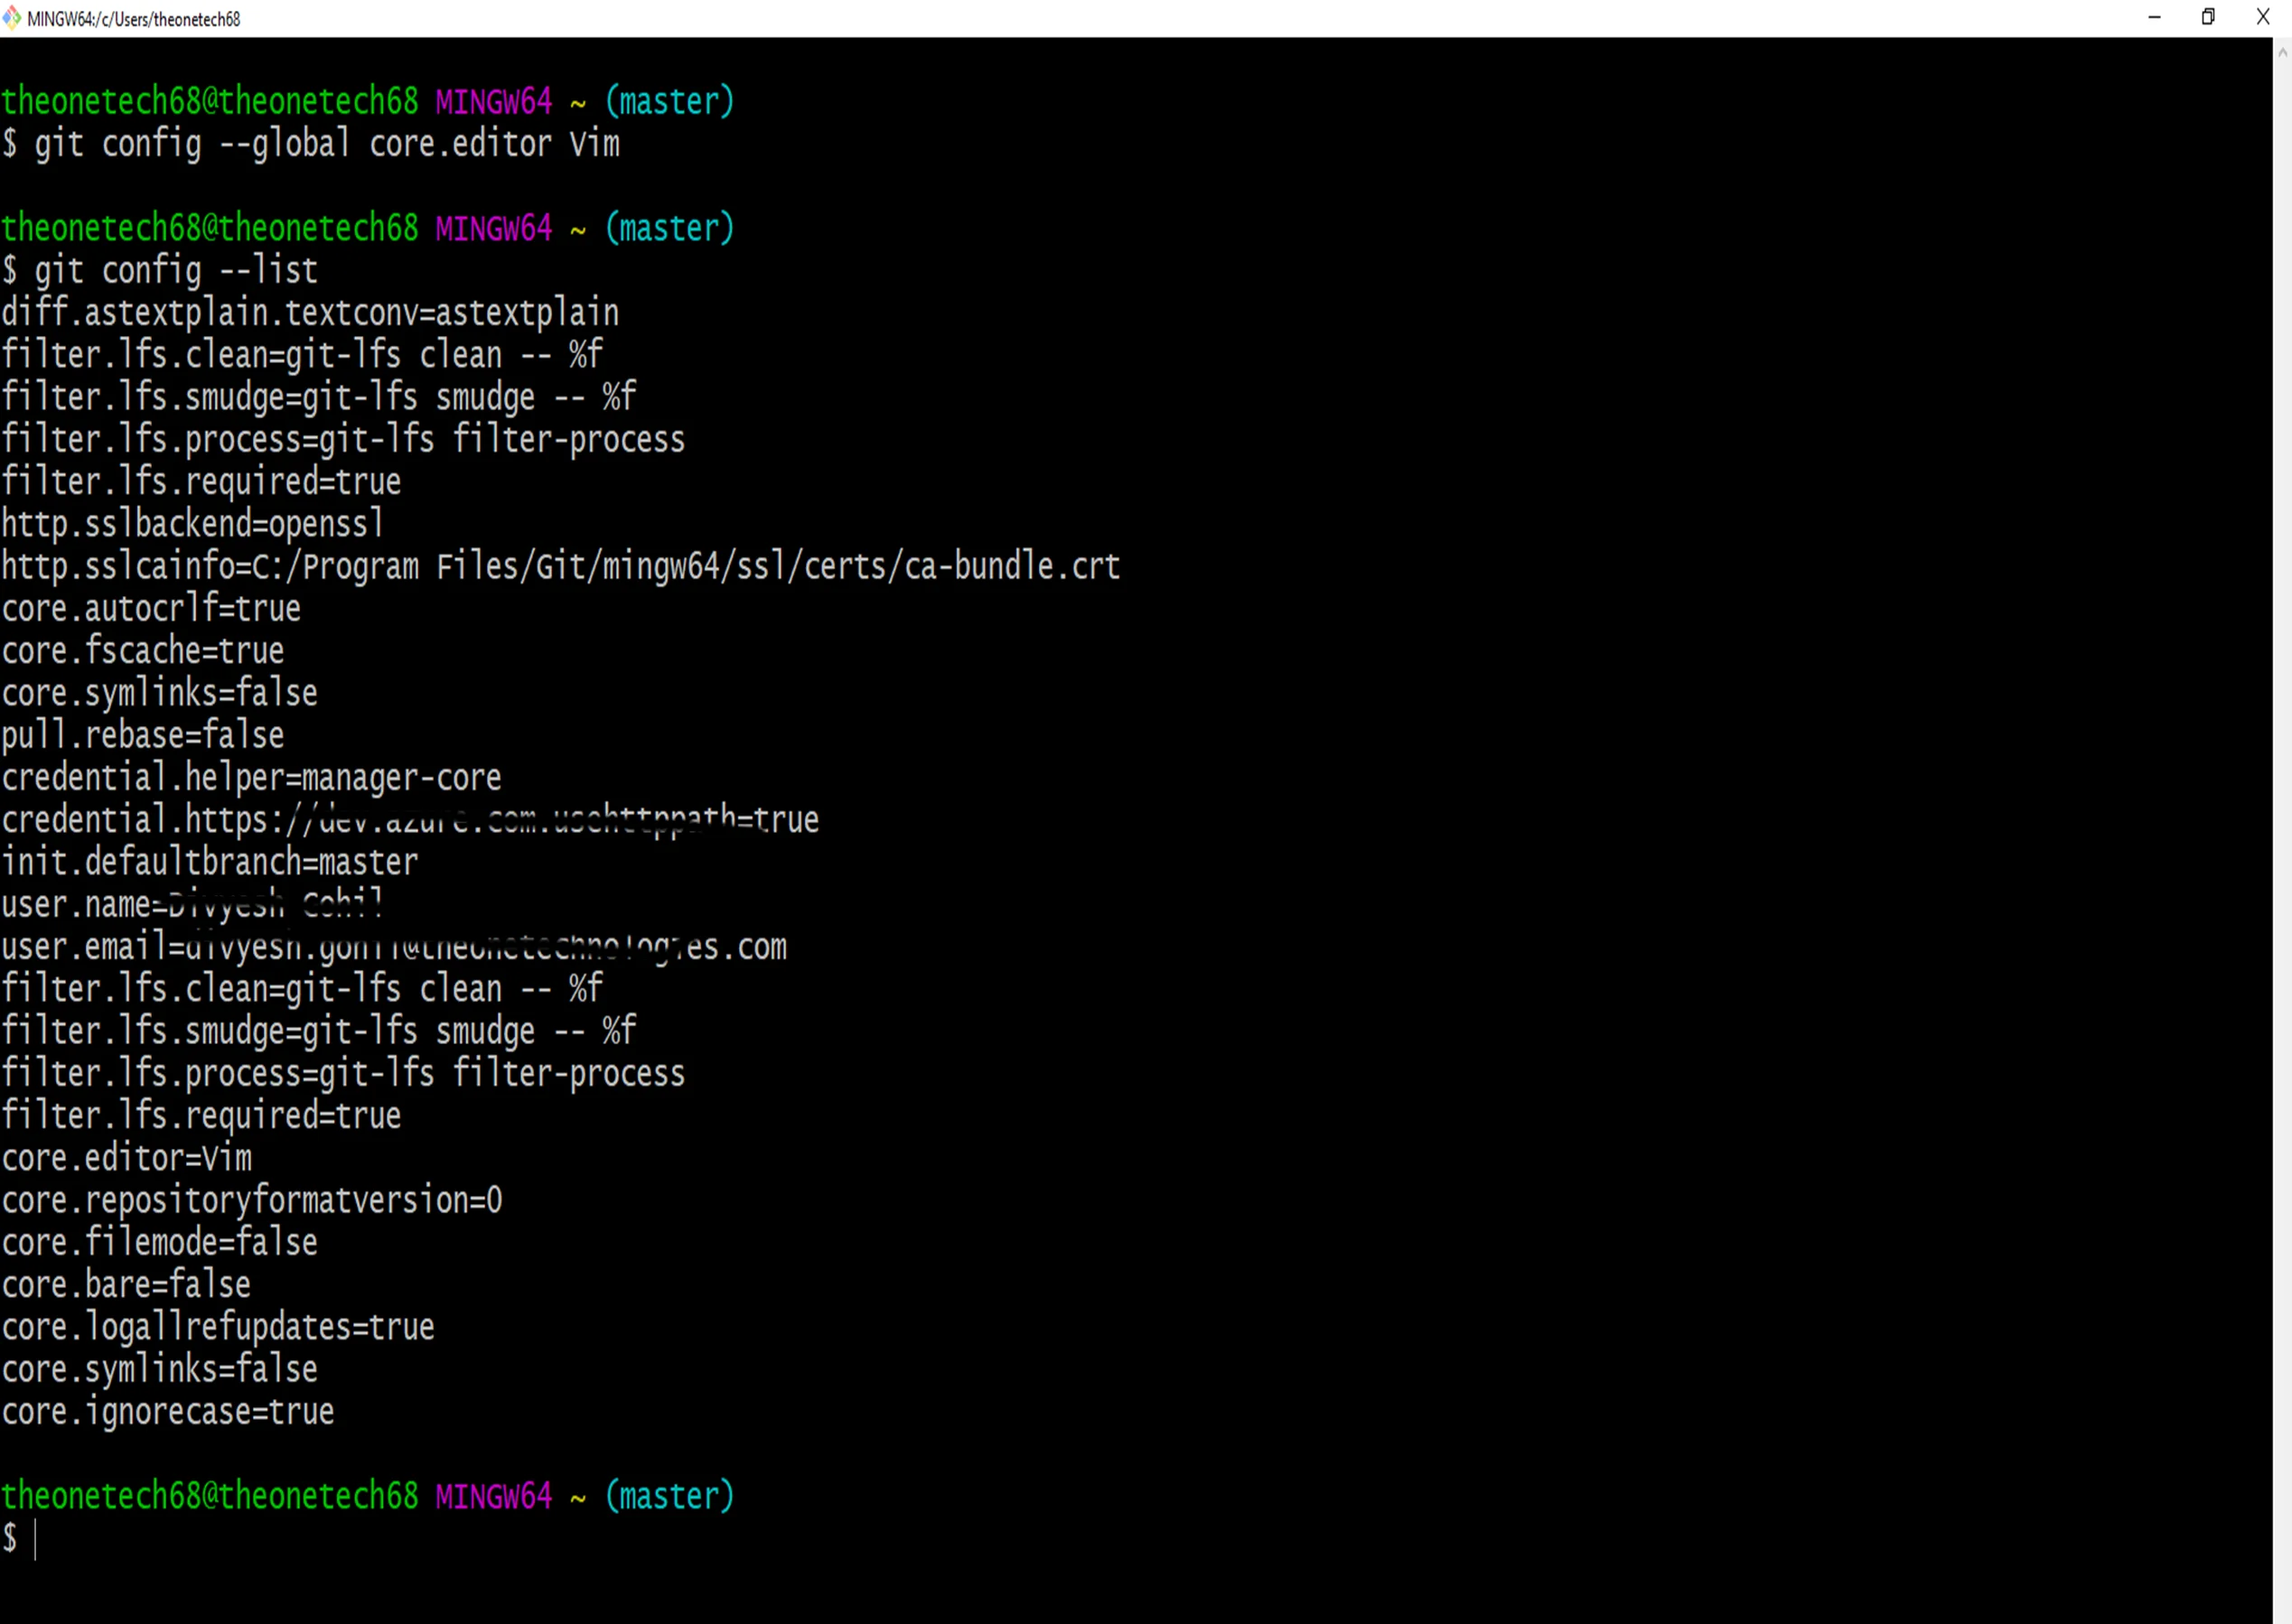
We can check our configuration settings using,
git config --list
Here is how you add your index.html file in the directory:
<!DOCTYPE html>
<html>
<head>
<title>QA_run TEST!</title>
</head>
<body>
<h1>Hello there!</h1>
<p>This is the first file in new Git Repo.</p>
</body>
</html>
To add a file from a directory, use the command:
git add <filename>
ls is used to list the files in the directory. Users can see that index.html is there as added.
Then, you can check the Git status and see if it is a part of the repository. To do this, use the command,
git status
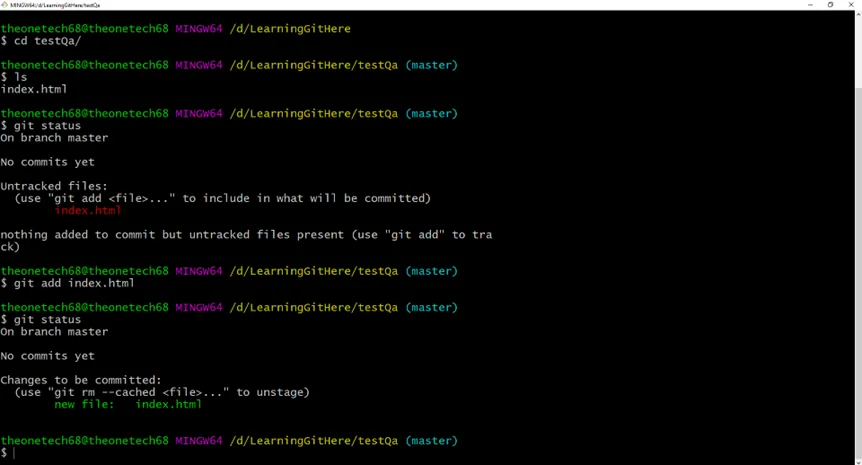
Now Git knows the file but has not yet added it to our repository!
Files in the Git repository directory can be in one of the 2 states:
- Tracked - Added to the repository the files that Git knows about.
- Untracked - Not added to the repository; the files are in your working directory only.
git add index.html
The file should be Staged. Let’s check the status
git status
So, the file has been added to the Staging Environment now.
Add More than One File
We can also store more files at a time. Let us add 2 more files to the working directory. Use the text editor again.
In this, I have used a GIT_L.txt file and a basic external style sheet (theme.css):
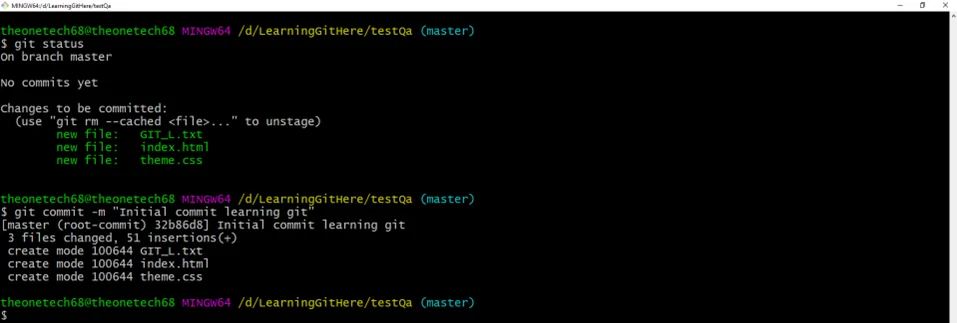
git add --all
Using --all will stage all files (new, modified, and deleted).
As shown in the above image, all 3 files are added to the Staging Environment, and we are ready to do our first commit.
After finishing the work, be ready to move from the stage to commit the repo.
By adding the messages to each commit, it is easy to see what has changed and when by using
git commit -m "Any text related to code"
(The commit command performs a commit, and the -m "message" adds a message.)
Refer to the image below:
The -a option will automatically stage every changed, already tracked file.
Git Commit without Stage
Sometimes, there is no need to stage the code for a minor change. We can skip the staging environment.
Let us update one line in the index.html file:
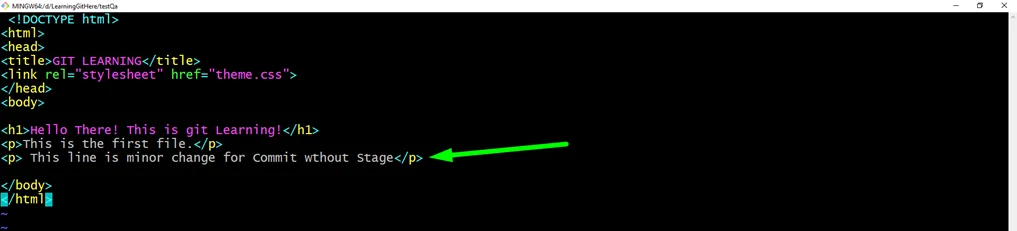
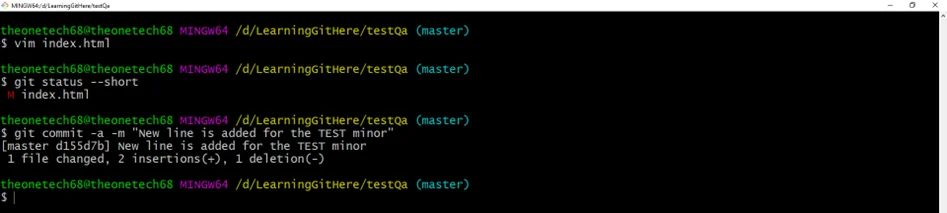
Let's check the status of our repository. You can use the --short option to see the changes more compactly:
git status --short

!dea: Short status flags in the GIT are:
?? = Untracked files
A = Files added to the stage
M = Modified files
D = Deleted files
So, let us commit it directly as we have made the minor change:
git commit -a -m "Your message here"
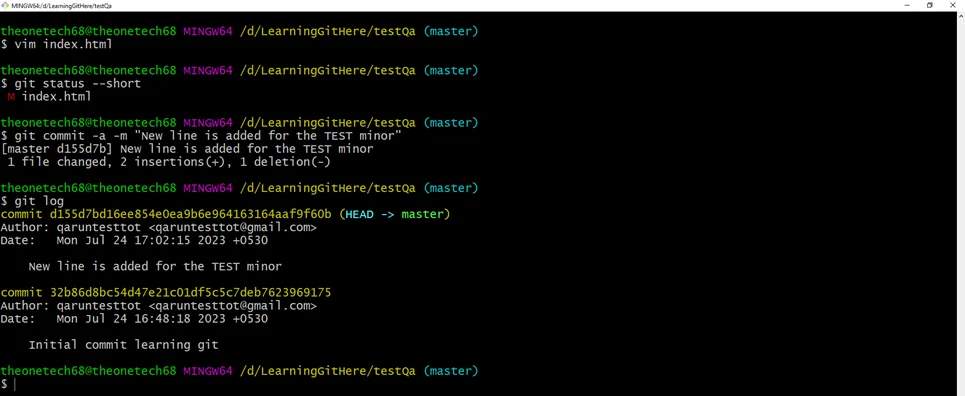
Git Commit Log
We can use the log command to view the commit history in the repository.
git log
Users can use the Git help feature to list all commands & their functions.
Here are a couple of different ways to use the help command in a command line:
git <command> -help – to see all the available options for the specific command
git help --all – to see all possible commands
Refer to the below images.
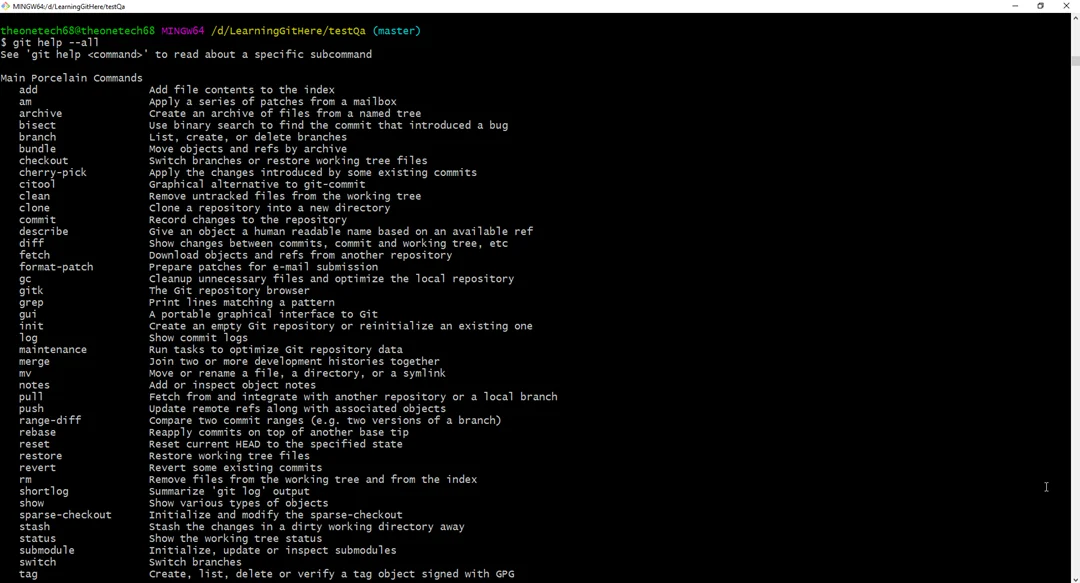
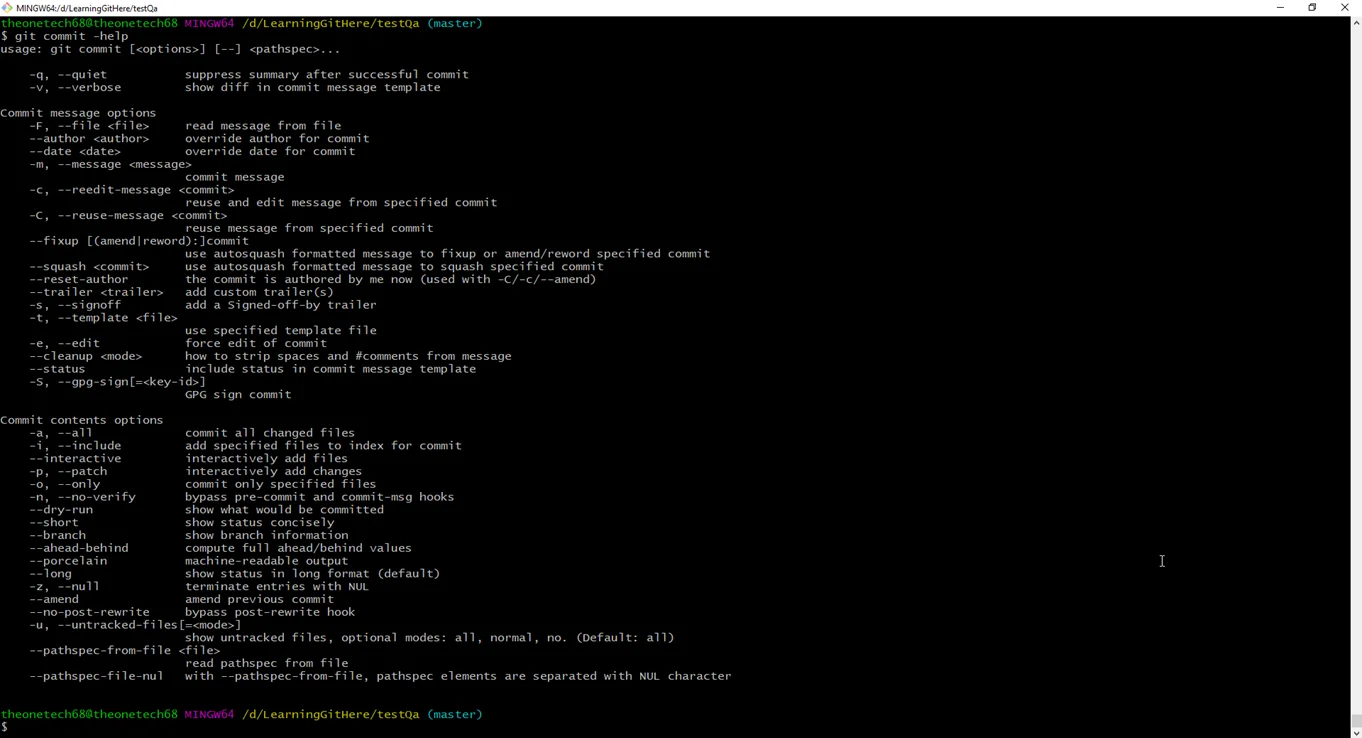
!dea: Press SHIFT + G to jump to the end of the list, then q to exit the view above the window.
Git Branches
In Git, a branch is any other repository that contains modified code of the main branch.
For example, users have a large project and need to update the design on it. So,
Without Git:
- Make a copy of your project, make the changes in the design sections, and save the work done in case you solved the errors that appeared during the modifications.
(After 2 weeks, you will realize that some error was not resolved in the new design version because you copied the files before the fix.)
With Git:
With a new branch called New Design, edit the code directly without impacting the main branch.
Maybe in urgency! There is an unrelated error somewhere else in the project that needs to be fixed.
- Make a new branch from the main project named minor-design-fix and the changes.
- Fix the unrelated error and merge the minor-design-fix branch with the main branch.
- Return to the minor-design-fix branch and finish the work there if it remains.
- Merge the minor-design-fix branch with the main. (getting alerted to the minor error fix that you were missing)
Branches facilitate working on different project parts without impacting the main branch.
After the work is done, a branch can be merged with the main project.
Users can switch between branches and work on multiple projects without interfering with each other.
So, branching in Git is very lightweight, easy, and fast!
New Git Branch
Now, Add new features to our index.html page on local Git. We are in our local repository and do not want to disturb the main project. So, we must create a new branch:
git branch NewBranch
Now we created a new branch called "NewBranch" and confirm that we have created a new branch:
git branch
We can see in the above image a new branch with the name "NewBranch," but the * beside master (or any branch) specifies that user is currently on that branch.

Move to another branch:
checkout is the command used to check out a branch. Moving us from the current branch to the one specified at the end of the command, Like
git checkout NewBranch
We have changed a file and added a new file in the working directory (the same directory as the main branch).
Now check the status of the current branch:
git status
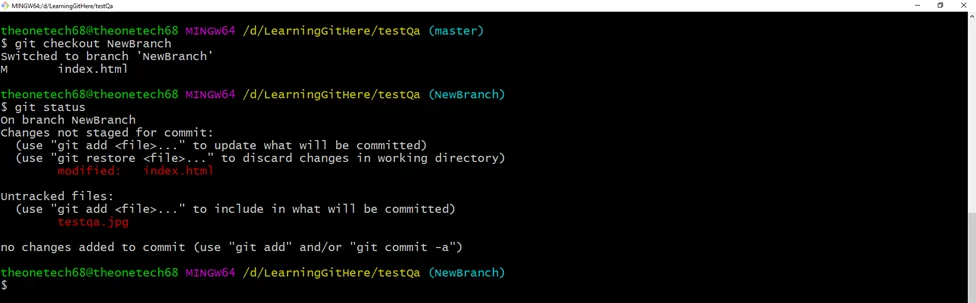
So, let us go through what happens here:
Here are changes to our index.html, but the file is not staged for commit
testqa.jpg file is not tracked
So, we need to add both files to the Staging Environment for this branch:
git add --all
Using --all instead of individual filenames will Stage all changed (new, modified, and deleted) files.
Check the status of the branch:
git status
We are good with our modification. So, we will commit them to the branch:
git commit -m "Added line & image"
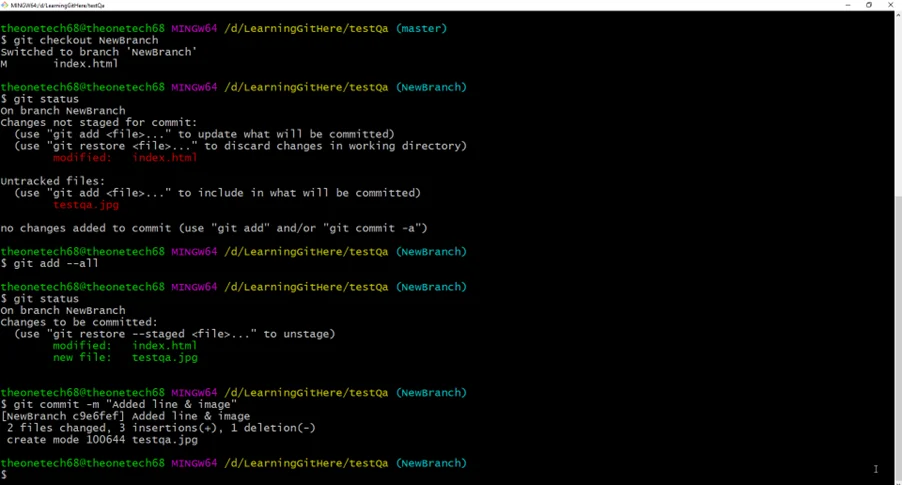
Now, we have a new branch different from the MASTER branch.
!dea: Using the -b option on checkout will create a new branch and move to it if it does not exist.
Switching Between Branches
It is very easy to work in different branches in Git. Let’s see, we are currently on the “NewBranch”. We added a text file to this branch, so let us list the files in the current directory:
ls

We can see the new testqa.jpg file; if we open the html file, we can see the code has been modified. All is as it should be.
Let’s see what happens when we change the branch to master.

testqa.jpg file is no longer there! And if we open the html file, we can see the code reverted to what it was before the modification.
Emergency Branch
Now, imagine that we need to fix an error on the master.
I do not want to mess with MASTER directly, nor do I want to mess with the GIT_L.txt file since it is under development.
So, we created a new branch to deal with the urgent:
git checkout -b urgent-fix

We have created a new branch in MASTER and changed it. We can safely fix the error without affecting any other branches.
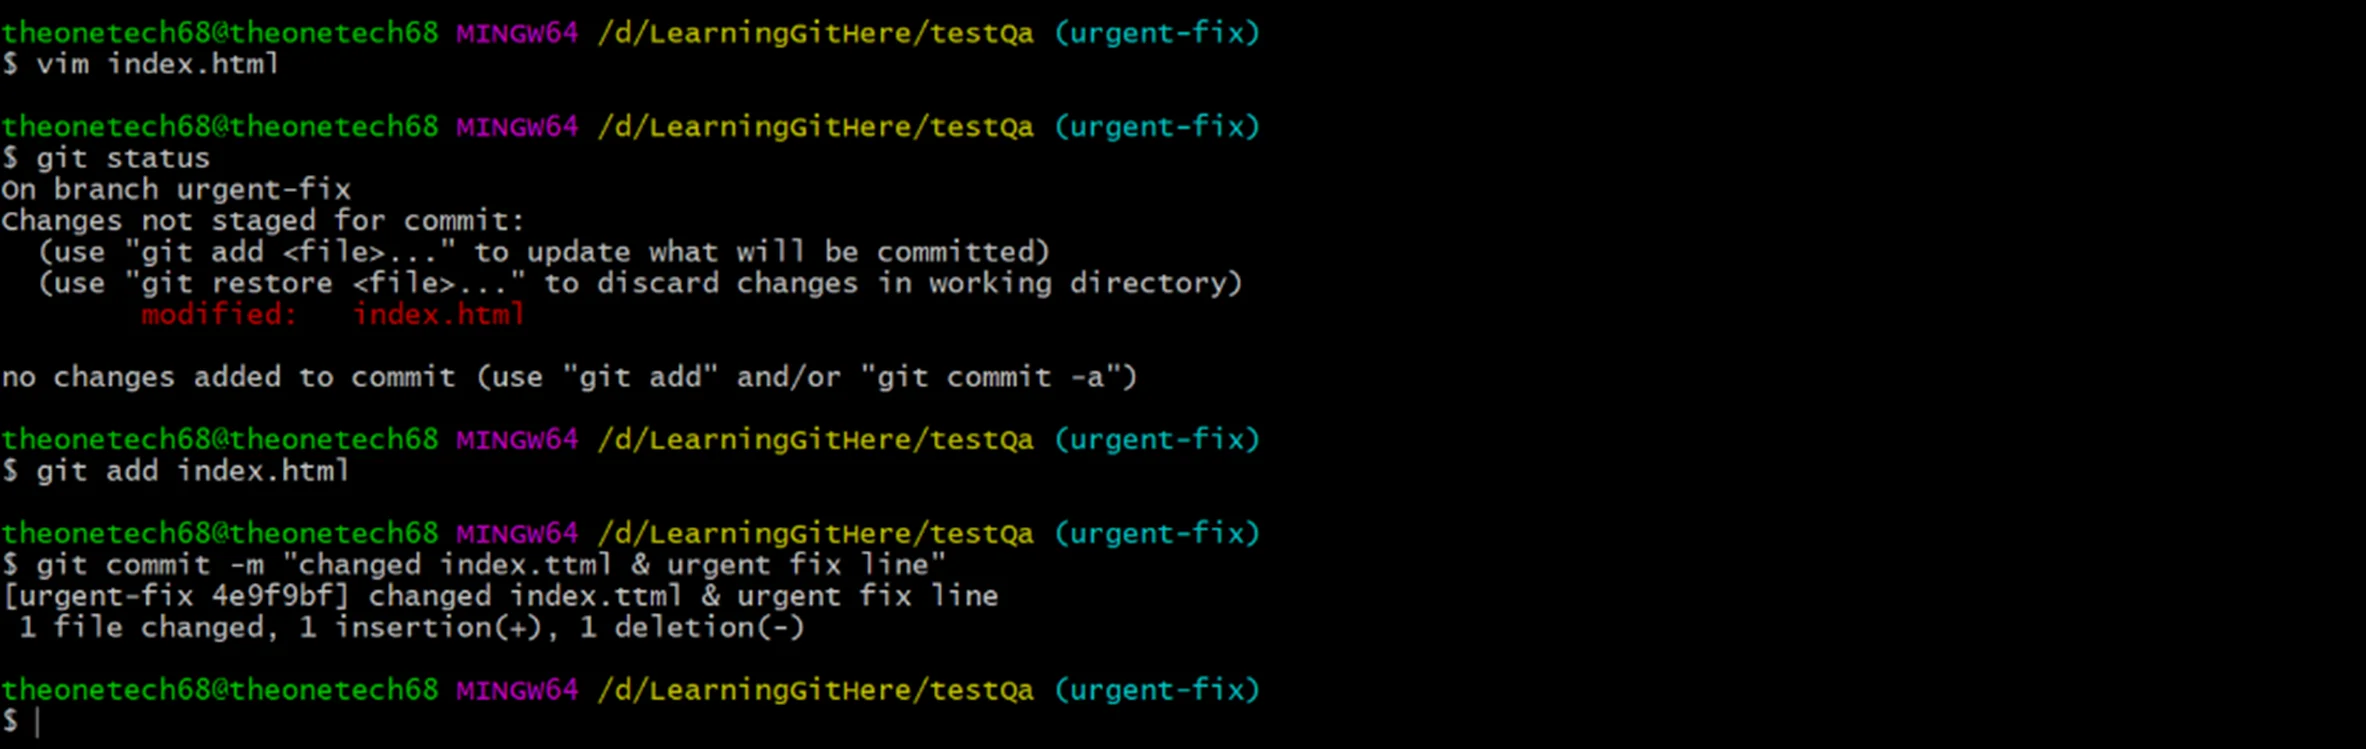
Let us fix our imaginary error in the index.html file:
We have made changes to this file and need to get those changes to the MASTER branch.
Check the status:
Git status
stage the file, and commit:
git add index.html
git commit -m "updated index.html with urgent fix"
We have a fix ready for MASTER and need to merge the two branches.
Merge Branches
We have the urgent fix ready, so let us merge the MASTER and urgent-fix branches.
First, we need to change to the MASTER branch:
git checkout <branchName>
Now, we merge the current branch (MASTER) with the urgent-fix branch:
git merge urgent-fix
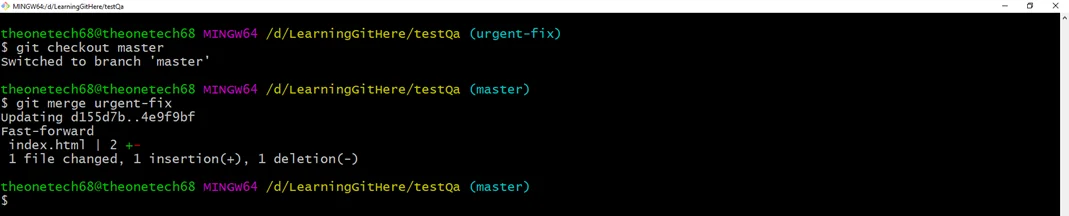
Since the branch ‘urgent-fix’ came directly from ‘master’ branch, and no other changes had been made to the master branch while we were working, Git sees this as a continuation of the master branch. So, it can be "Quick," just pointing both master and urgent-fix branches to the same commit.
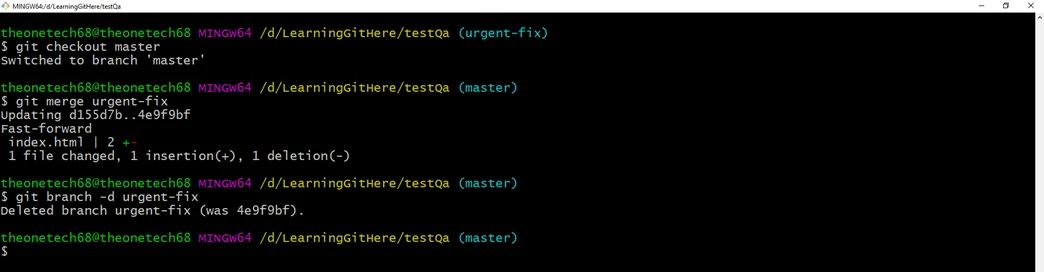
As master branch and urgent-fix branch are the same now, we can delete urgent-fix, as it is no longer needed:
git branch -d urgent-fix
Deal with Merge Conflict
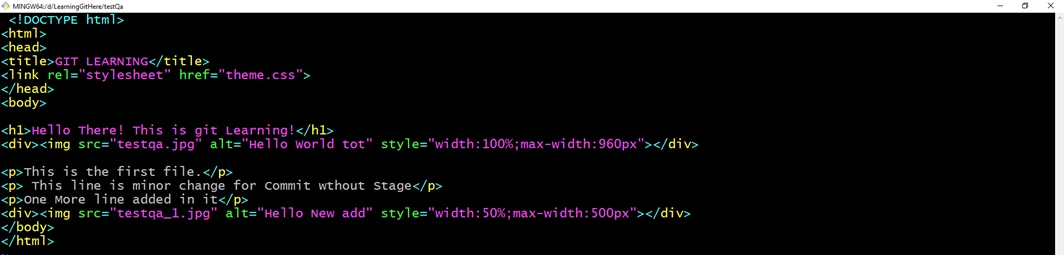
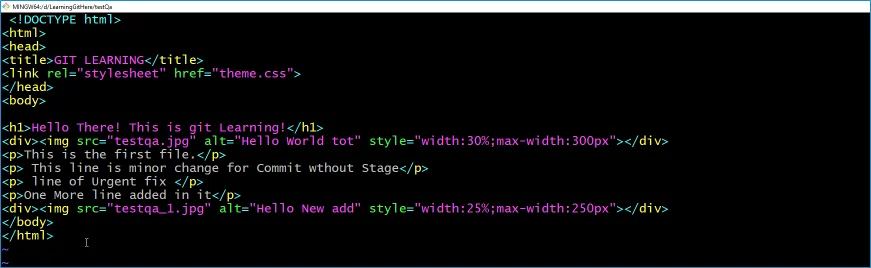
Now, we can move over to NewBranch and keep working. Add another .jpg file (qatest_1.jpg) and change index.html, so it shows it:
git checkout NewBranch
Vim index.html

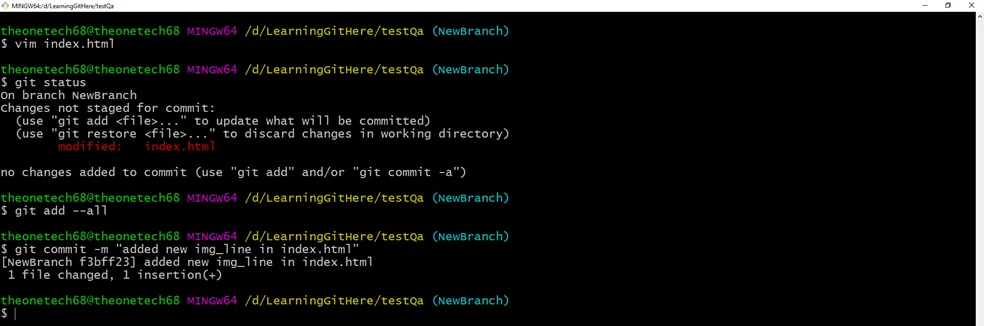
Now, we are done with our work here and can stage and commit to this branch:
git status
git add --all
git commit -m "added new image_line in index.html"
We can see that the index.html file has been changed in both branches. Now, we can merge the NewBranch into the master.
git checkout master

Let us see what will happen to the changes we recently made in master.
git merge NewBranch

The merge failed, & redirected to the editor page:
Once you type :q and enter it, navigate to bash & and it will auto merge.
The merge failed, as there is a conflict between the versions for index.html. Let us check the status:
git status
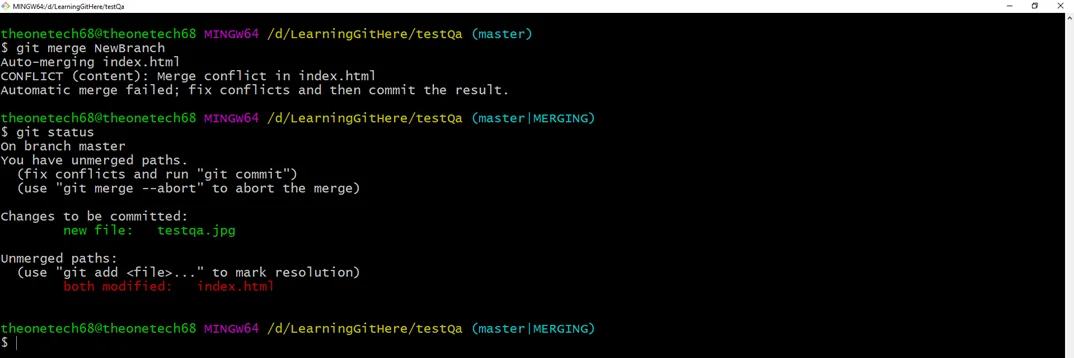
This confirms that there are conflicts in index.html, but the .jpg files are ready and staged to be committed.
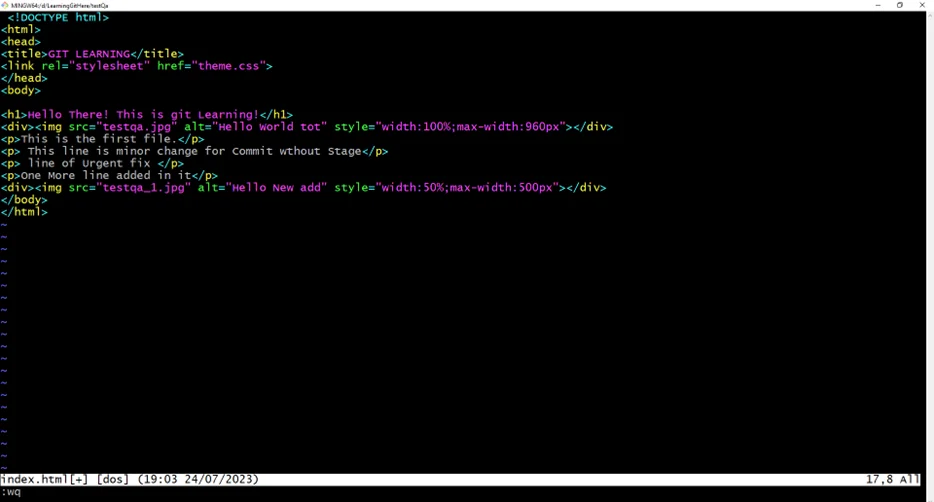
So, we need to fix that conflict. Open the file in our editor: vim index.html

We can see the differences between the versions edit them as we want:
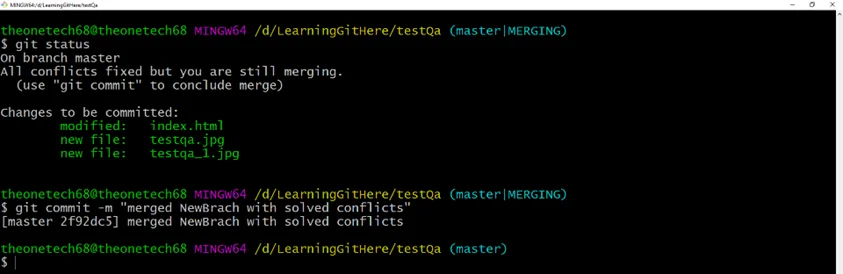
Now we can stage index.html and check the status:
git add index.html
git status
The conflict has been fixed, and we can use commit to conclude the merge:
git commit -m "merged after solved conflicts"
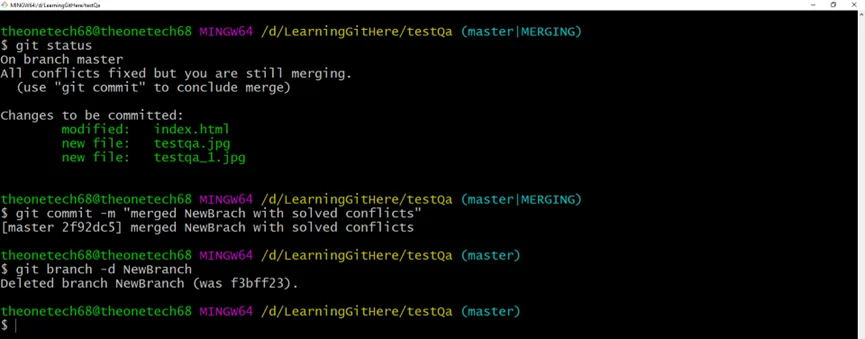
And delete the branch NewBranch:
git branch -d NewBranch
Now, you have a better understanding of how branches and mergers work. It is time to start working with a remote repository!
Go to GitHub and sign up for an account:
Reminder! Remember to use the same Email address you used in the Git config.
After registering yourself, the next is to:
Create a Repository on GitHub
Now Sign into the GitHub and create a new Repo:
We will go over the different options and what they mean later. But for now, choose Public (if you want the repo to be viewable for anyone) or Private (if you want to choose who can view the repo). Either way, you can choose who can contribute to the repo.
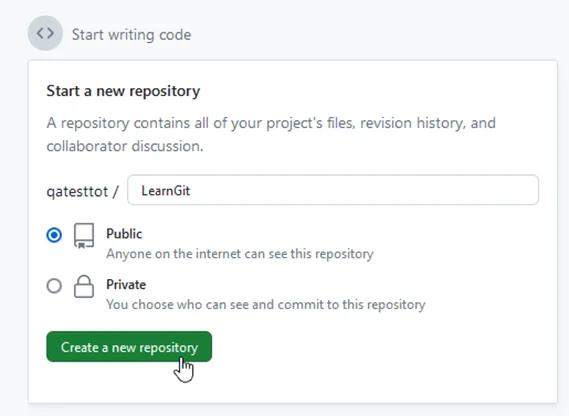
Then click "Create a new repository".
Push Local Repository to GitHub
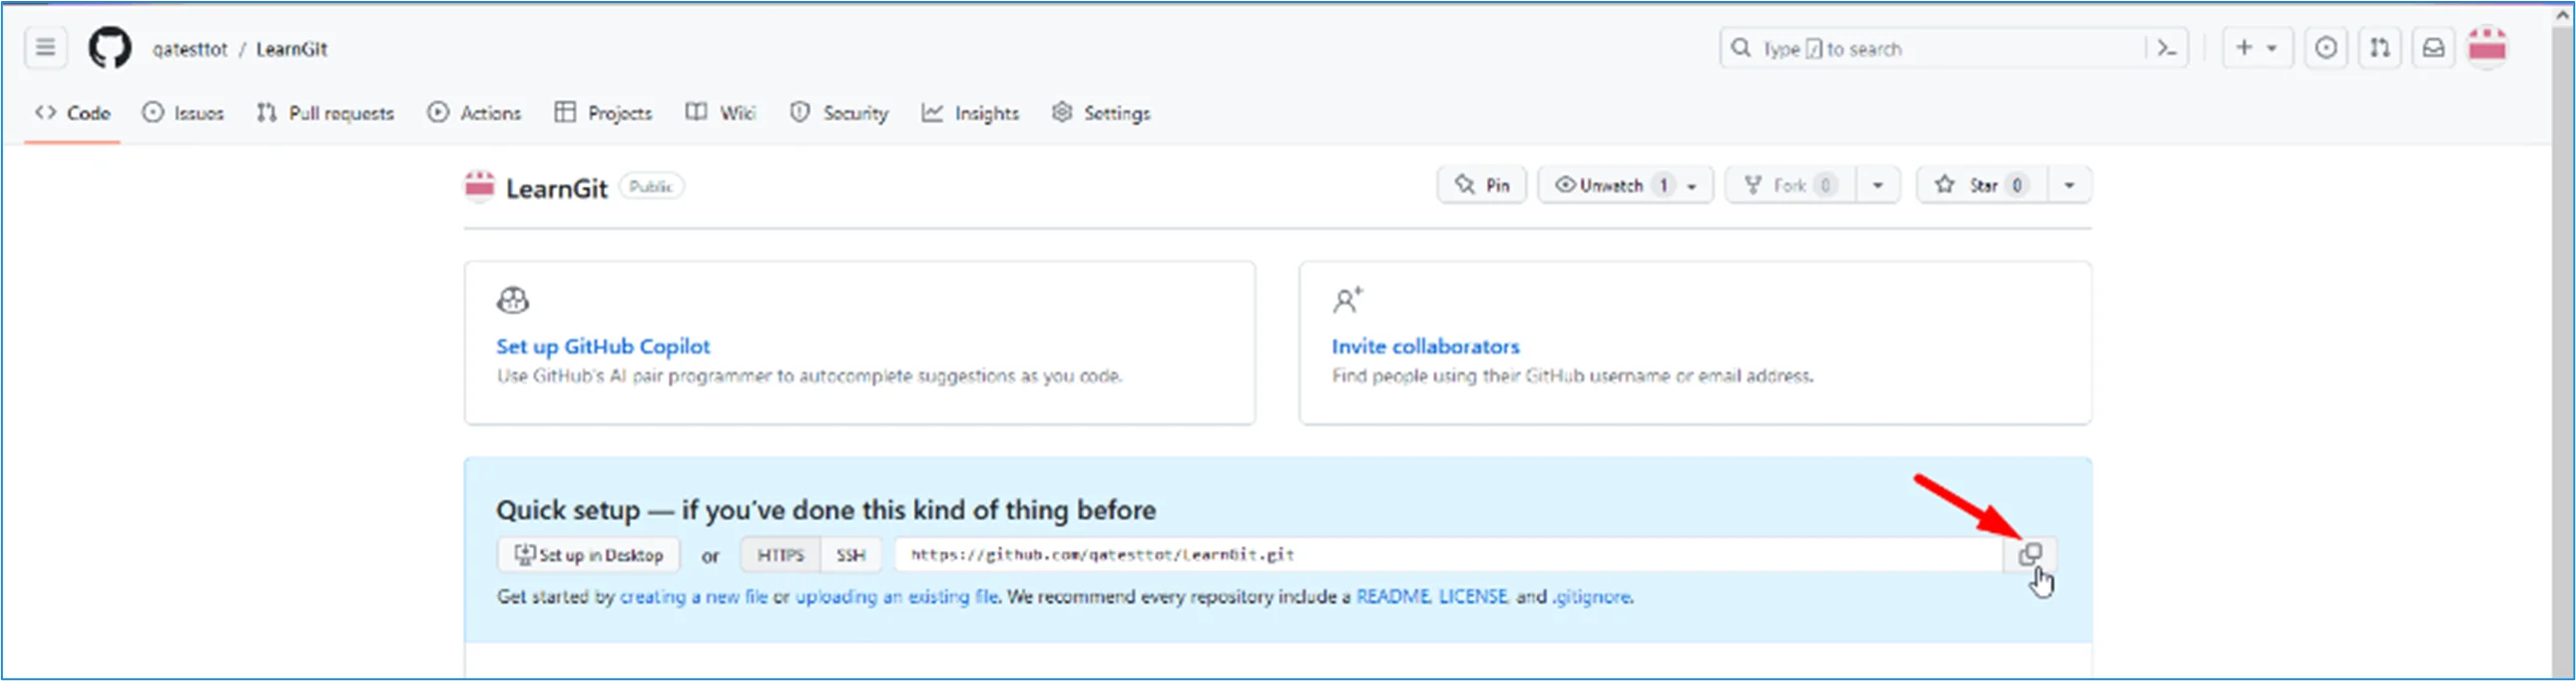
Since we have already set up a local Git repo, we are going to push that to GitHub:
Copy the URL, or click the clipboard marked in the .jpg above.
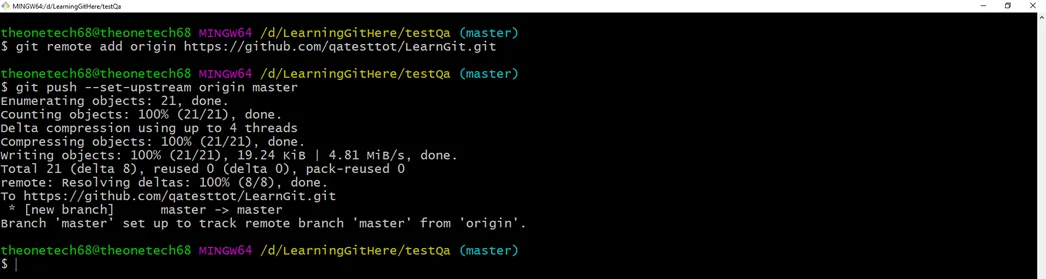
Now paste the following command in git bash:
git remote add origin https://github.com/qatesttot/LearnGit.git

-git remote add origin URL specifies that you are adding a remote repository, with the specified URL, as an origin to your local Git repo.
Now, we are going to push our master branch to the origin URL and set it as the default remote branch:
git push --set-upstream origin master
Warning: Since this is the first time you connect to GitHub, you will get a notification to authenticate this connection. (As image below)
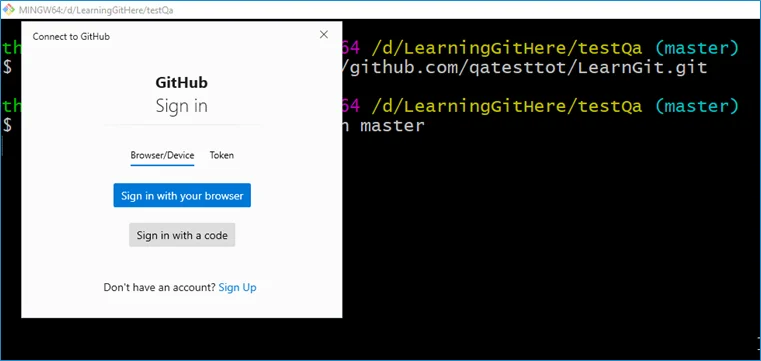
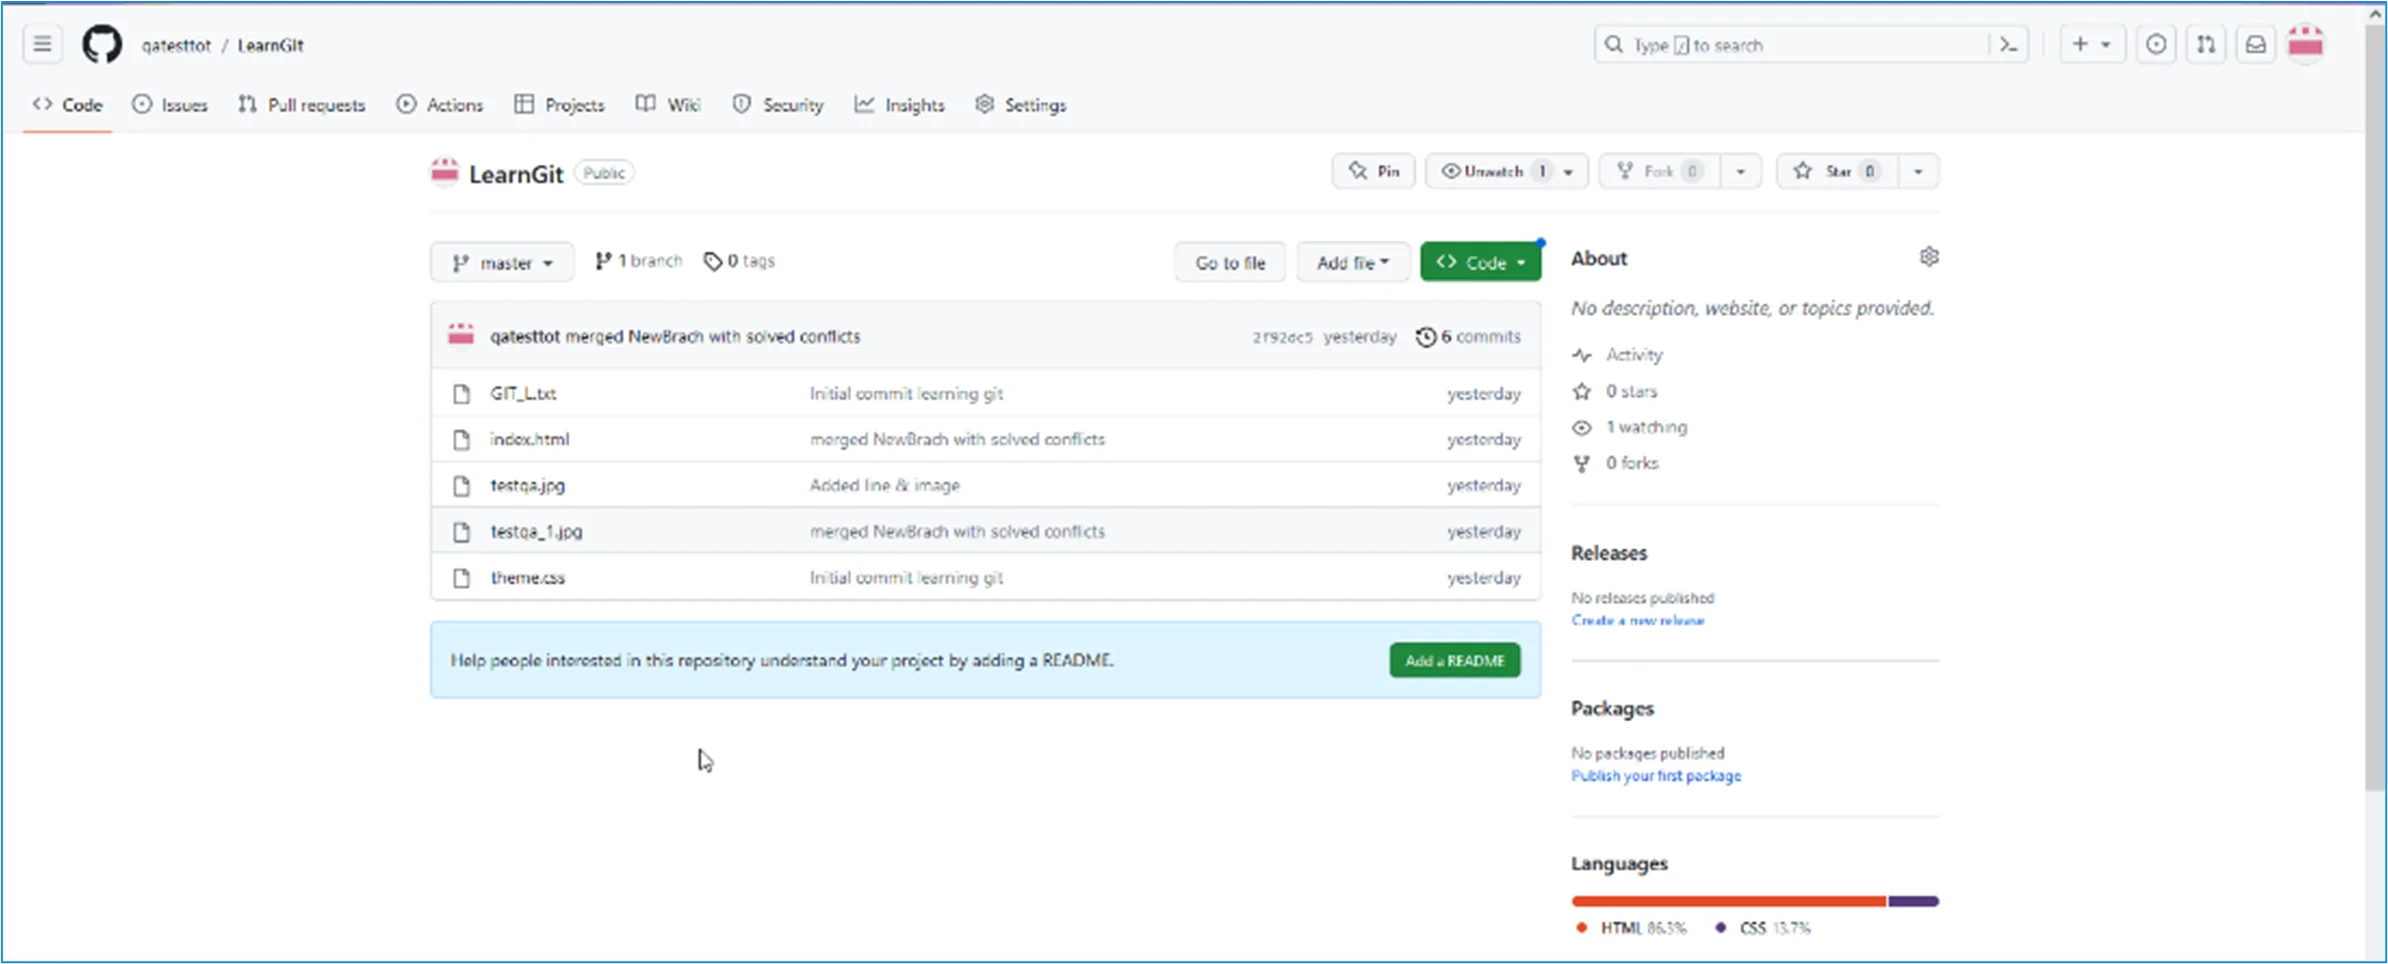
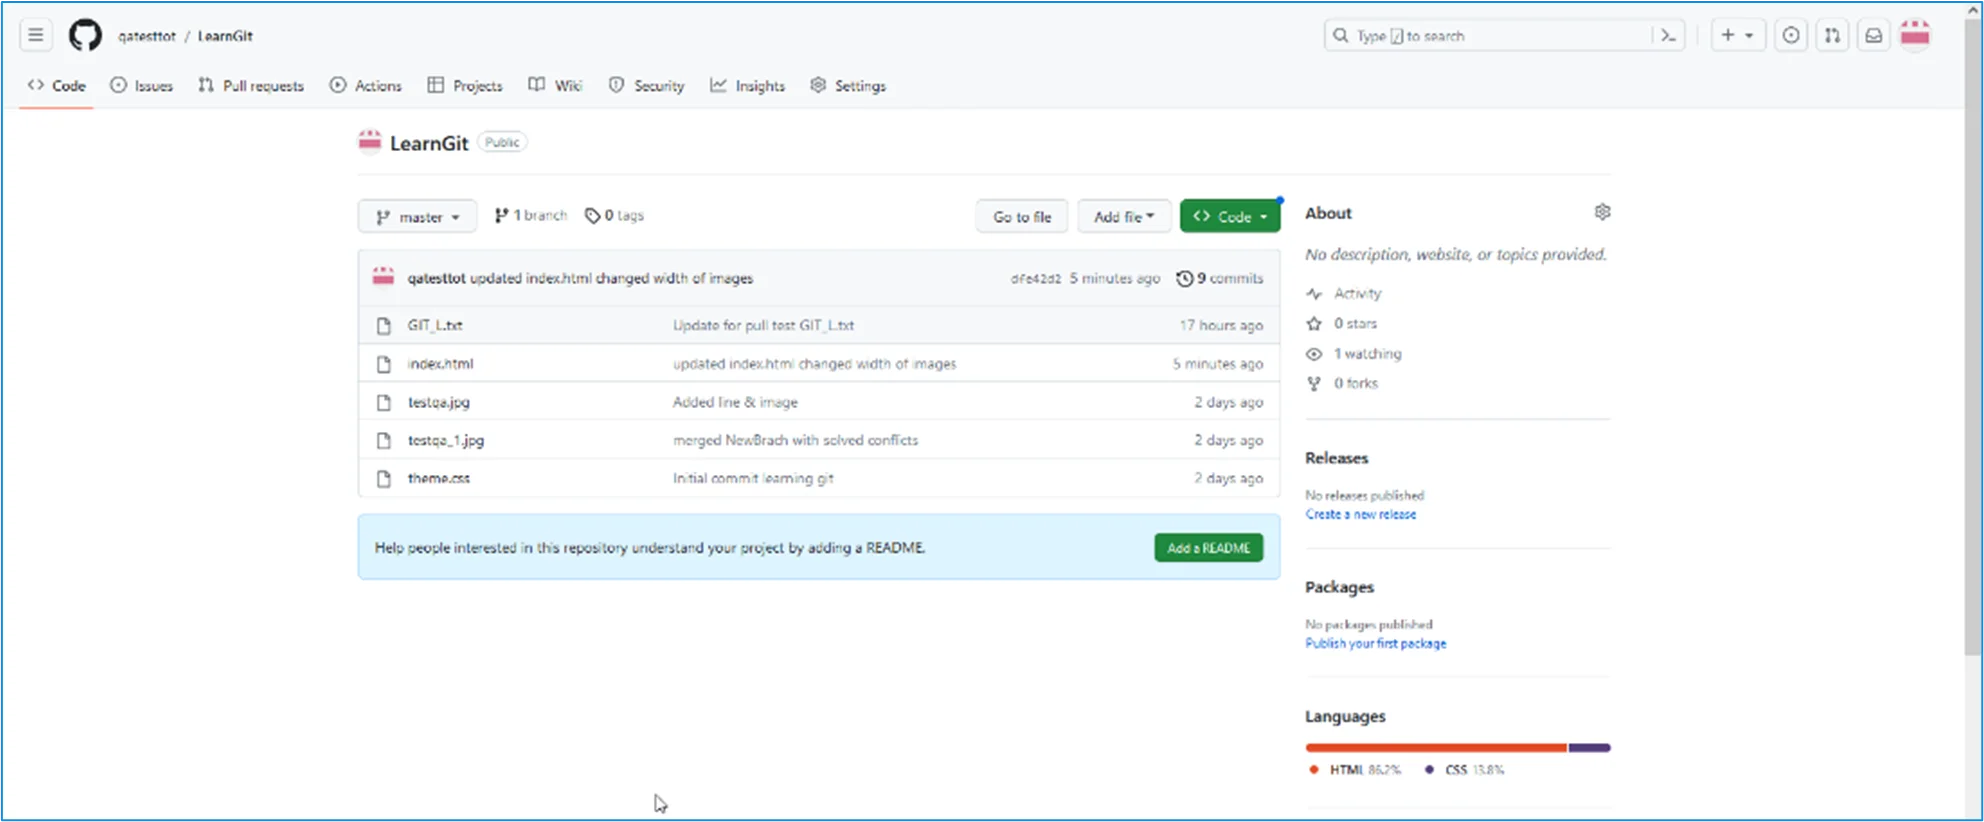
Now, go back into GitHub and see that the repository has been updated:
Edit Code in GitHub:
In addition to being a host for Git content, GitHub has a very good code editor.
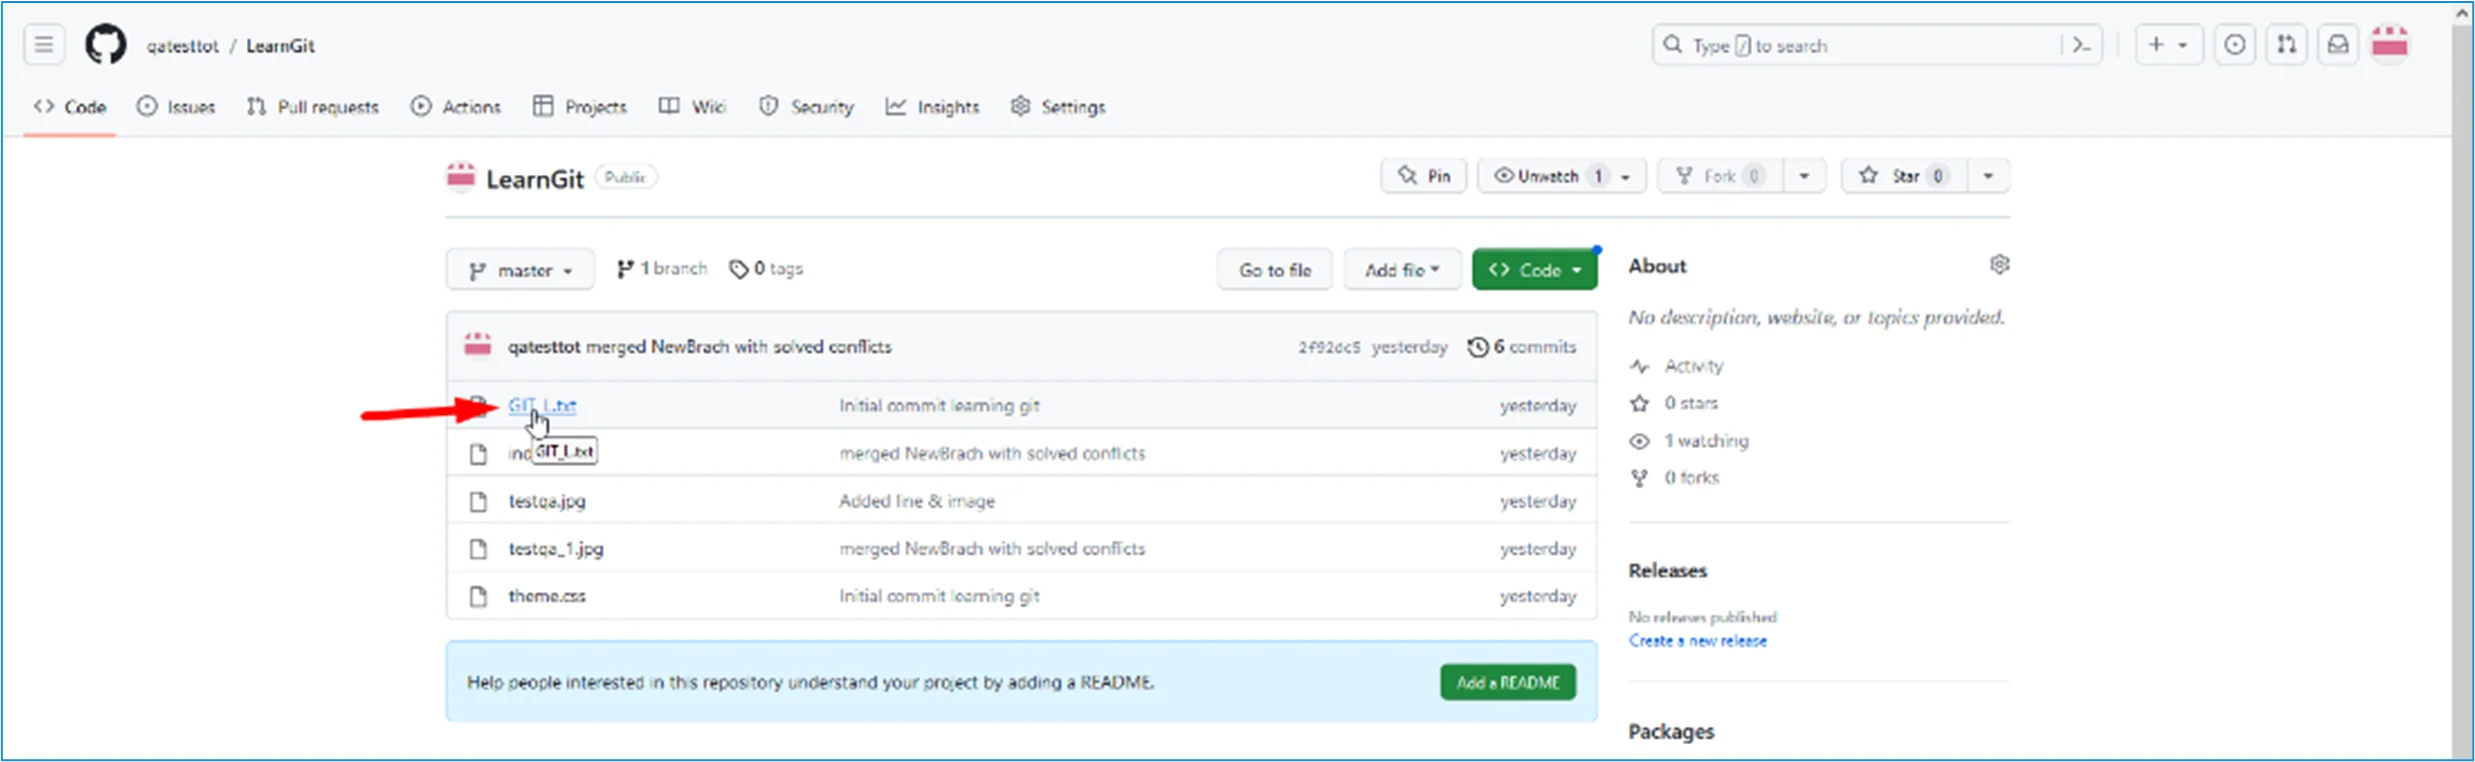
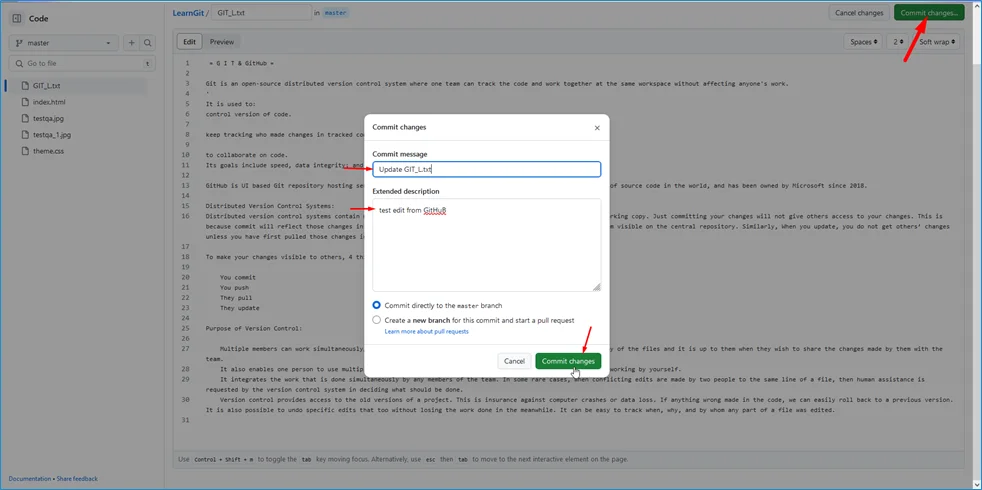
Let us try to edit the GIT.txt file in GitHub. Just click the on-file name & then the edit button:
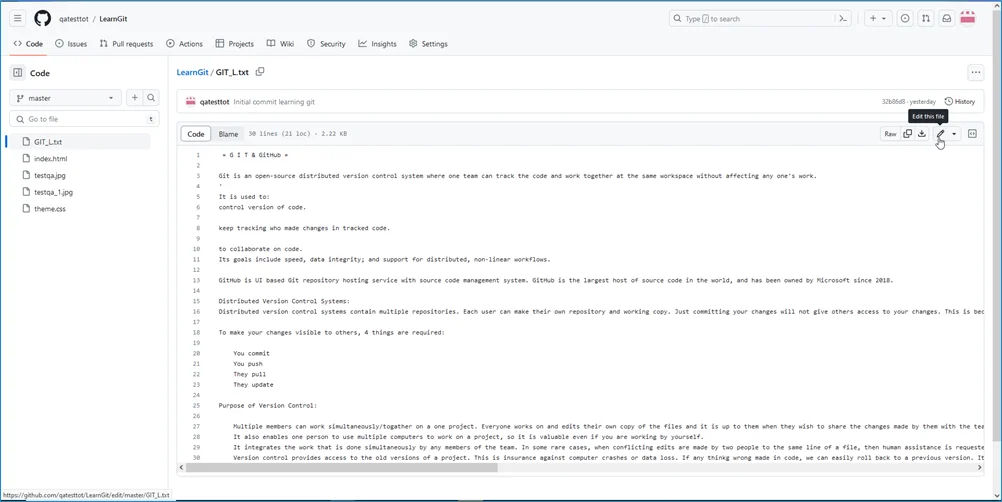
Add some changes to the code, and then commit the changes. For now, we will "Commit directly to the master branch."
Remember to add a description for the commit:
Git Pull from GitHub
When working on a project everyone should be up to date.
When users start working on a project, they should get the most recent changes to the local copy.
With Git, you can do that with pull.
pull is a combination of fetch & merge commands. Let us closely see how fetch, merge, and pull work.
Git Fetch
fetch gets all the change history of a tracked branch or repository.
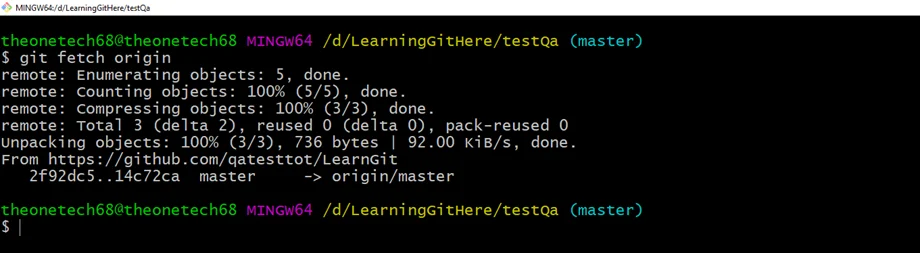
So, on local Git, fetch updates to see what has changed on GitHub:
git fetch origin
Now that we have the recent changes, we can check our status:
git status
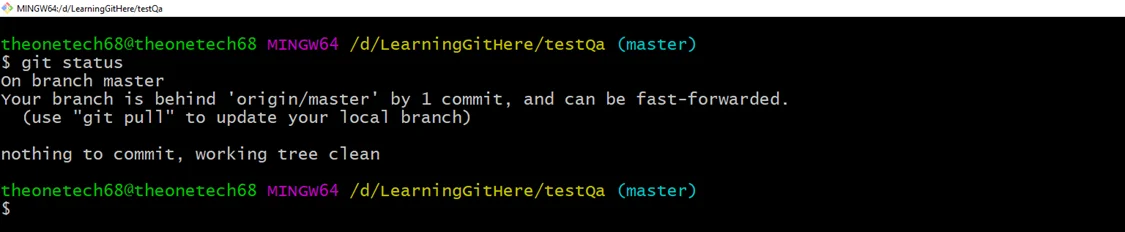
We are behind the origin/master by 1 commit. That should be the updated GIT_L.txt, but let's double-check by viewing the log:
git log origin/master
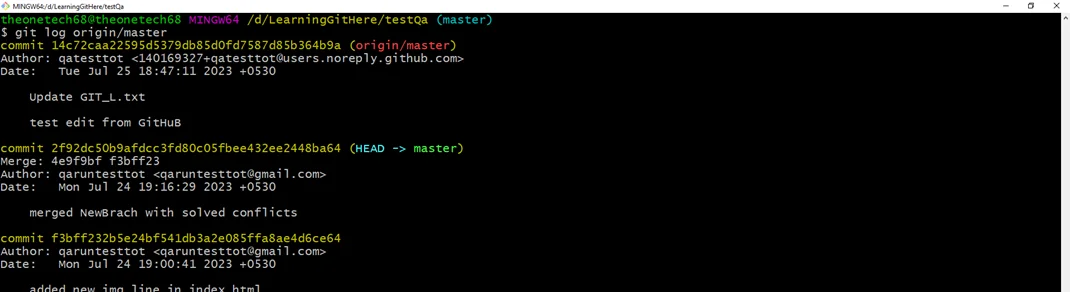
That looks as expected, but we can also verify by showing the differences between our local master and origin/master:
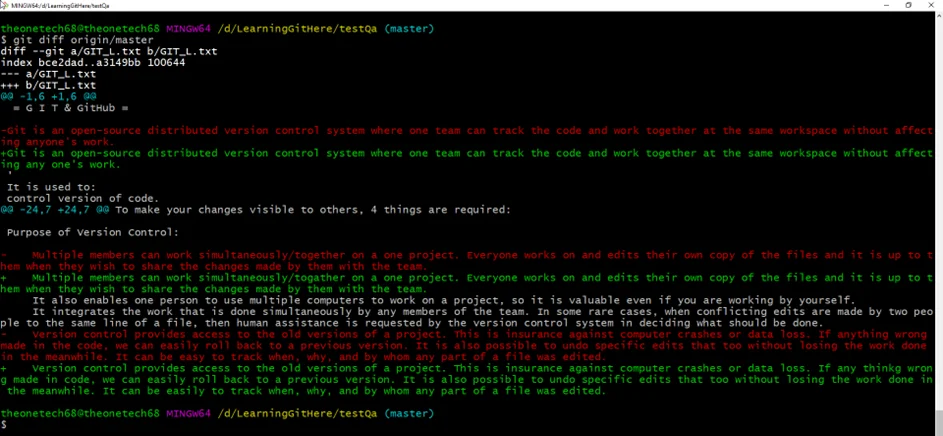
That looks as expected! Now, we can safely merge.
Git Merge
Merge combines the current branch with a specified branch.
We have confirmed that the updates are as expected, and we can merge our current branch (master) with the origin/master:
git merge origin/master

Check our status again to confirm we are up to date:
git status

Now, your local Git is up to date!
Pull
But what if you want to update the local repository without going through all those steps?
pull is a combination of fetch and merge. It is used to pull all changes from a remote repository into the branch you are working on.
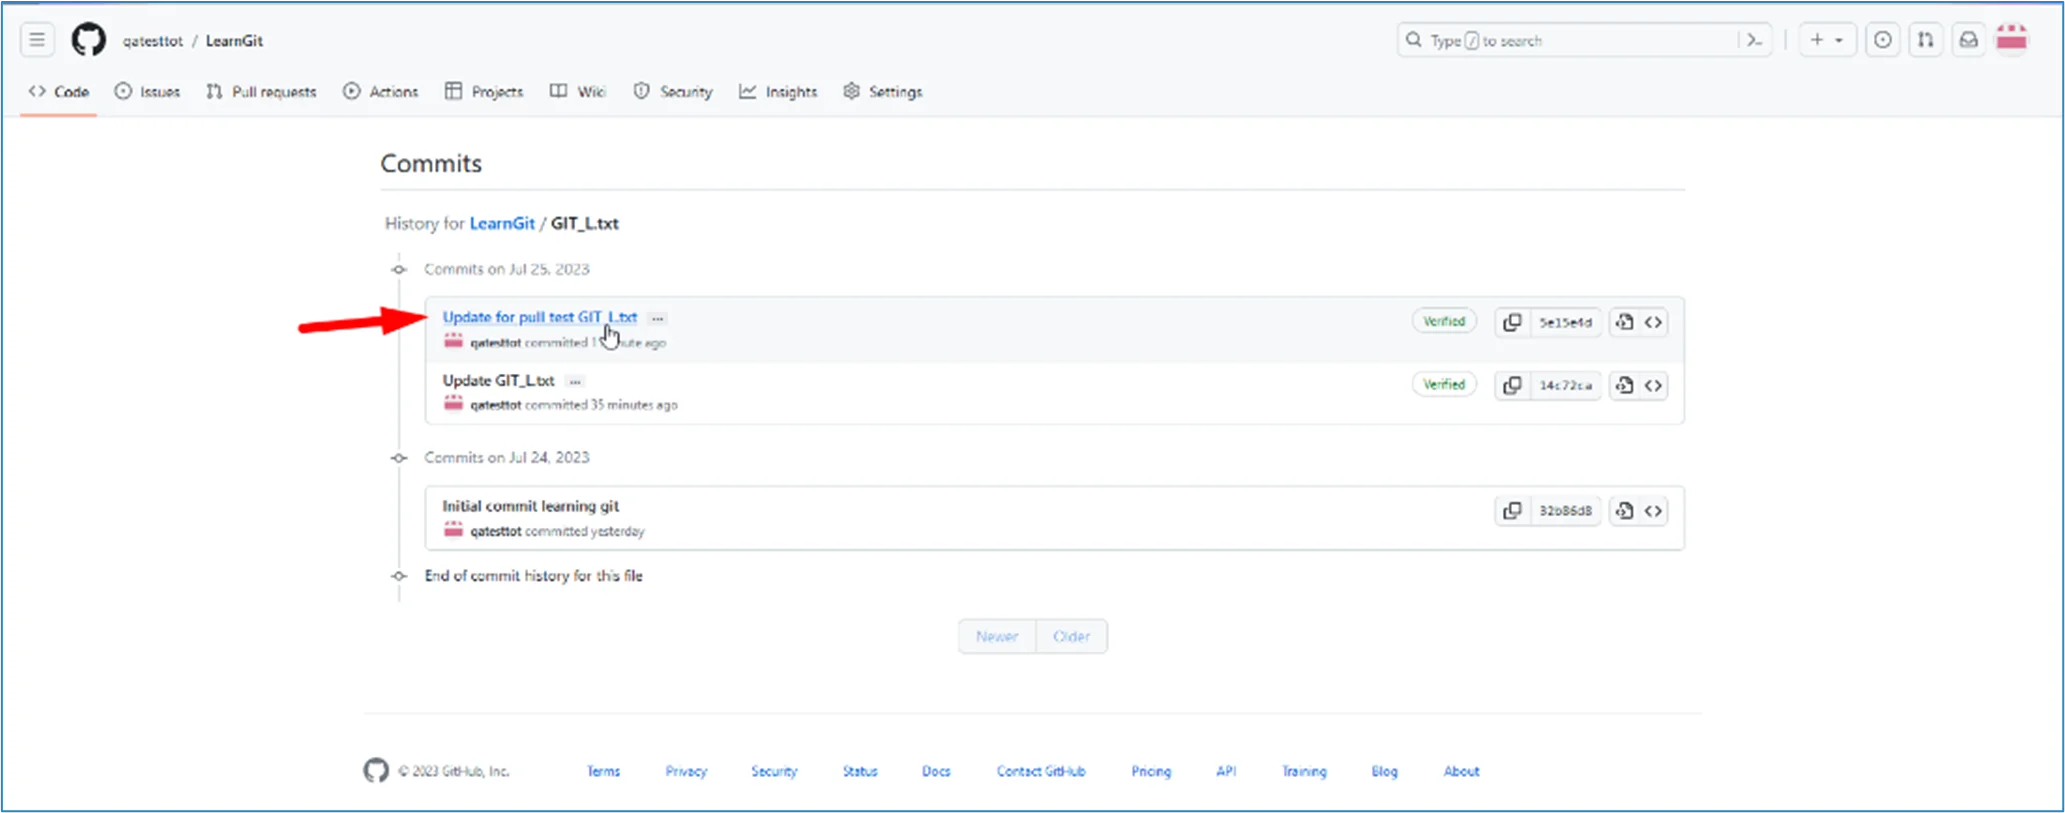
Let us make another change to the GIT_L.txt file on GitHub.
Use a pull to update our local Git:
git pull origin
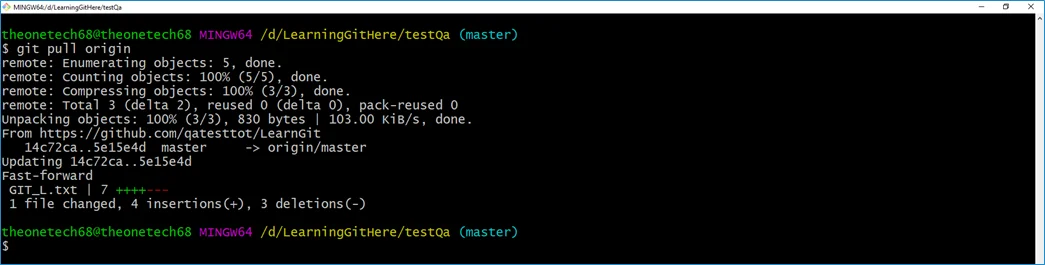
That is how we keep our local Git up to date from a remote repository.
Git Push to GitHub
Now, try changing our local git and pushing them to GitHub.
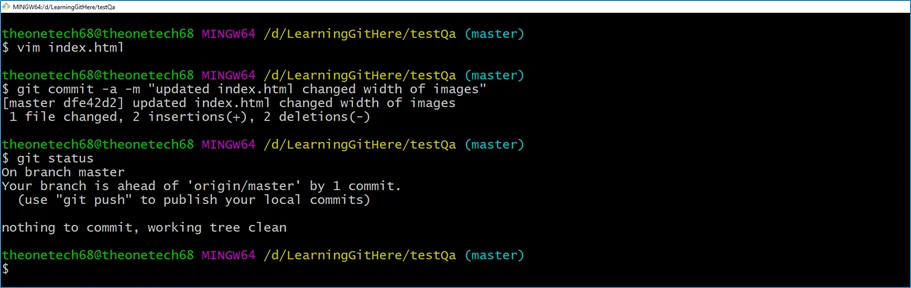
Commit the changes:
git commit -a -m "Updated index.html Changed width of images"
And check the status:
git status
Now, push our changes to our remote origin:
git push origin
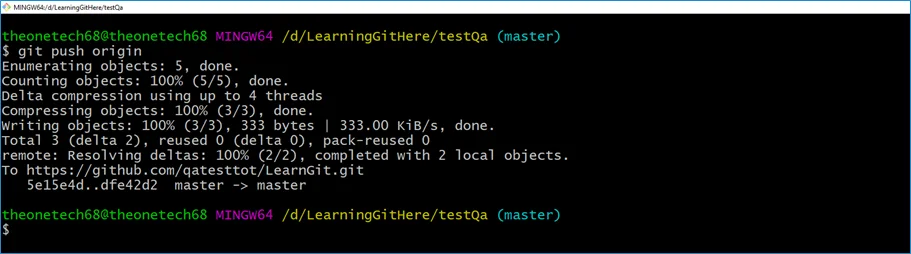
Next, check that the repository has a new commit on GitHub.

Now, we are going to start working on branches on GitHub.
Git GitHub Branch
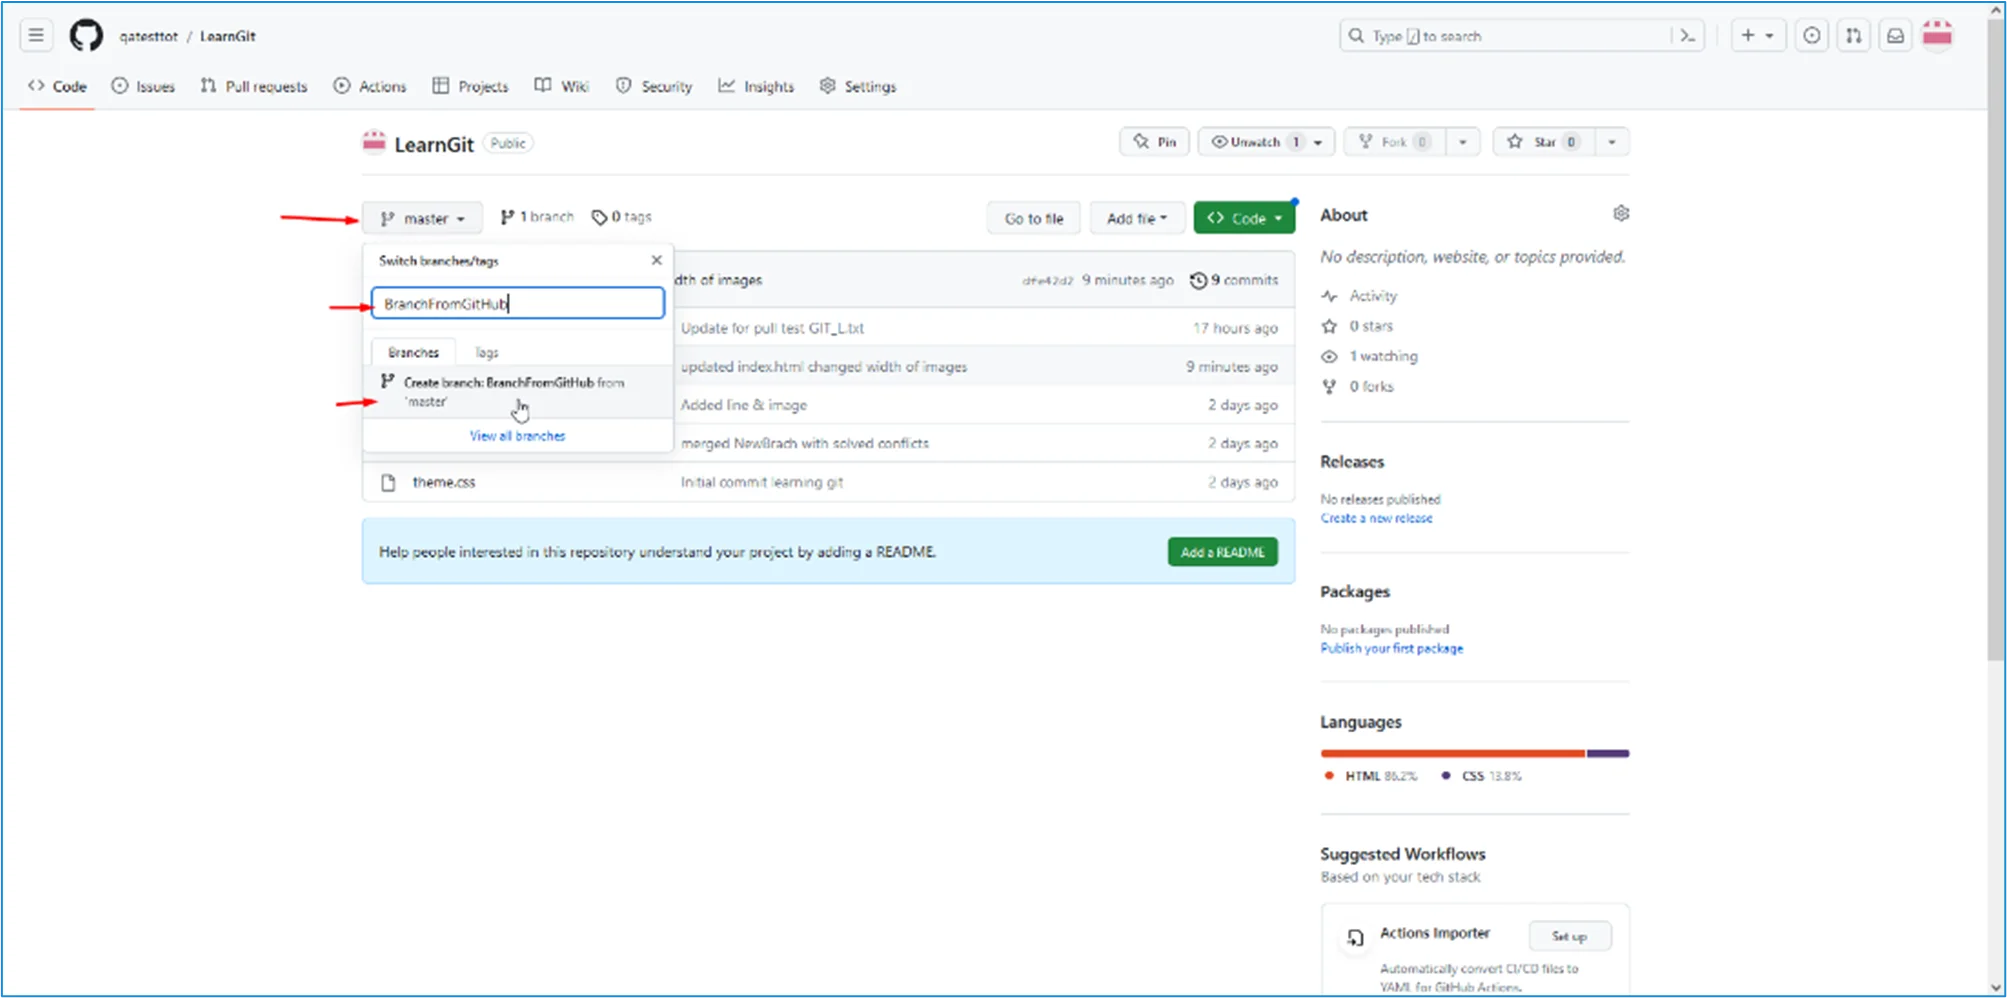
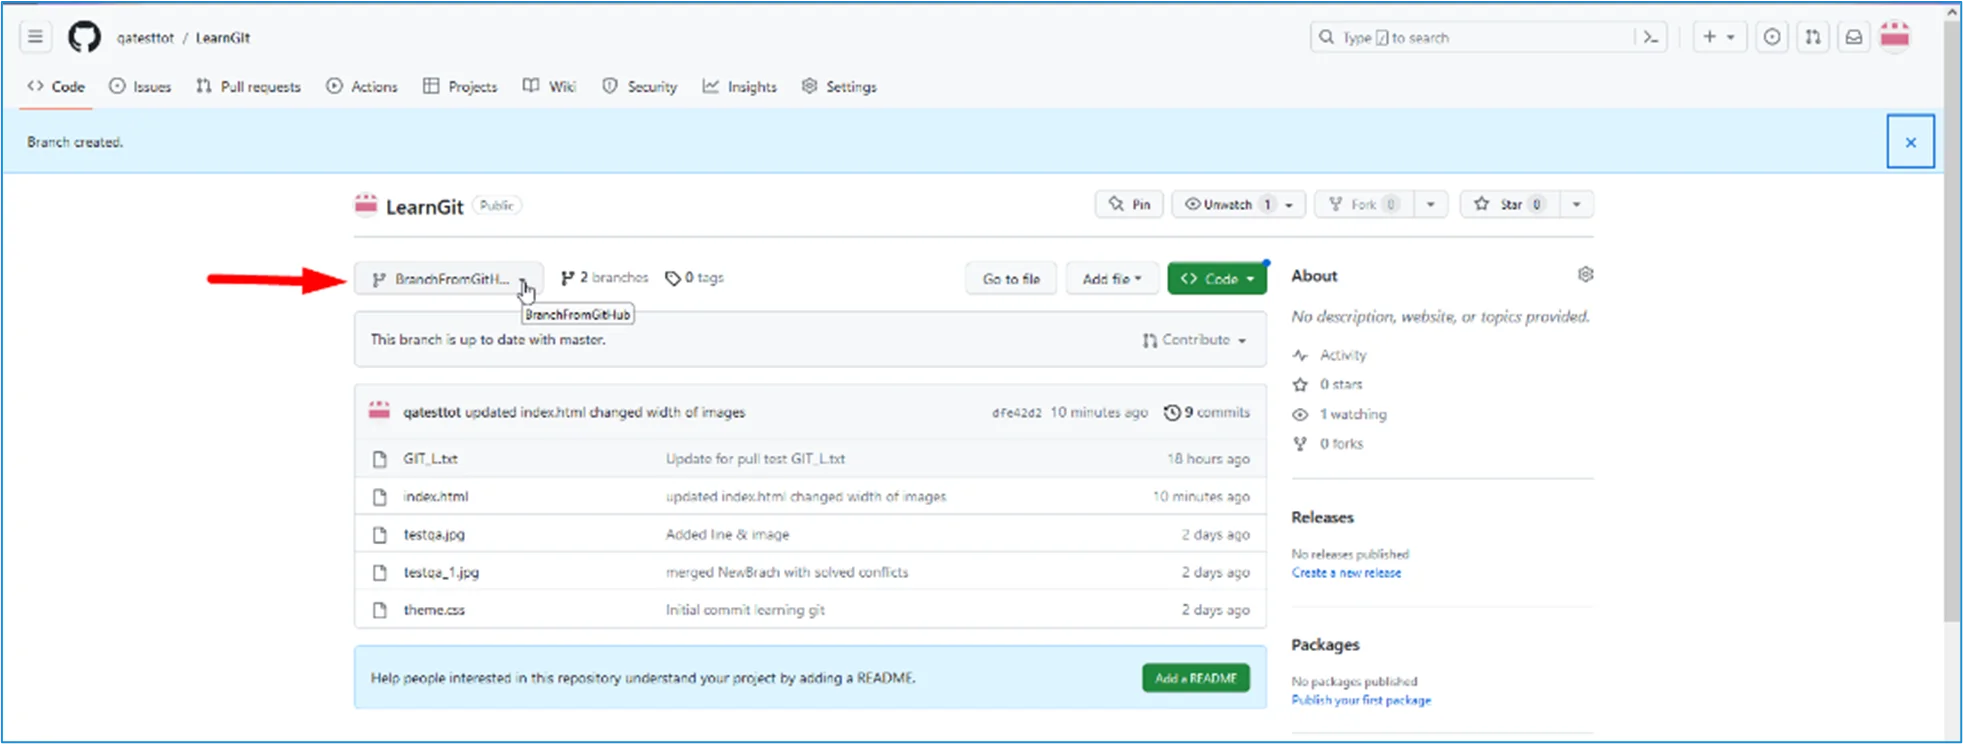
On GitHub, access your repository and click the "master" branch button.
We can create a new Branch. Type in a descriptive name, and click Create branch as shown in the image:
Users can confirm which branch they are working on by looking at the branch button. See that it now says "BranchFromGitHub" instead of "main"?
Let us work on an existing file in this branch. Click the "index.html" file and start editing:
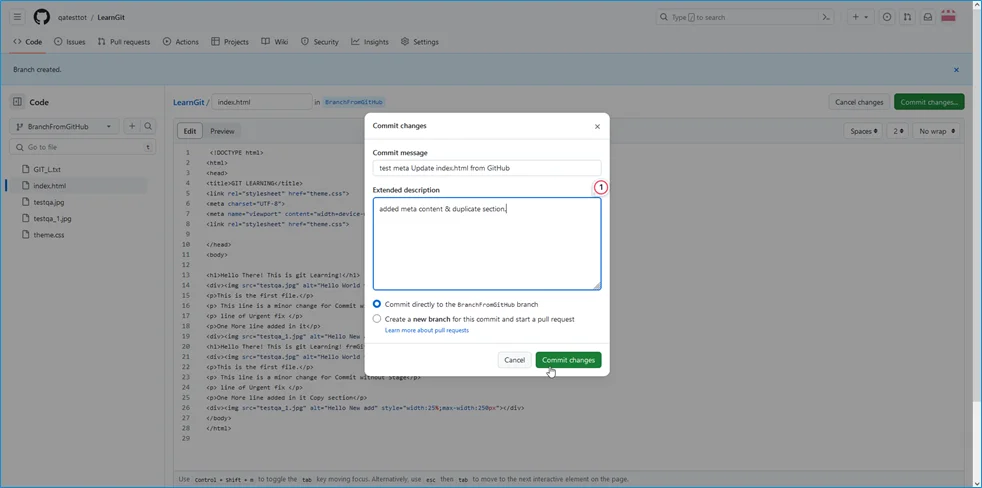
After you are done with the change, add a comment and click on Commit changes, as shown in the image above.
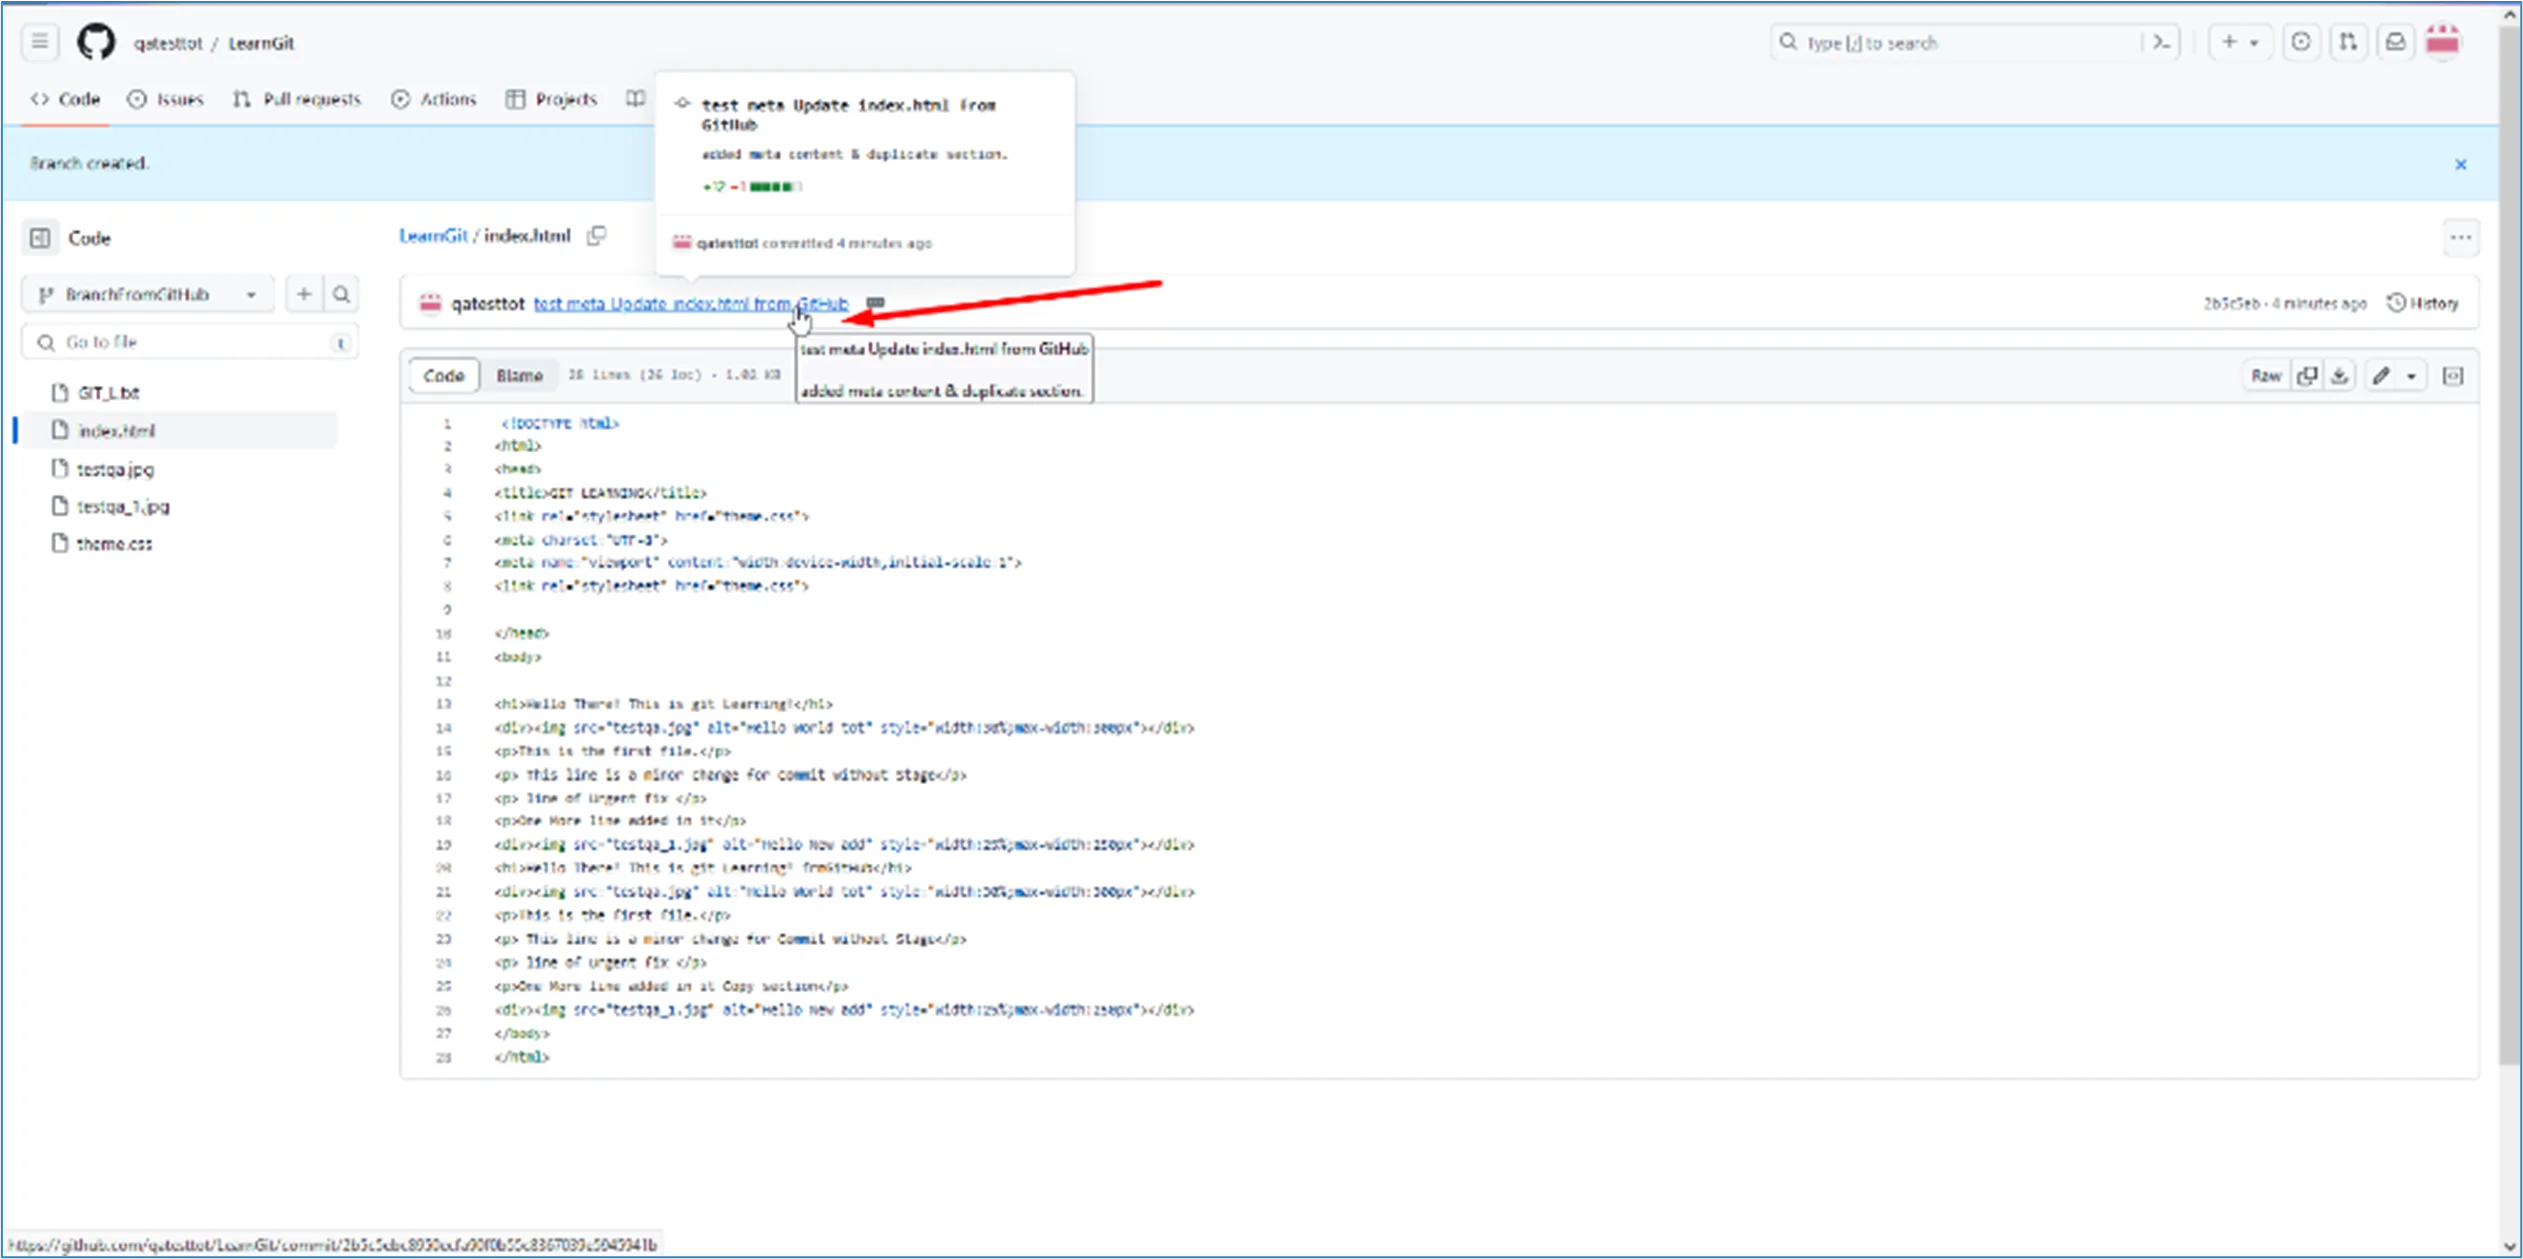
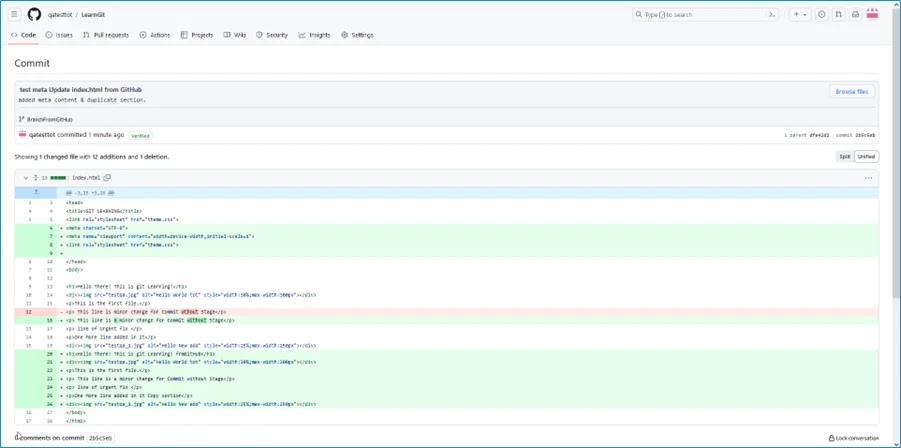
Now, we have a new branch on GitHub, updated with some changes!
After committing to the file, click the "History Section" to see the changes made highlighted:
Pulling a Branch from GitHub
Now, let us move to our local Git.
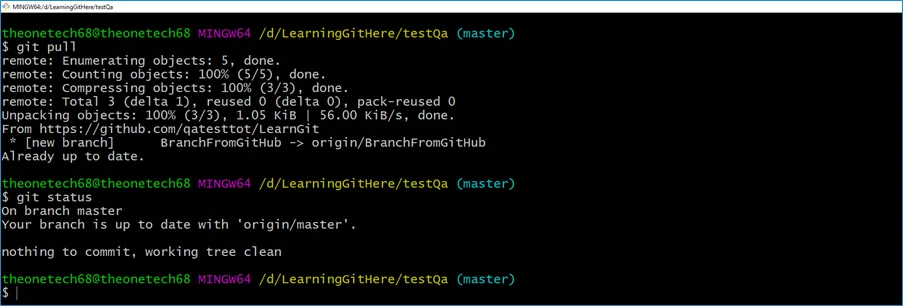
Let us pull from GitHub again so the code will be up to date:
git pull
Now it is up to date. And we can see that a new branch is available on GitHub.
Check the status:
git status
And confirm which branches we have and where we are working now:
git branch

We have a new branch in our local Git. But it is available on GitHub. So, we can use the -a option to see all local and remote branches:
git branch -a
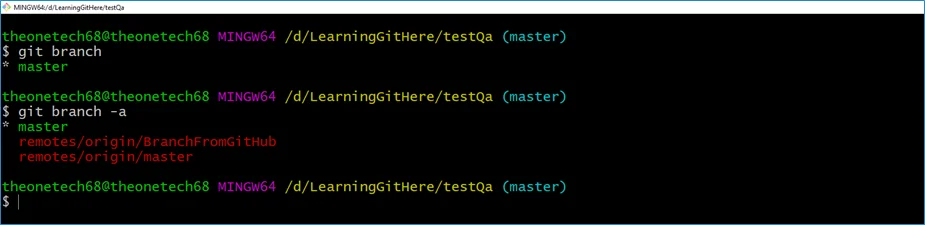
Caution: branch -r is for remote branches only.
The branch BranchFromGitHub is available remotely but not on our local git. Let us check it out:
git checkout BranchFromGitHub

And check if it is all up to date:
git pull

Which branches do we have now, and where are we working from? Let us check:
git branch

Now, from the editor, we can confirm the changes from the GitHub branch have carried over.
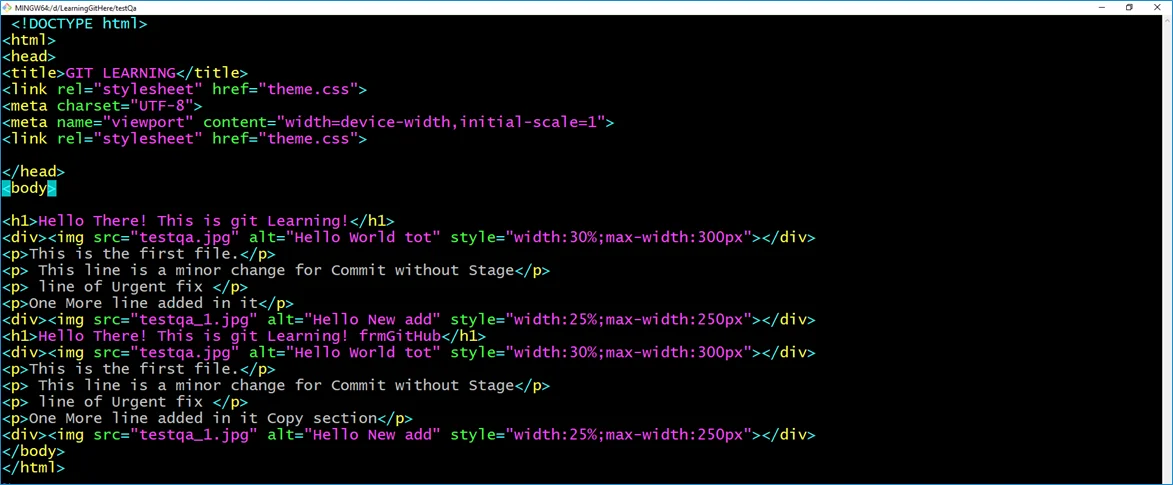
This is how you pull a GitHub branch to your local Git.
Push a Branch to GitHub
Let us create a new local branch and push that to GitHub.
Start by creating a branch, as we did earlier:
git checkout -b NewGIT_L

And made some changes to the GIT_L.txt & index.html files. Just add a new line.
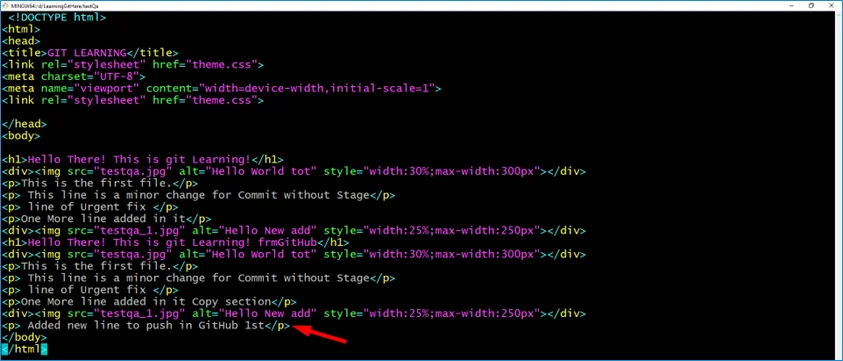
So now check the status of the current branch.
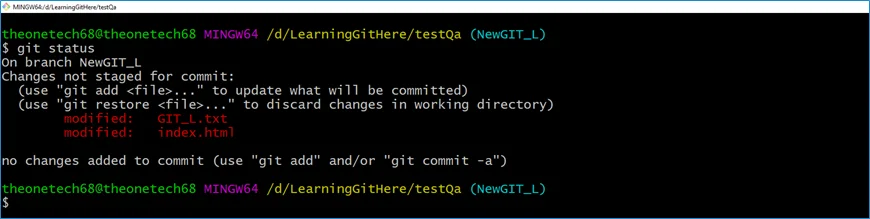
As shown in the image, both files are modified but not added to the Staging Environment:
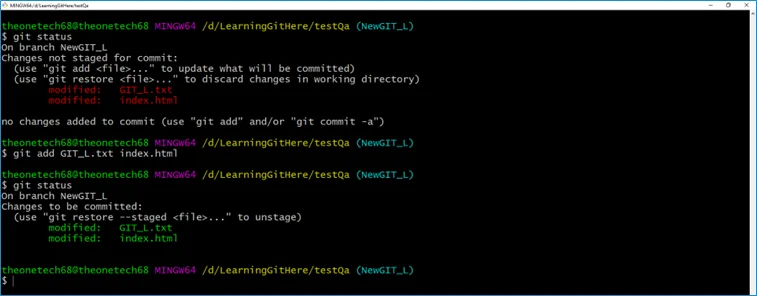
git add GIT_L.txt index.html
Check the status of the branch:
git status
After performing the changes, commit them to the branch:
git commit -m "Updated GIT_L.txt & index.html for GitHub Branches"

Let us push the branch from the local Git repository to GitHub, where everyone can see the changes:
git push origin NewGIT_L
Checking the status of the branch:
git status

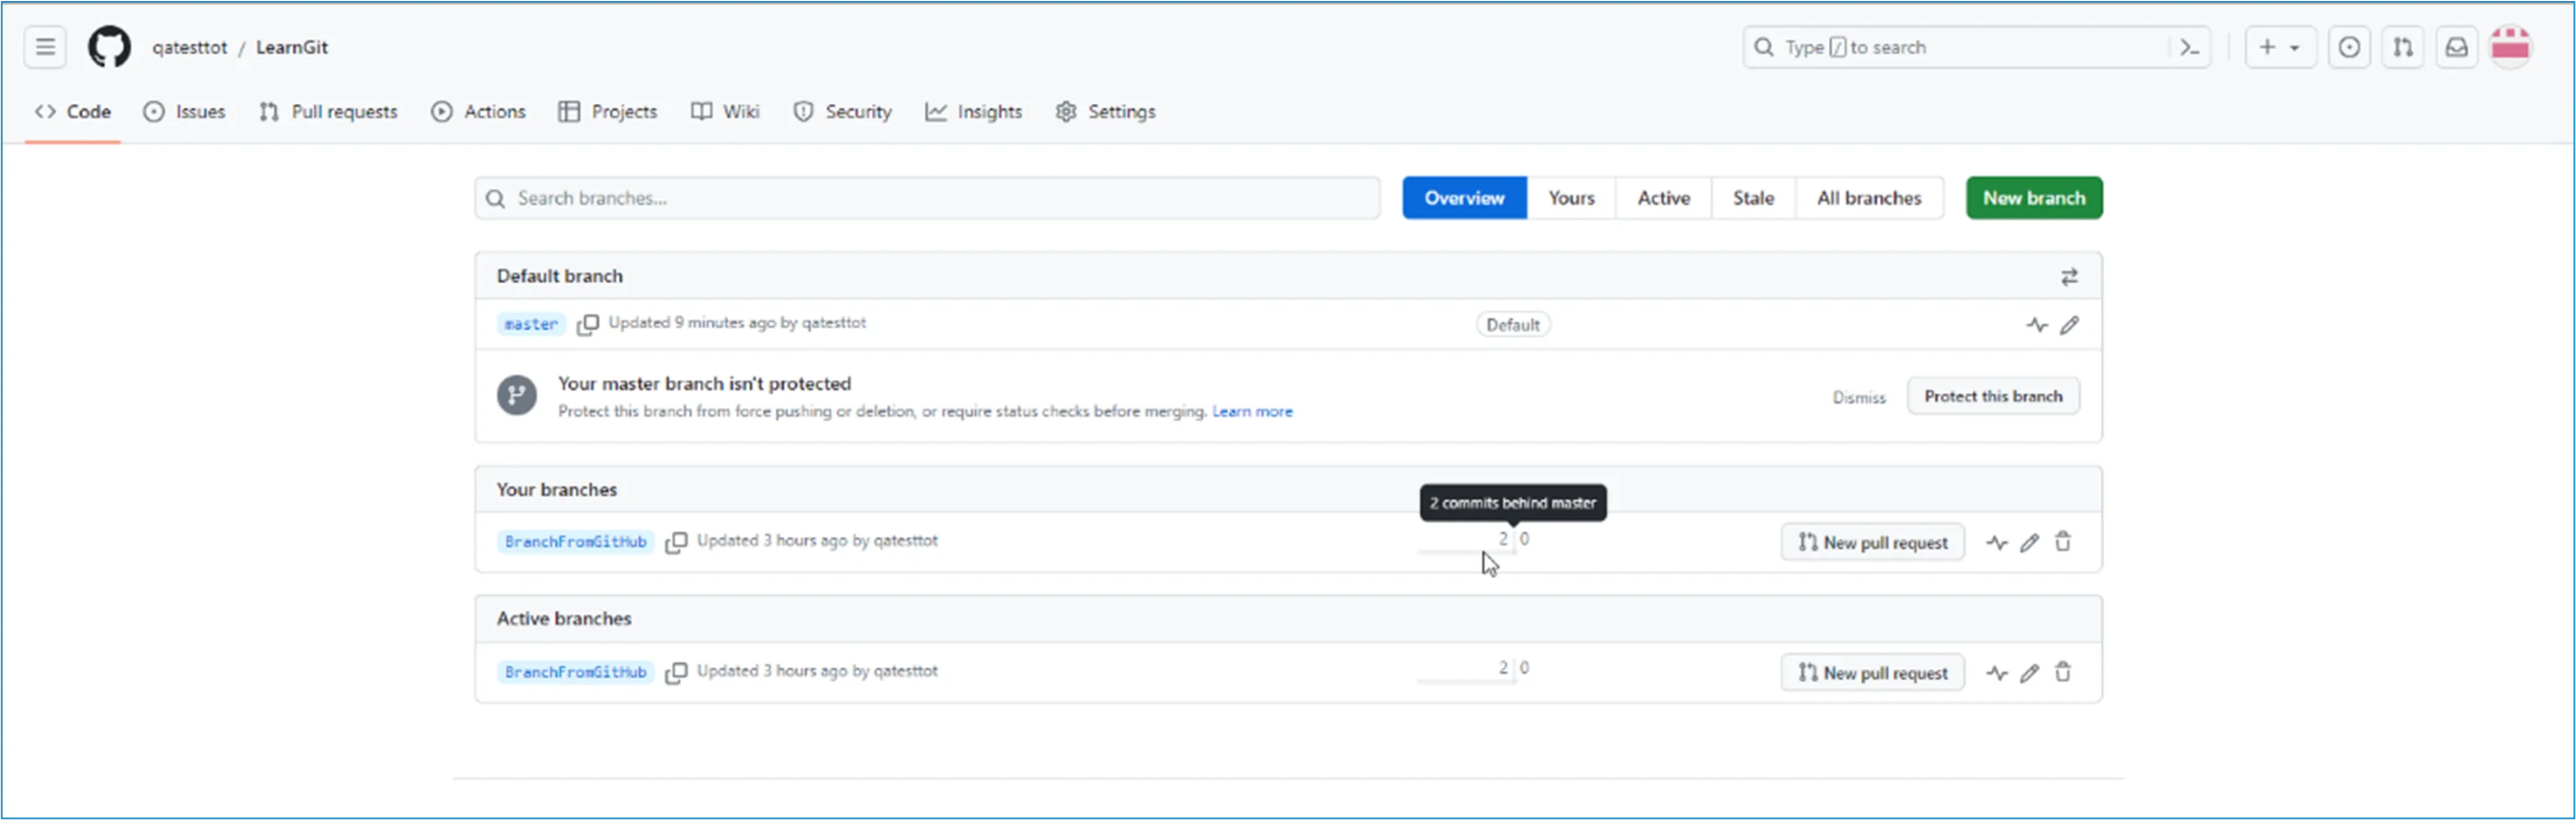
Verify that the repository has a new branch on GitHub:
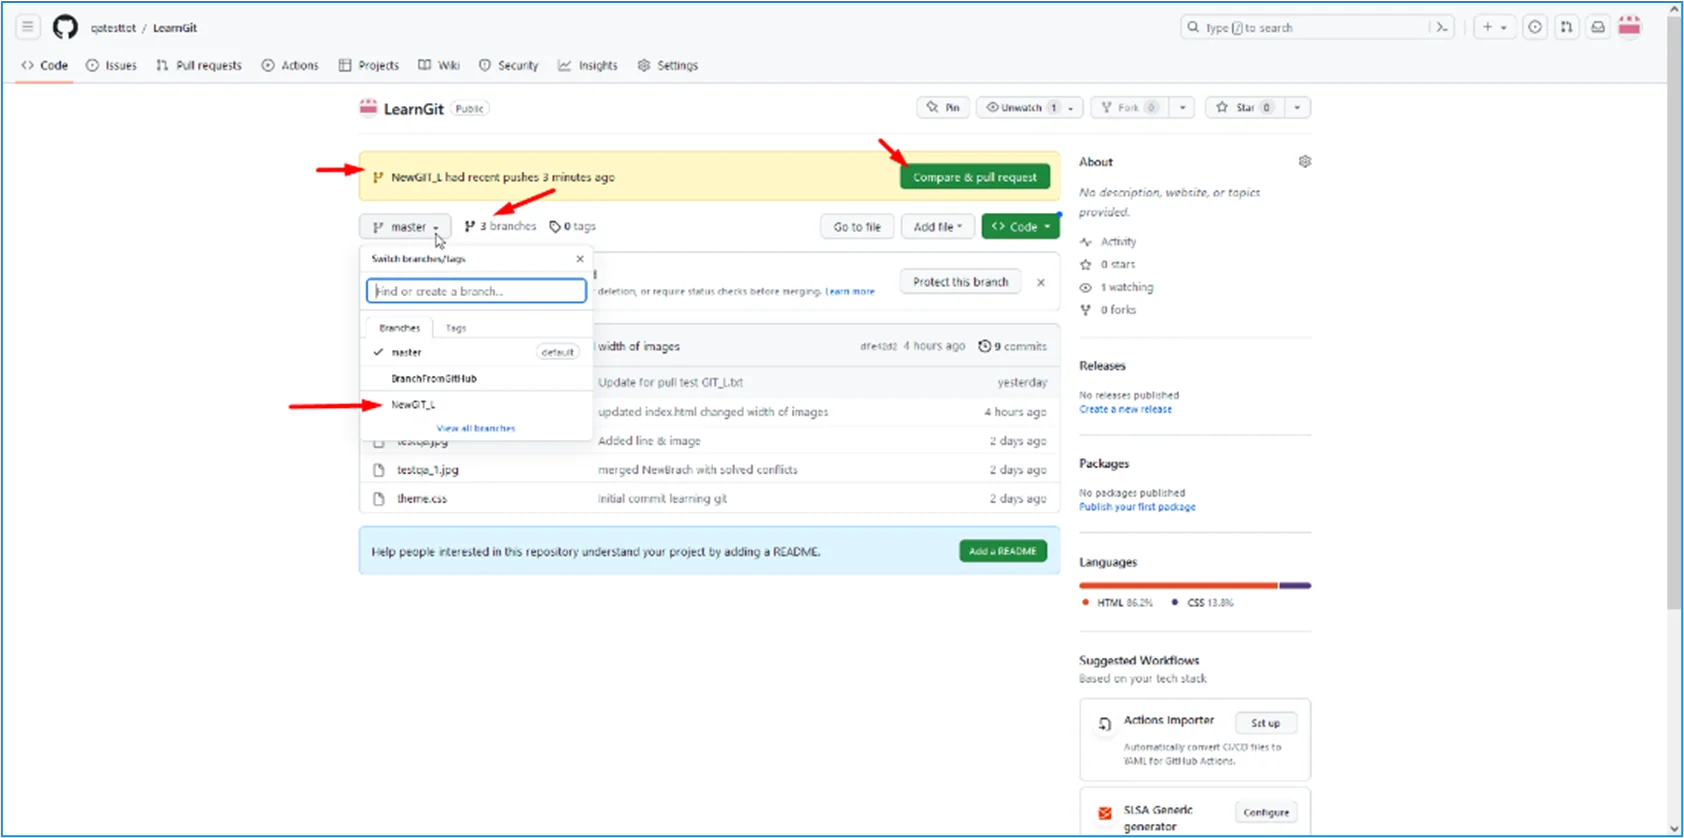
You can see the changes in GitHub and merge them into the master branch if we approve it.
If you click the "Compare & pull request," you can go through the changes made and new files added:
Caution: This comparison shows both changes from NewGIT_L and NewBranch because we created the new branch FROM ‘NewBranch.’
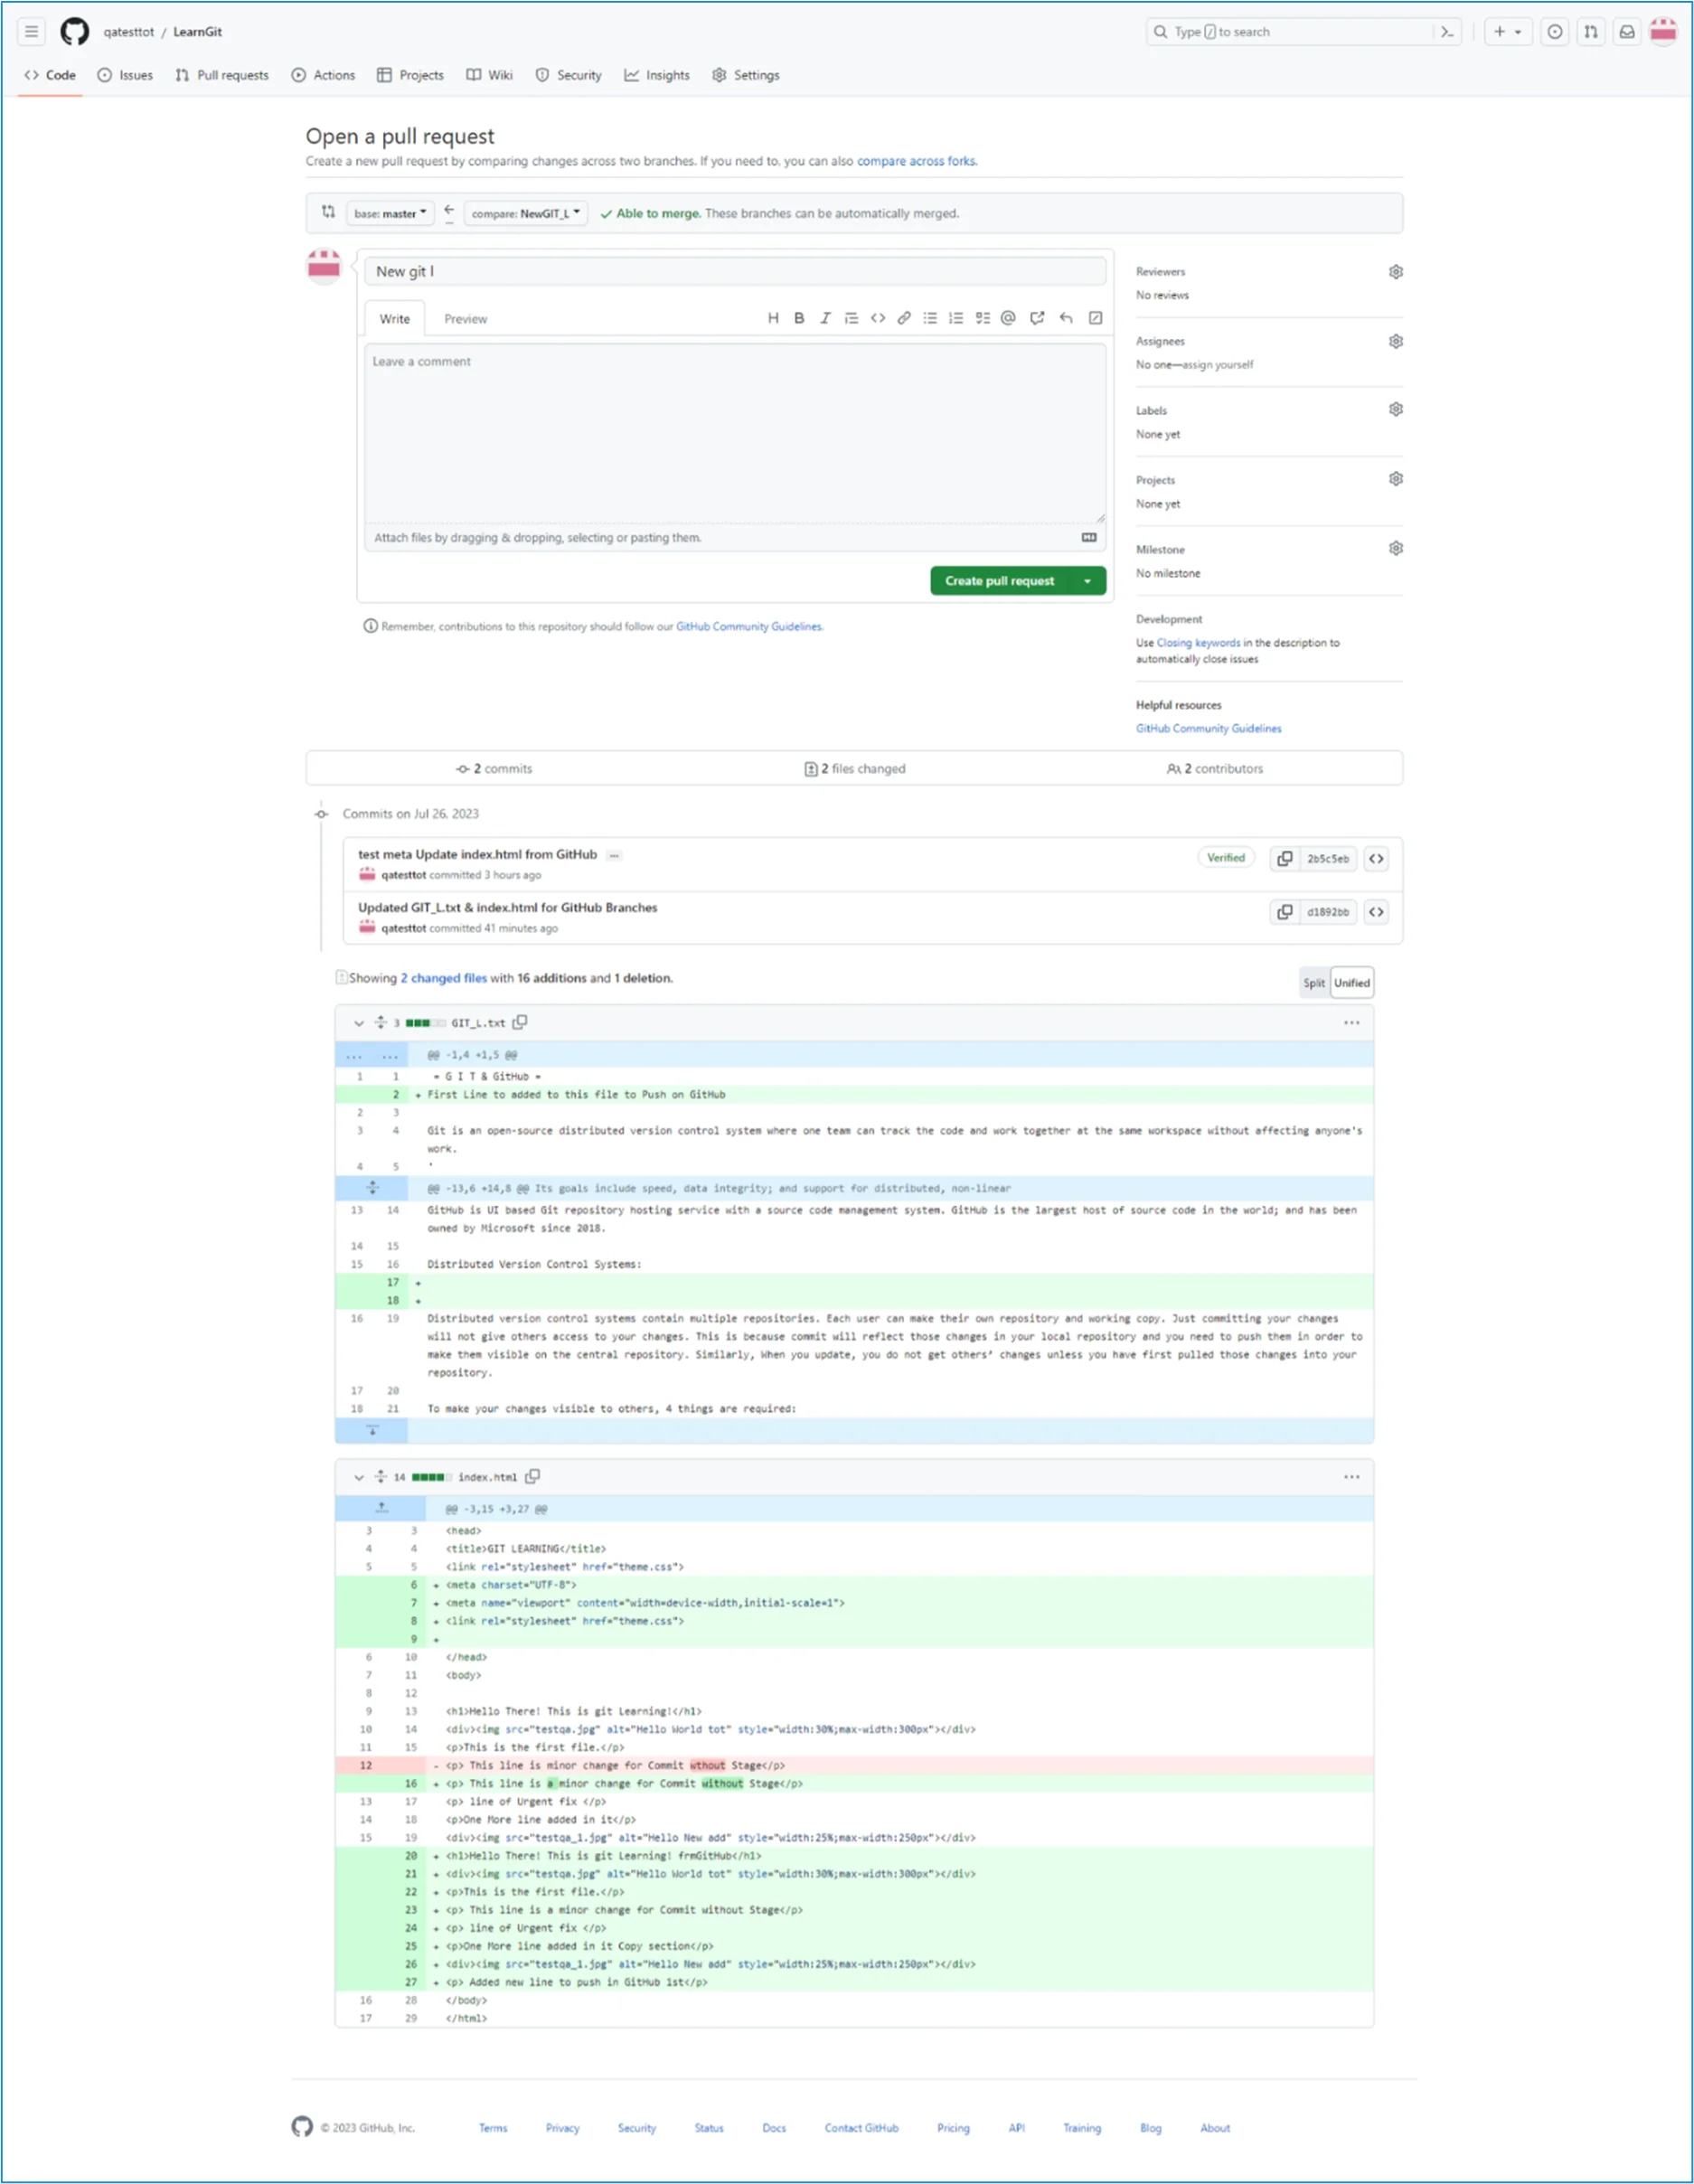
Once changes are done, go forward, creating a pull request:
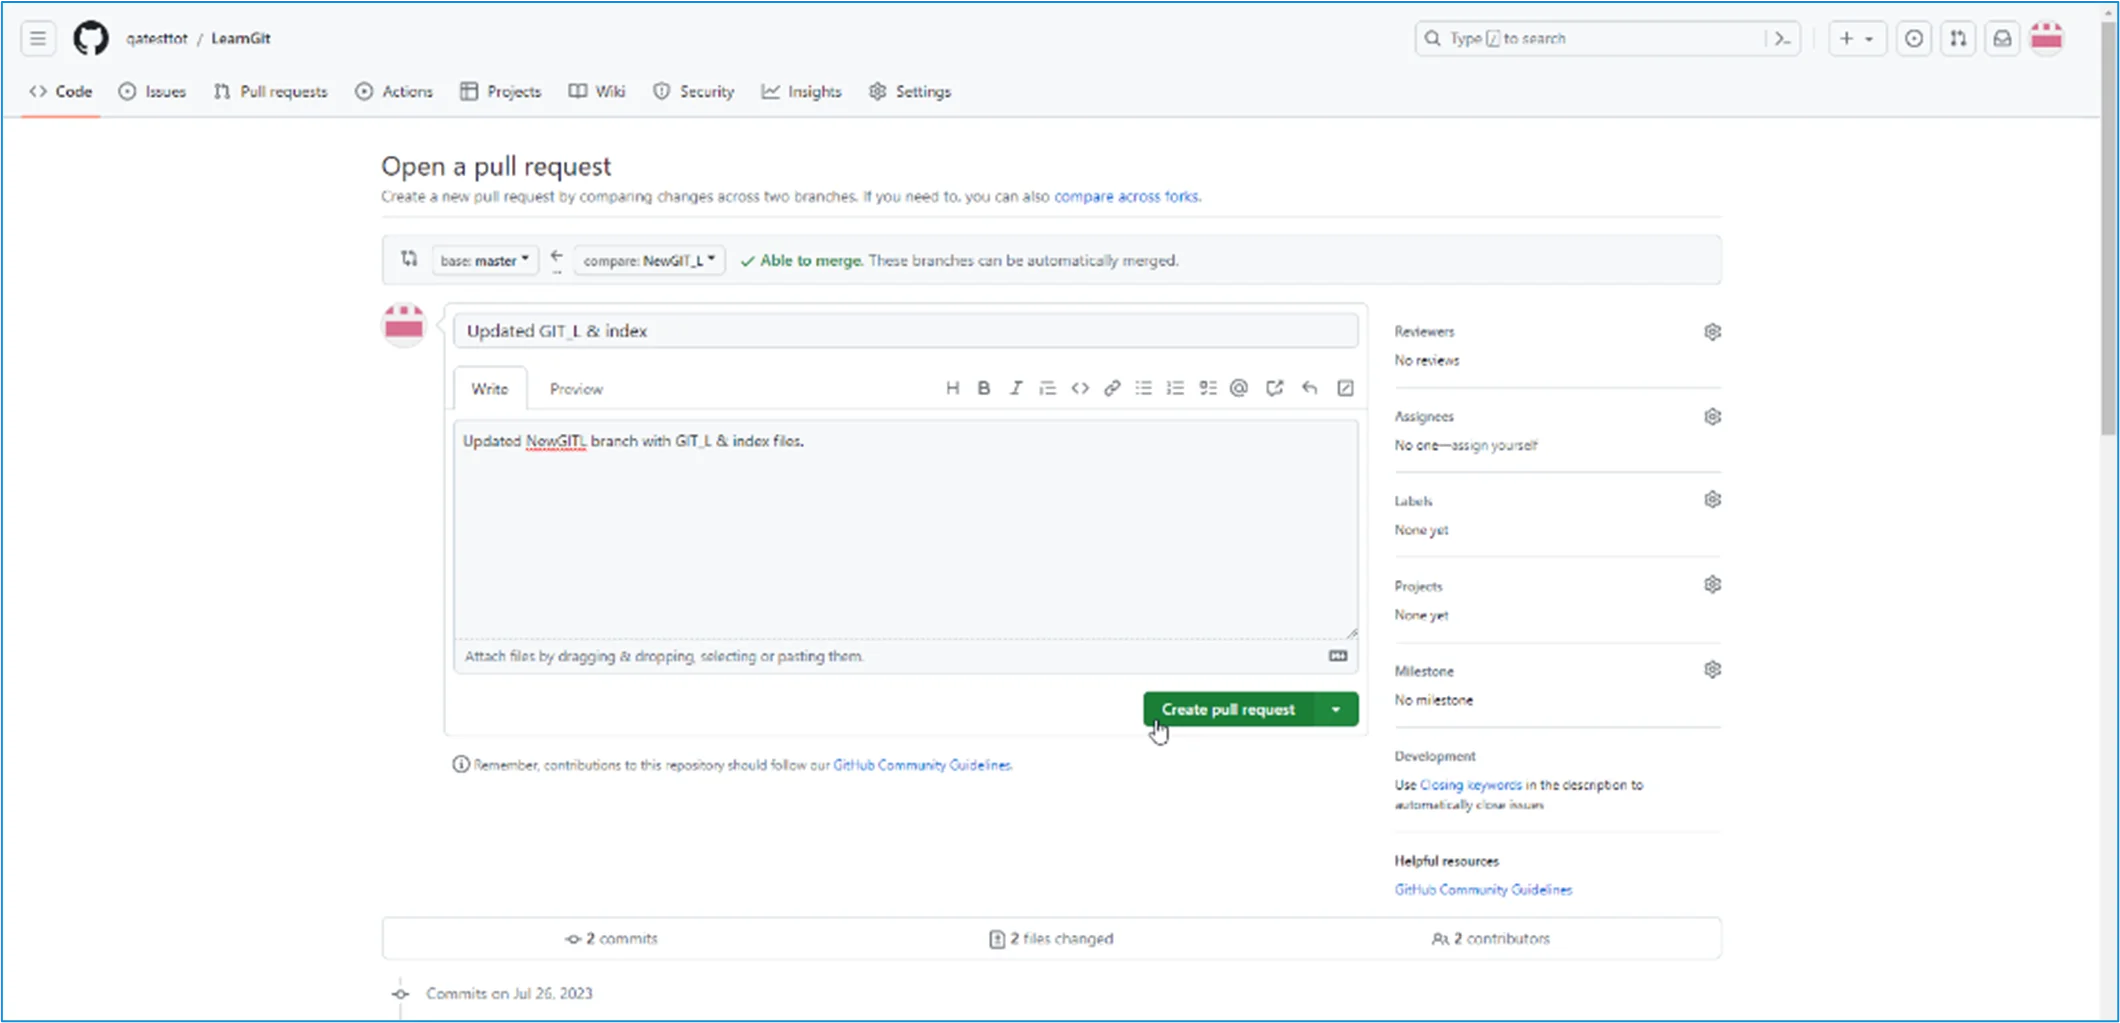
Why pull? A pull request is how you propose changes. You can ask someone to review your changes or pull your contribution and merge it into their branch.
Since this is your own repository, you can merge your pull request yourself:

The pull request will record the changes so you can go through them later to figure out the changes made.
The result should be something like this, as shown in the below image:
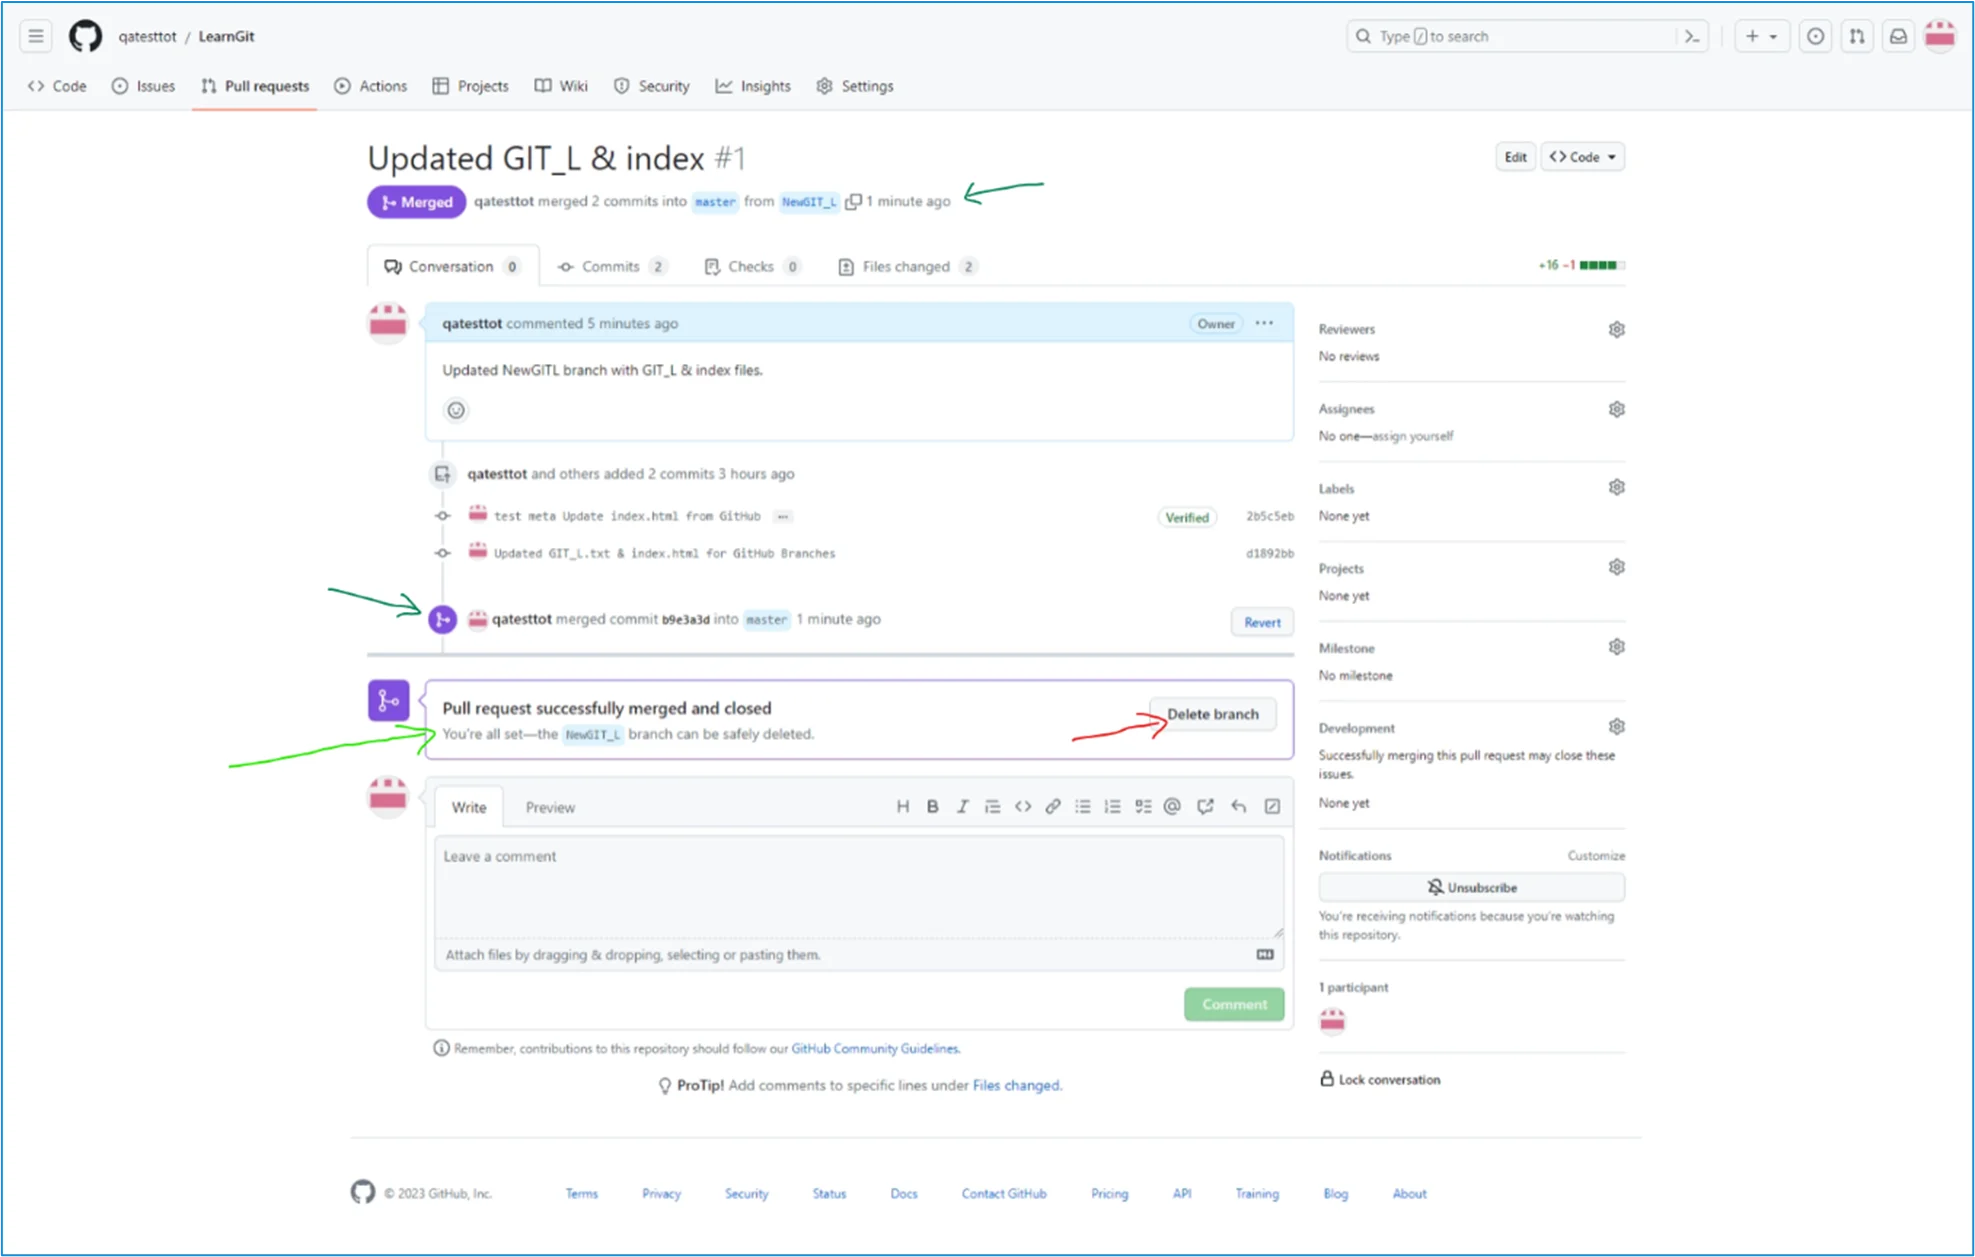
We can delete the unused branch by clicking "Delete branch" to keep the repo from getting overly complicated.

Once you confirm that the changes from the previous branch were included, delete that as well:
Working using the GitHub Flow
Is the workflow designed to work well with Git and GitHub?
It focuses on branching and facilitating members to work freely and make deployments regularly.
The GitHub flow works like this:
- Create a new Branch
- Make changes and add Commits
- Open a Pull Request
- Review
- Deploy
- Merge
You should already have a good understanding of how this works from the previous readings.
Git GitHub Pages
Host Your Page on GitHub
GitHub allows you to host a webpage from your repository. Let us try to use GitHub Pages to host the repository.'
Create a New Repository
Start by signing into GitHub. GitHub pages need a special name and setup to work, so we start by creating a new repository:
This repository needs a special name to function as a GitHub page. It needs to be your GitHub username, followed by .github.io:
Push Local Repository to GitHub Pages
We added this new repository as a remote for our local repository, calling it gh-page (for GitHub Pages).
Copy the URL from here:
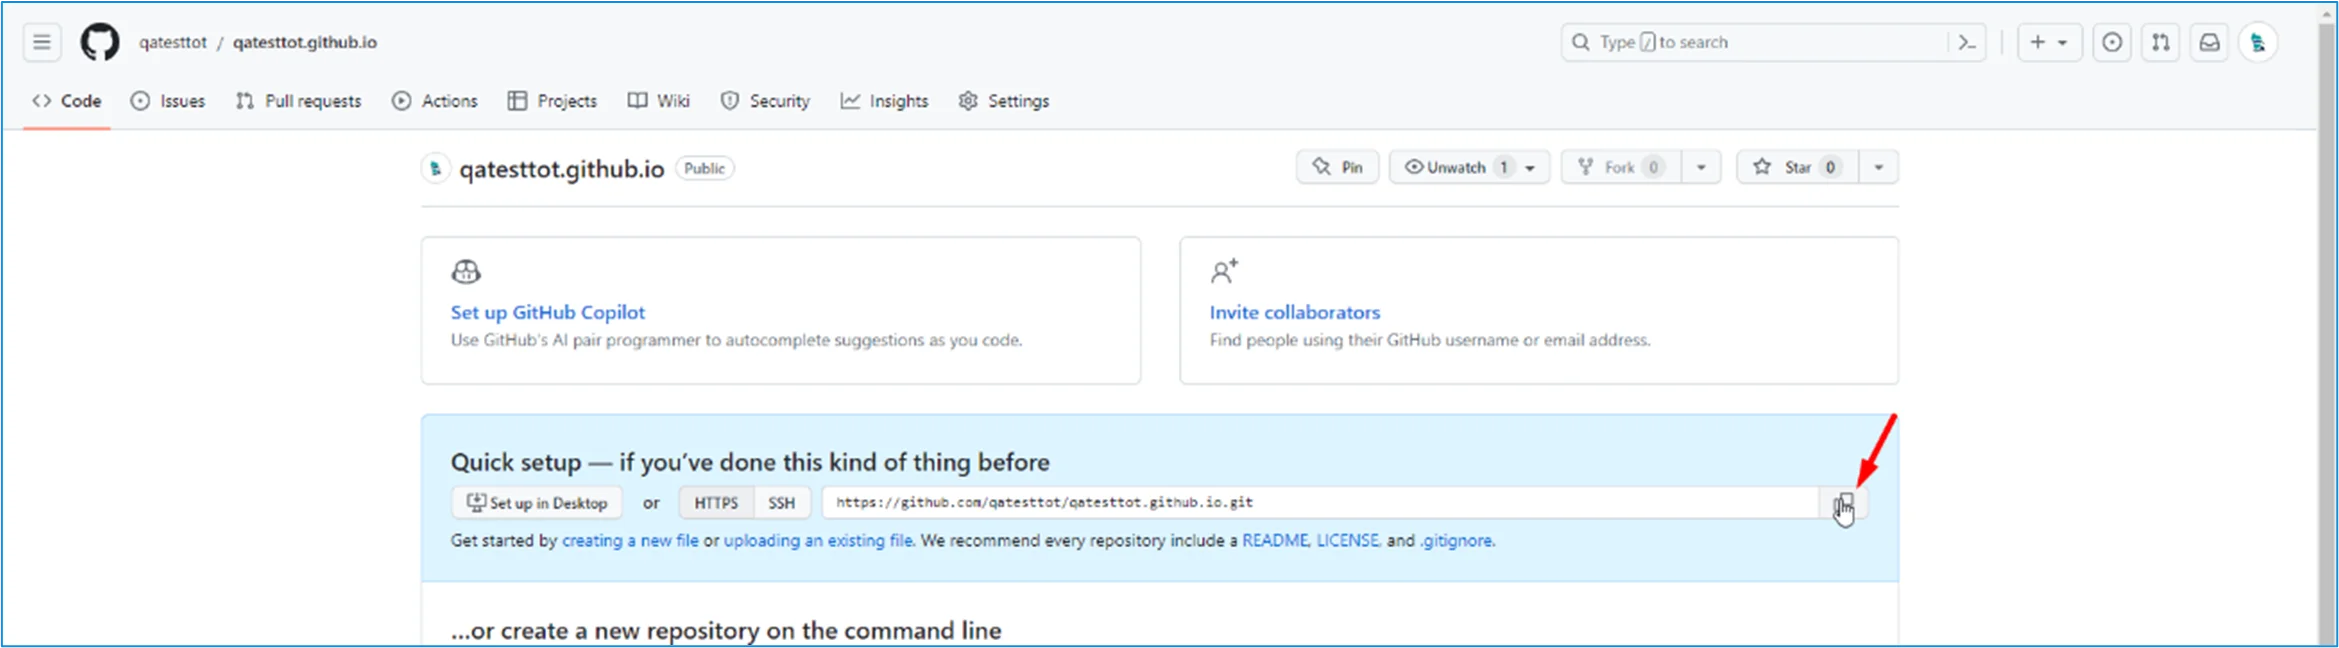
And add it as a new remote:
git remote add gh-page https://github.com/qatesttot/qatesttot.github.io.git

Make sure the master branch, then push the master branch to the new remote:
git push gh-page master
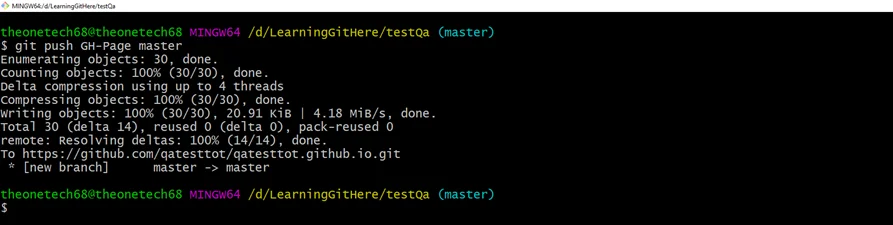
Note: If this is the first time, you will be notified to authenticate this connection.
Check that the new repository has received all the files:

Check Out Your GitHub Page
Once you are done, click the Settings menu and navigate to the Pages tab:

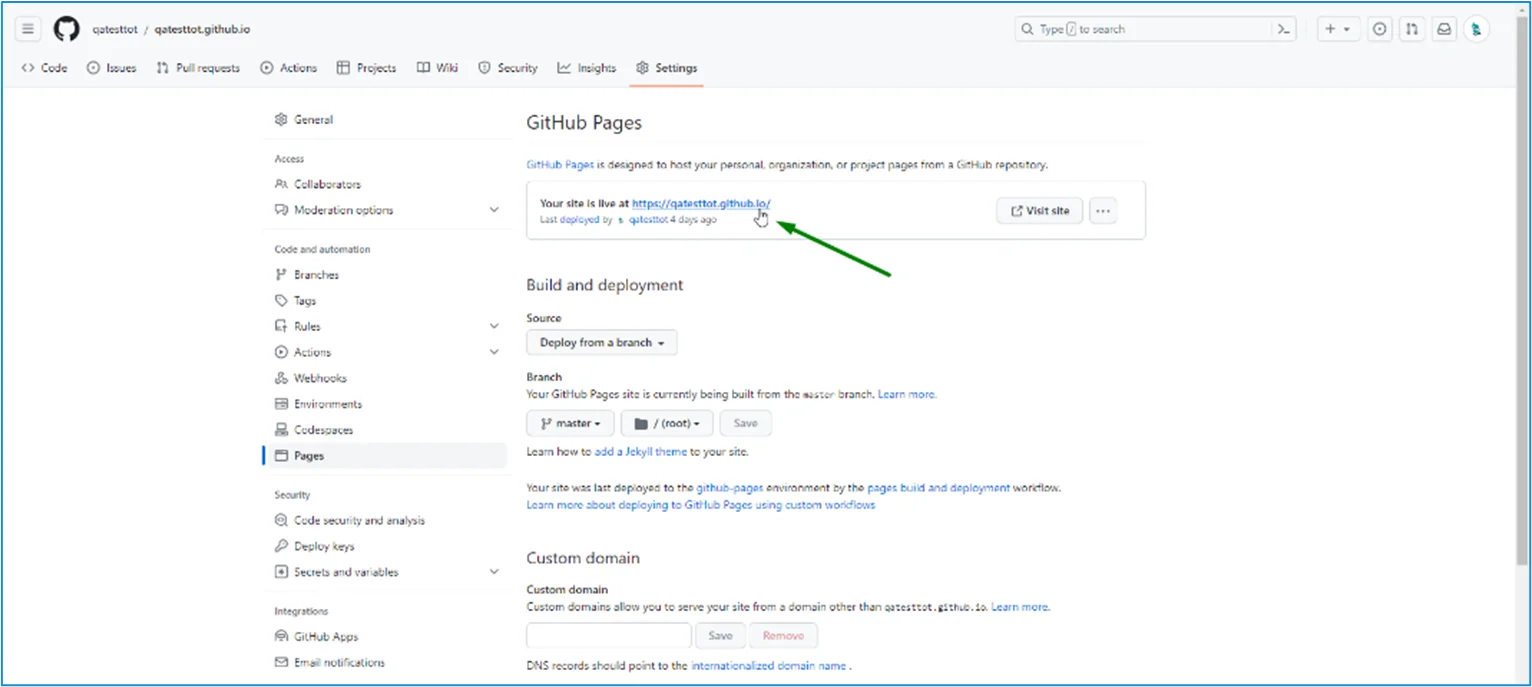
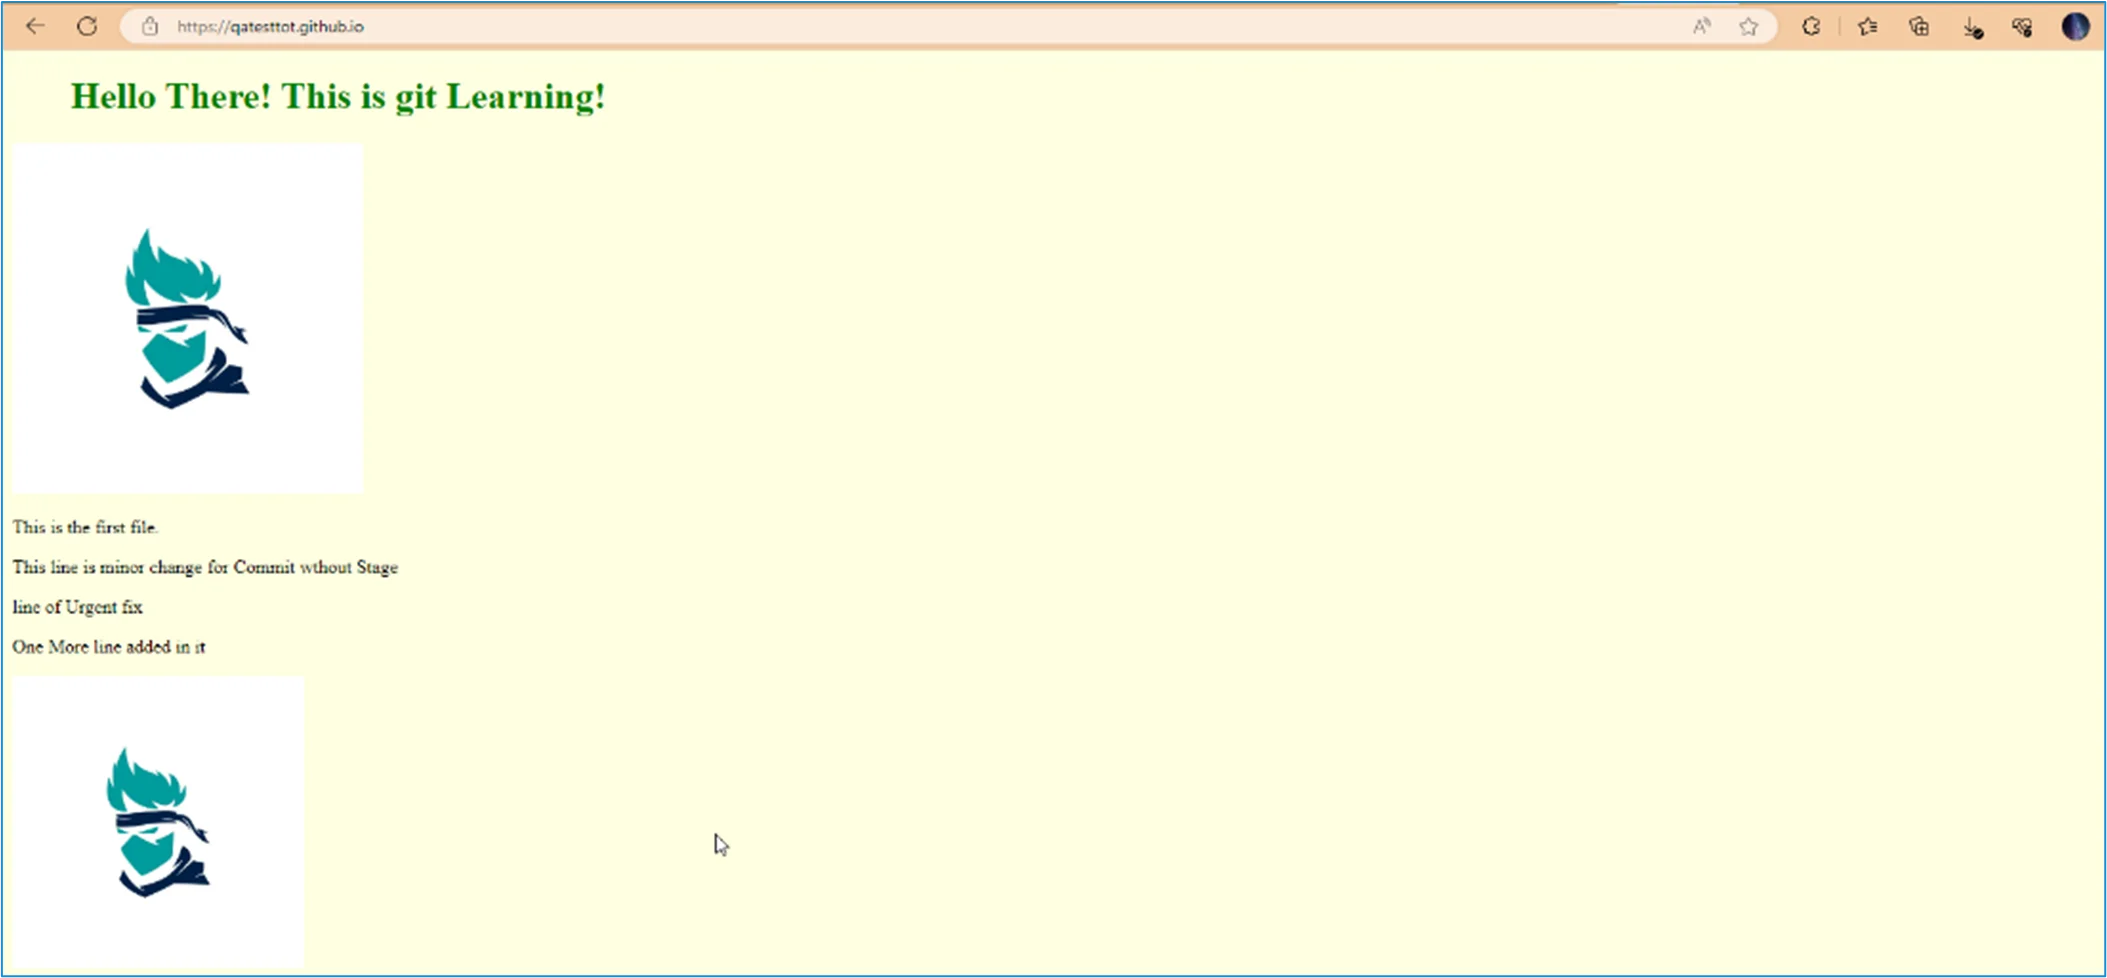
Our GitHub page is created, and you can click the URL to view the result...
Conclusion
Git is a code version control system that allows developers to track changes in their code files; it facilitates multiple users/team members to access the other's code and can experiment on it separately by branching. It also allows the merging of the code files by comparing them. GitHub is a web-based hosting service for git repositories. Users can use Git without GitHub but cannot use GitHub without Git.
About Author
 Arun Solanki, a dedicated QA Engineer at PixelQA, has made significant strides since entering the IT industry in September 2021, making a lasting impact on the field of quality assurance.
Beyond software testing, he loves listening to songs, embracing the beauty of nature, and spending his spare time through countless chess games.