In web-based Applications File upload and download are common scenarios. To perform automation testing effectively on web-based applications, achieving Selenium automation testing services with comprehensive test coverage and ensuring proper interaction with the apps requires automation of file upload and download scenarios. In this blog post, we explore handling file download and file upload by Auto-IT, and Java Robot class in Selenium webdriver.
Table of Contents
- Handling file downloads in Selenium WebDriver
- Handling File Uploads with AutoIt
- Managing File Downloads with AutoIt
- Handling File Uploads with Robot Class
- Managing File Downloads with the Robot Class
- Conclusion
Handling file downloads in Selenium WebDriver
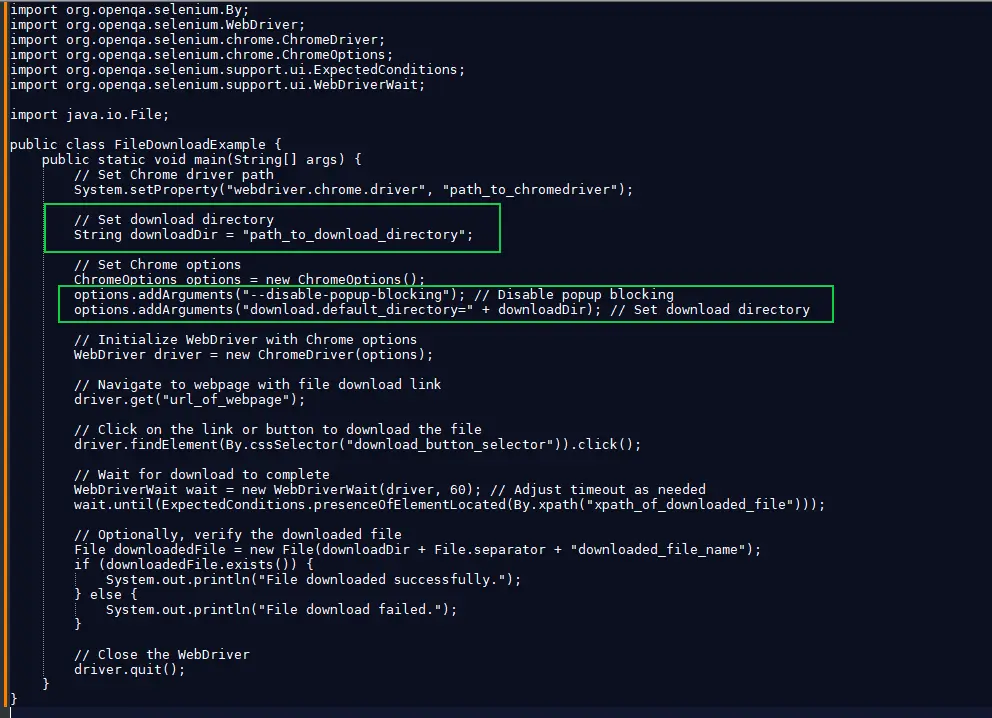
It is commonly accepted to download files in Selenium WebDriver with Java by specifying the download directory default with browser settings, and then dealing with downloaded files from there. The general approach on how you can implement this is as follows:
Set up WebDriver with desired browser options: Configure your WebDriver instance with options to set the download directory and handle downloads.
Interact with the app: Go to a web page which includes a link or button to download a file.
Trigger file download: Simulate a click or any action that initiates the file download.
Wait for Completing Download File: To wait up to completing the download file need to implement logic like using WebDriverWait with expected conditions for file presence in the download directory.
Verify/downloaded file: Optionally, you can verify the downloaded file's existence or perform further actions with it.
Example -
Handling File Uploads with AutoIt
AutoIt defines its own scripting language, devised for the purpose of Windows GUI automation and general scripting. It is most useful for some very specific things, such as automating file uploading, since it can handle file dialogs and windows really well. Let's see how we can integrate AutoIt with Selenium Java for handling file uploads:
1. Install AutoIt: Begin by downloading and installing AutoIt from the official website.
2. Write AutoIt Script: Write an AutoIt script to handle the file upload dialog. This script should simulate the steps a user would take to select a file.
Below is an example script named `upload_script.au3`:
Example:
WinWaitActive("File Upload")
Send("path_to_your_file")
Send("{ENTER}")
3. Compile the Script: Compile the AutoIt script into an executable (.exe) file using the AutoIt compiler.
4. Invoke AutoIt Script from Selenium: In your Selenium Java code, invoke the compiled AutoIt script using the `Runtime.getRuntime().exec()` method. Here's an example:
WebElement uploadButton = driver.findElement(By.id("uploadButton"));
uploadButton.click();
Thread.sleep(2000); // Wait for the file upload dialog to appear
Runtime.getRuntime().exec("path_to_compiled_autoit_script.exe");
5. Continue with Selenium Automation: After uploading the file, continue with your Selenium test automation as usual.

Managing File Downloads with AutoIt
AutoIt is a highly useful scripting language for Windows GUI automation in the case of file handling operations. Here's the procedure:
1. Download and install AutoIt on the PC: First things first, download the installer for AutoIt conveniently using the download option from their official website.
2. Write AutoIt Script: Create an AutoIt script to handle the file download dialog. This script should mimic user actions to specify the download location. Here's a basic example script named download_script.au3:
WinWaitActive("Save As")
Send("path_to_save_location")
Send("{ENTER}")
3. Compile the Script: Compile the AutoIt script into an executable (.exe) file using the AutoIt compiler.
4. Trigger File Download: Use Selenium to click on the download link/button on the web page.
5. Execute AutoIt Script: Once the download starts, execute the compiled AutoIt script to handle the save dialog. Here's a sample code snippet:
WebElement downloadButton = driver.findElement(By.id("downloadButton"));
downloadButton.click();
Thread.sleep(2000); // Allow time for the download to start
Runtime.getRuntime().exec("path_to_compiled_autoit_script.exe");
6. Continue Automation: After initiating the download, continue with your Selenium automation as required.
Handling File Uploads with Robot Class
Mouse and Keyboards event is also handled by using the Robot class of Java, so we use this logic in the file uploads scenario. Let's follow below steps:
1. Locate the Upload Button: Use Selenium to find and interact with the upload button on the web page.
2. Initiate File Selection Dialog: Clicking on the upload button usually triggers a file selection dialog. Simulate this action using Selenium.
3. Simulate File Selection: Once the dialog appears, use the Robot class to input the file path into the dialog. Below is an example snippet:
WebElement uploadButton = driver.findElement(By.id("uploadButton"));
uploadButton.click();
Thread.sleep(2000); // Wait for the file upload dialog to appear
Robot robot = new Robot();
StringSelection fileSelection = new StringSelection("path_to_your_file");
Toolkit.getDefaultToolkit().getSystemClipboard().setContents(fileSelection, null);
robot.keyPress(KeyEvent.VK_CONTROL);
robot.keyPress(KeyEvent.VK_V);
robot.keyRelease(KeyEvent.VK_V);
robot.keyRelease(KeyEvent.VK_CONTROL);
Thread.sleep(1000); // Wait for file to be selected
robot.keyPress(KeyEvent.VK_ENTER);
robot.keyRelease(KeyEvent.VK_ENTER);
4. Continue Automation: After selecting the file, proceed with your Selenium automation as usual.

Managing File Downloads with the Robot Class
The Robot class in Java allows you to simulate keyboard and mouse events. This can be leveraged to handle file downloads in Selenium. Here's how to use the Robot class for managing file downloads:
1. Move to the Download Page: Navigate to the selected web page from which the desired file is to be downloaded with the help of Selenium.
2. Click the Download Button: Clicking the download link or button using Selenium.
3. Simulate Keyboard Events using Robot: As soon as the download starts, invoke the Robot class to simulate keystrokes (for example, CTRL+S) to invoke the save dialog. Then, simulate keyboard inputs to navigate the save dialog and specify the download location. Finally, press Enter to initiate the download.
Below is an example code snippet:
WebElement downloadButton = driver.findElement(By.id("downloadButton"));
downloadButton.click();
Thread.sleep(2000); // Allow time for the download to start
Robot robot = new Robot();
robot.keyPress(KeyEvent.VK_CONTROL);
robot.keyPress(KeyEvent.VK_S);
robot.keyRelease(KeyEvent.VK_S);
robot.keyRelease(KeyEvent.VK_CONTROL);
Thread.sleep(1000); // Wait for the save dialog to appear
// Set file name and location and press Enter to save
StringSelection stringSelection = new StringSelection("file_name_to_save");
Toolkit.getDefaultToolkit().getSystemClipboard().setContents(stringSelection, null);
robot.keyPress(KeyEvent.VK_CONTROL);
robot.keyPress(KeyEvent.VK_V);
robot.keyRelease(KeyEvent.VK_V);
robot.keyRelease(KeyEvent.VK_CONTROL);
Thread.sleep(1000);
robot.keyPress(KeyEvent.VK_ENTER);
robot.keyRelease(KeyEvent.VK_ENTER);
Conclusion
Automation of upload and download file scenarios is significant for easy web testing. With the aid of AutoIt and Java Robot Classes, automation is simplified. With these tools, one can accomplish anything with ease, like uploading and downloading files from a web page. This combination makes a powerful automation code that works in almost a seamless manner with the web testing framework. So, if you want to manage your web application files more efficiently, try these techniques in your automation scripts!!!
After reading this post, if you're planning to boost your software's reliability and performance, then partner with a dedicated software testing company and excellent automation testing services for bug-free solutions. Connect with PixelQA and elevate your product quality!
About Author
 Having spent 5+ years of his time as a QA Executive, Gajanan Kolase now desires to take on a higher position of work as QA Lead. He had begun with manual testing, then moved from an accomplished automation tester to advanced quality assurance methodologies. He is always on the lookout for new technologies and future trends that keep him updated.