
What is BDD?
Behavior-Driven Development, or BDD, is a cooperative methodology for software teams that facilitates communication between technical and business experts. It achieves this by enhancing collaboration during test creation and aligning with tools commonly used in Selenium Automation Testing Services to ensure the application's behavior meets user expectations:
- Fostering collaboration across different roles to cultivate a collective comprehension of the issue.
- Embracing swift, incremental iterations to enhance feedback loops and value delivery.
- Generating system documentation that undergoes automatic validation against the system's actual behavior.
Installation of JAVA & Eclipse:
- Download the JDK as per the system configuration.
- Download the Eclipse IDE for Java developers.
- Set the Java home path and bin path in the system environment variables
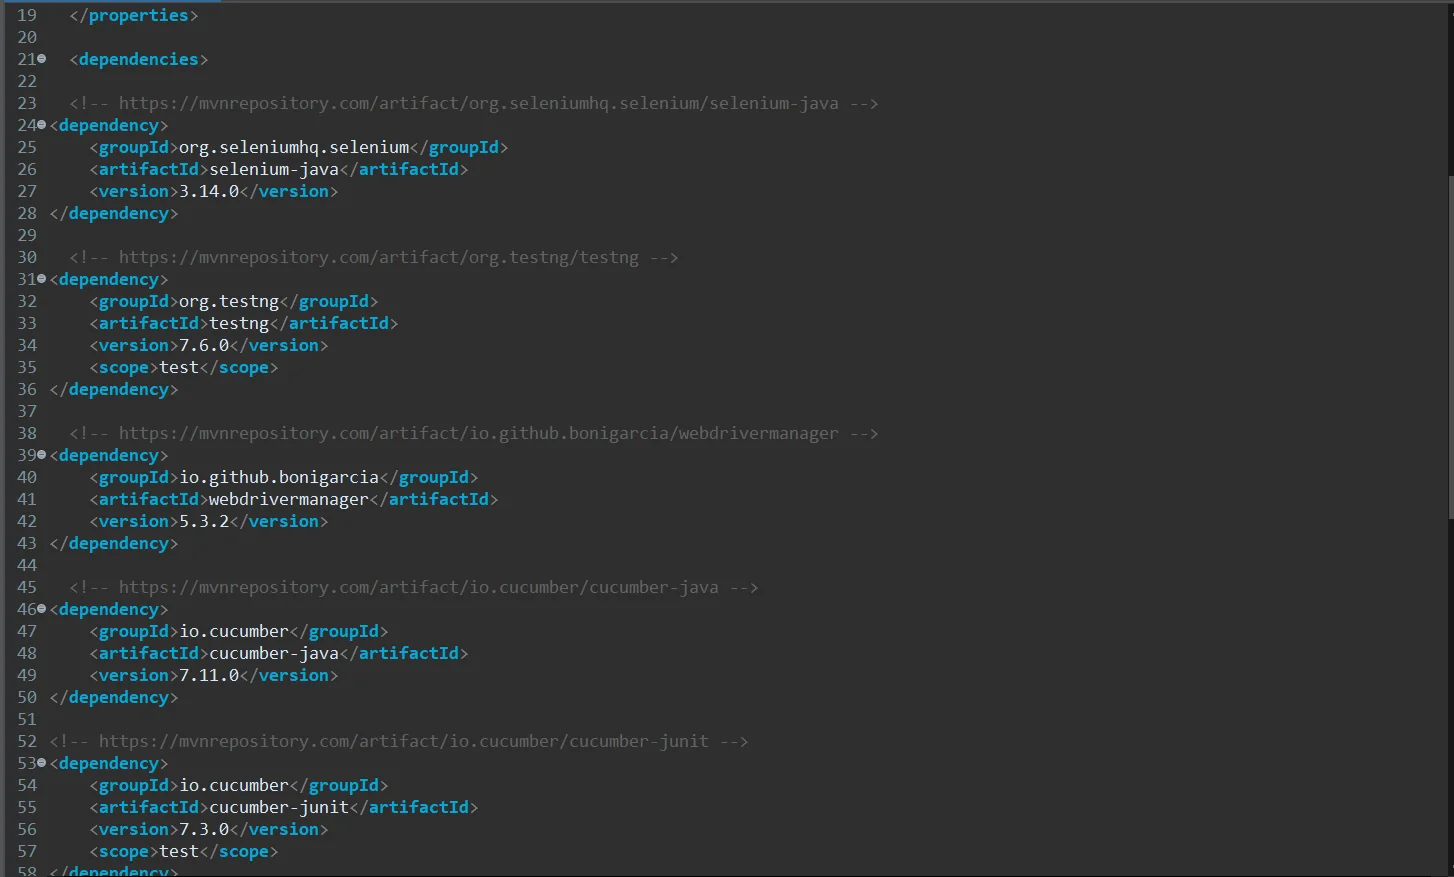
Add the Dependencies in Pom.xml
- To add the required dependencies, go to the maven repository and add the following dependencies in pom.xml
- Selenium-java, TestNG, WebdriverManager, Cucumber-java, JUnit
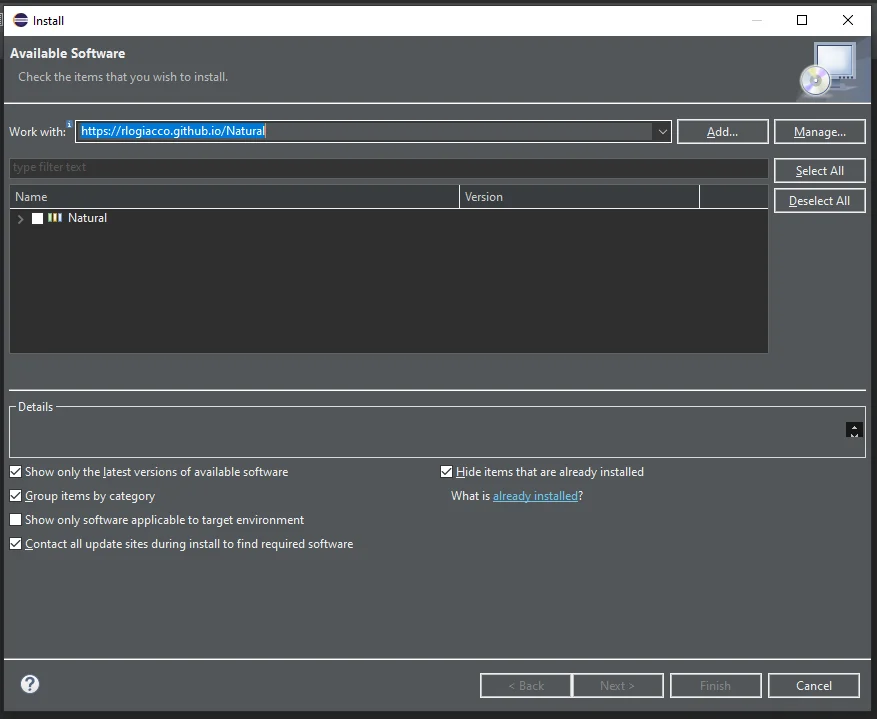
- Add Natural plugins in Eclipse using Cucumber eclipse
Go to Help > Install new software > paste this link.
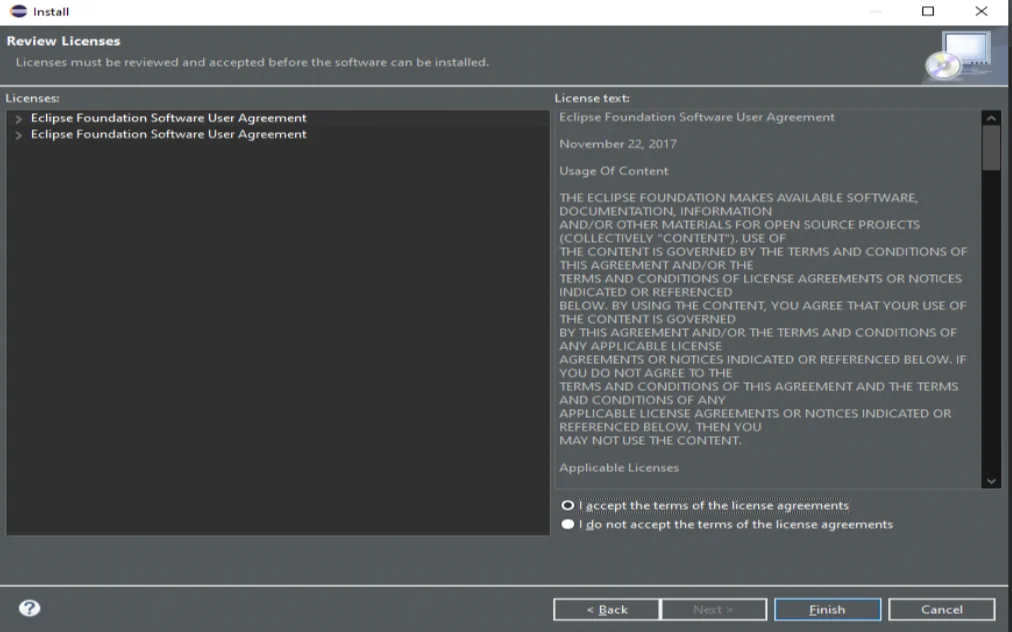
- Accept the terms and conditions and click on finish, Restart the Eclipse
- Go to Eclipse Marketplace > search cucumber > install cucumber plugin.
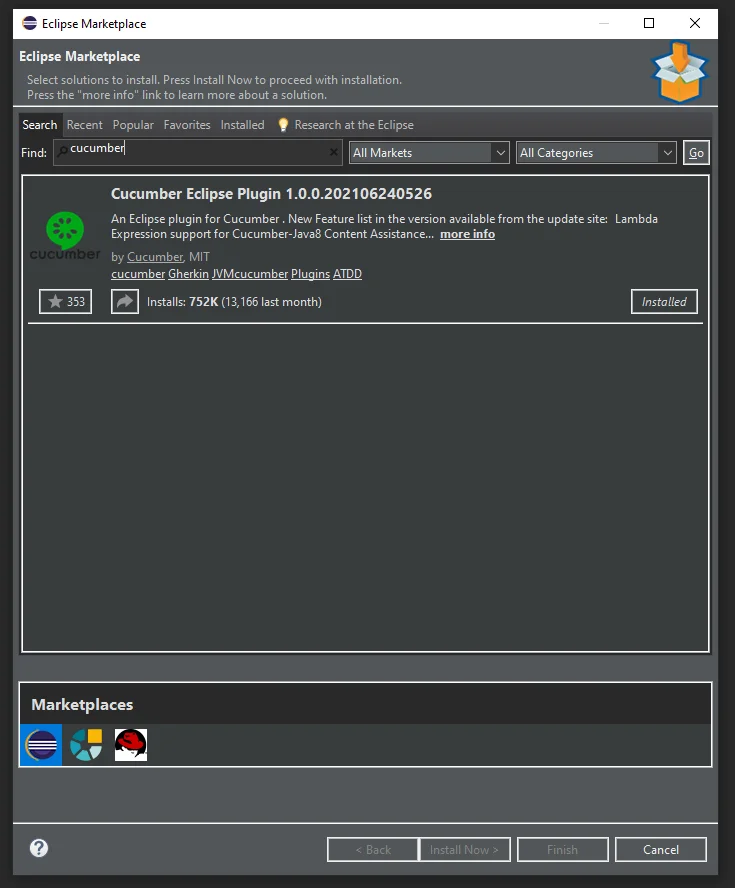
- Accept the terms and conditions and restart the Eclipse.
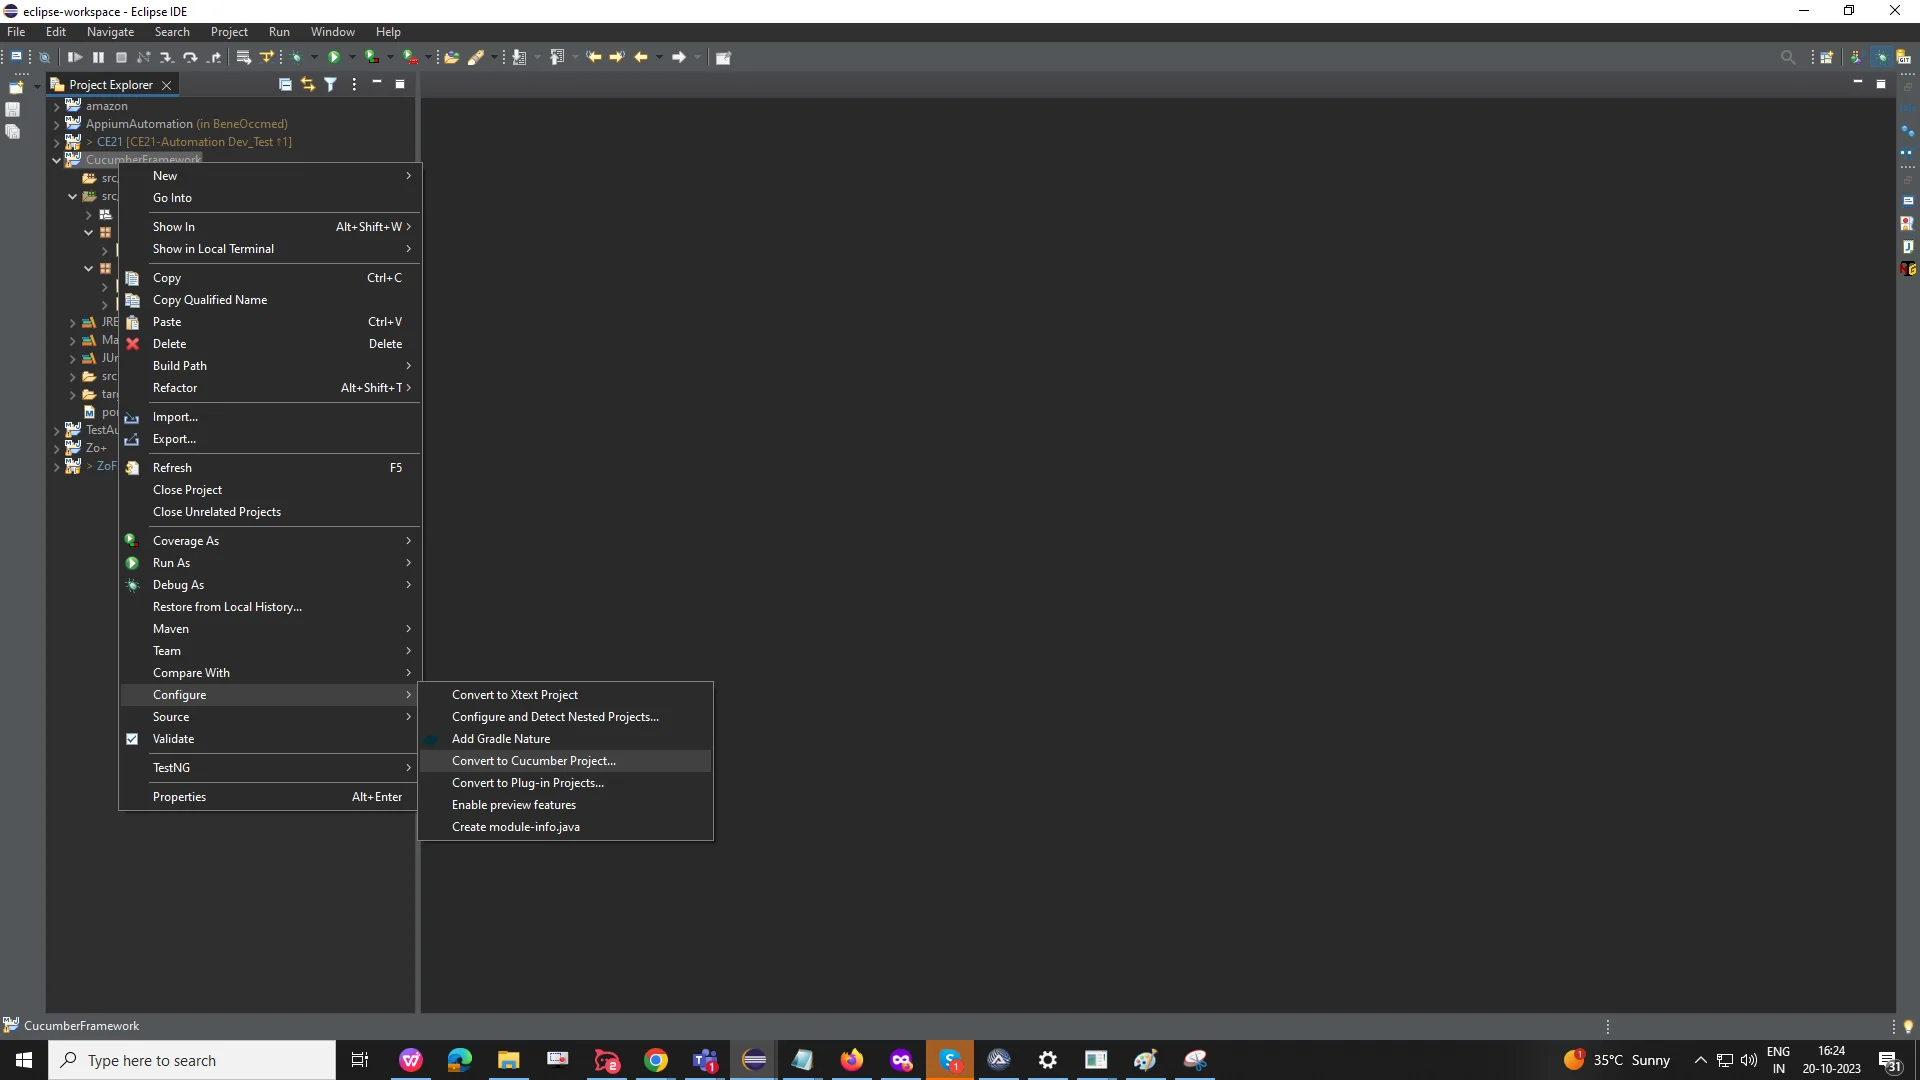
Convert the Maven project to the Cucumber Project:
- Right-click on project > configure > convert to cucumber project.
What is Gherkin syntax?
- "Gherkin uses a set of special keywords to give structure and meaning to executable specifications. In the Gherkin language, lines mostly start with these keywords."
- The primary/Widely used keywords in Gherkin are listed below:
- Feature, Scenario, Given, When, Then, And, But, Example.
- Feature - In the feature, we can describe the module, like on which module we are working or creating the feature file.
- Scenario - In the Scenario, we are describing our TC or scenario.
- Given - The given keyword describes the initial context (Prerequisites).
- When - When a keyword is used to describe the Action.
- Then - In Then, we add the Expected result or what we expect.
- And, But: Used to combine multiple Given, When, or Then steps.
- Example -Provides a table of inputs to a Scenario Outline
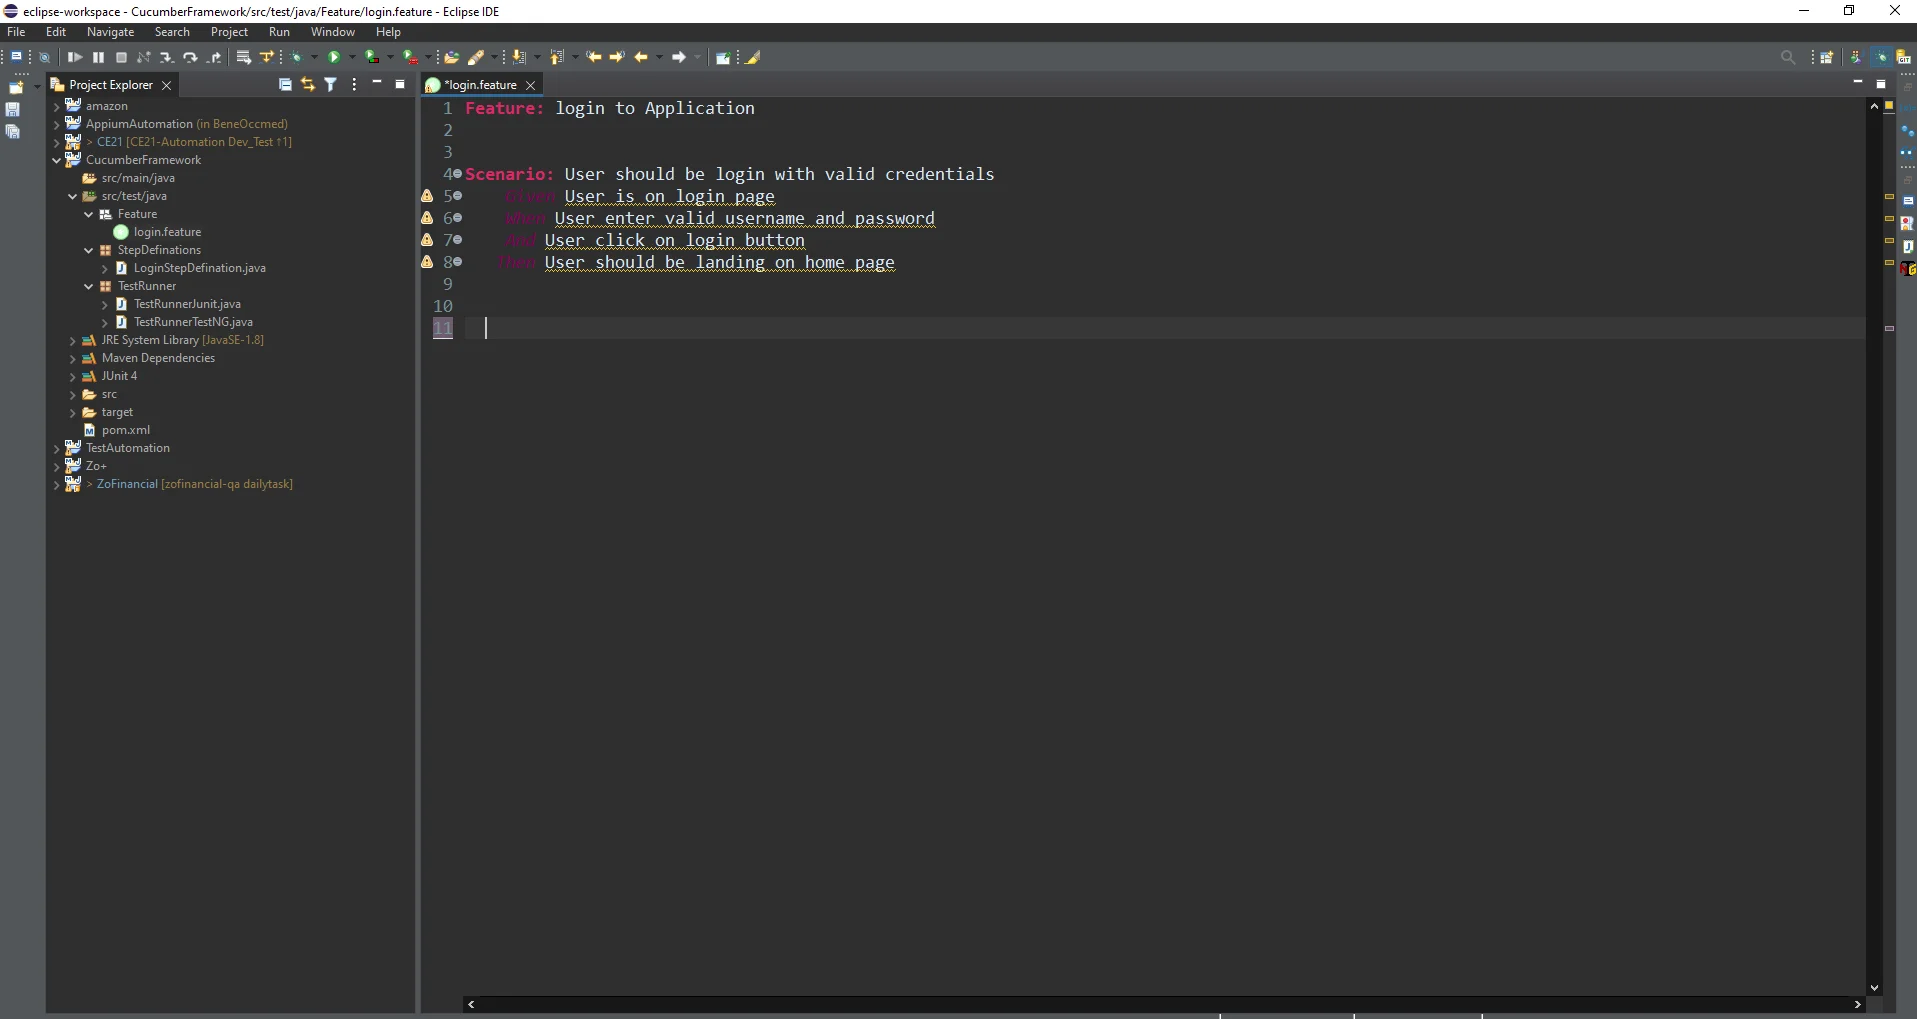
Feature File
- A feature file is a common file used to store features and scenarios. It serves as the entry point for writing Cucumber tests.
- The extension of the feature file is ".feature". Each functionality of the application must have a separate feature file. Multiple feature files can be created, but all must have the ".feature" extension.
StepDefination File
- A Step Definition is a method with an expression that links it to one or more Gherkin steps. When Cucumber executes a Gherkin step in a scenario, it will look for a matching step definition to execute.
- How to create a StepDefination file :
- create feature files using Gherkin syntax.
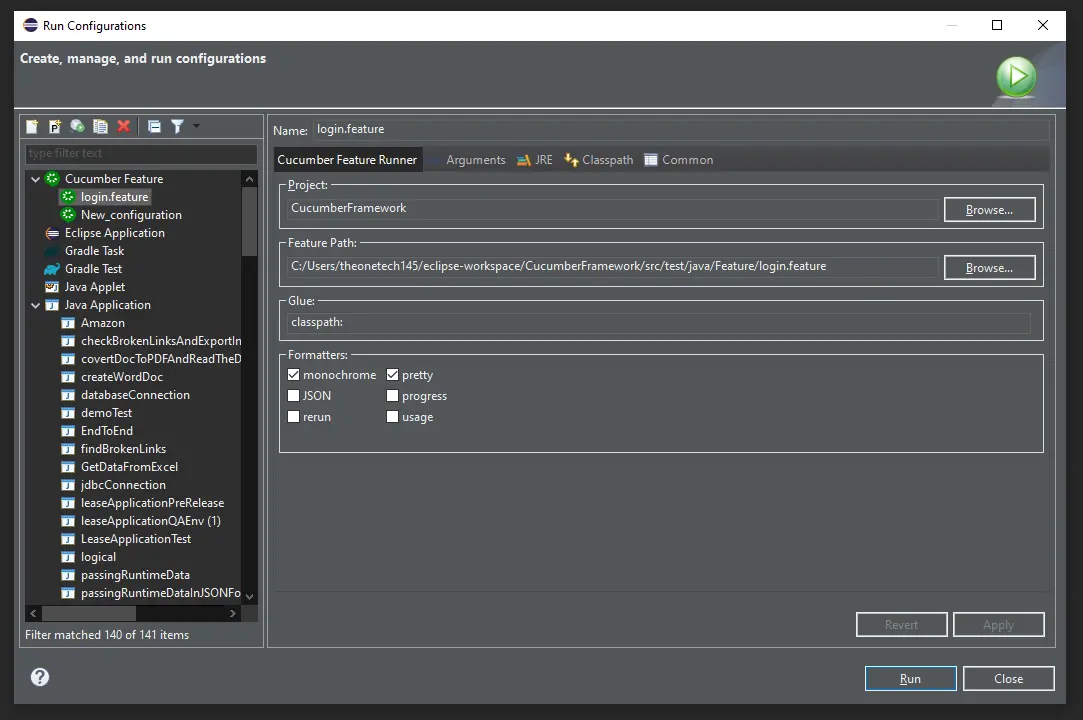
- Right-click on feature file > Run As > Run configuration
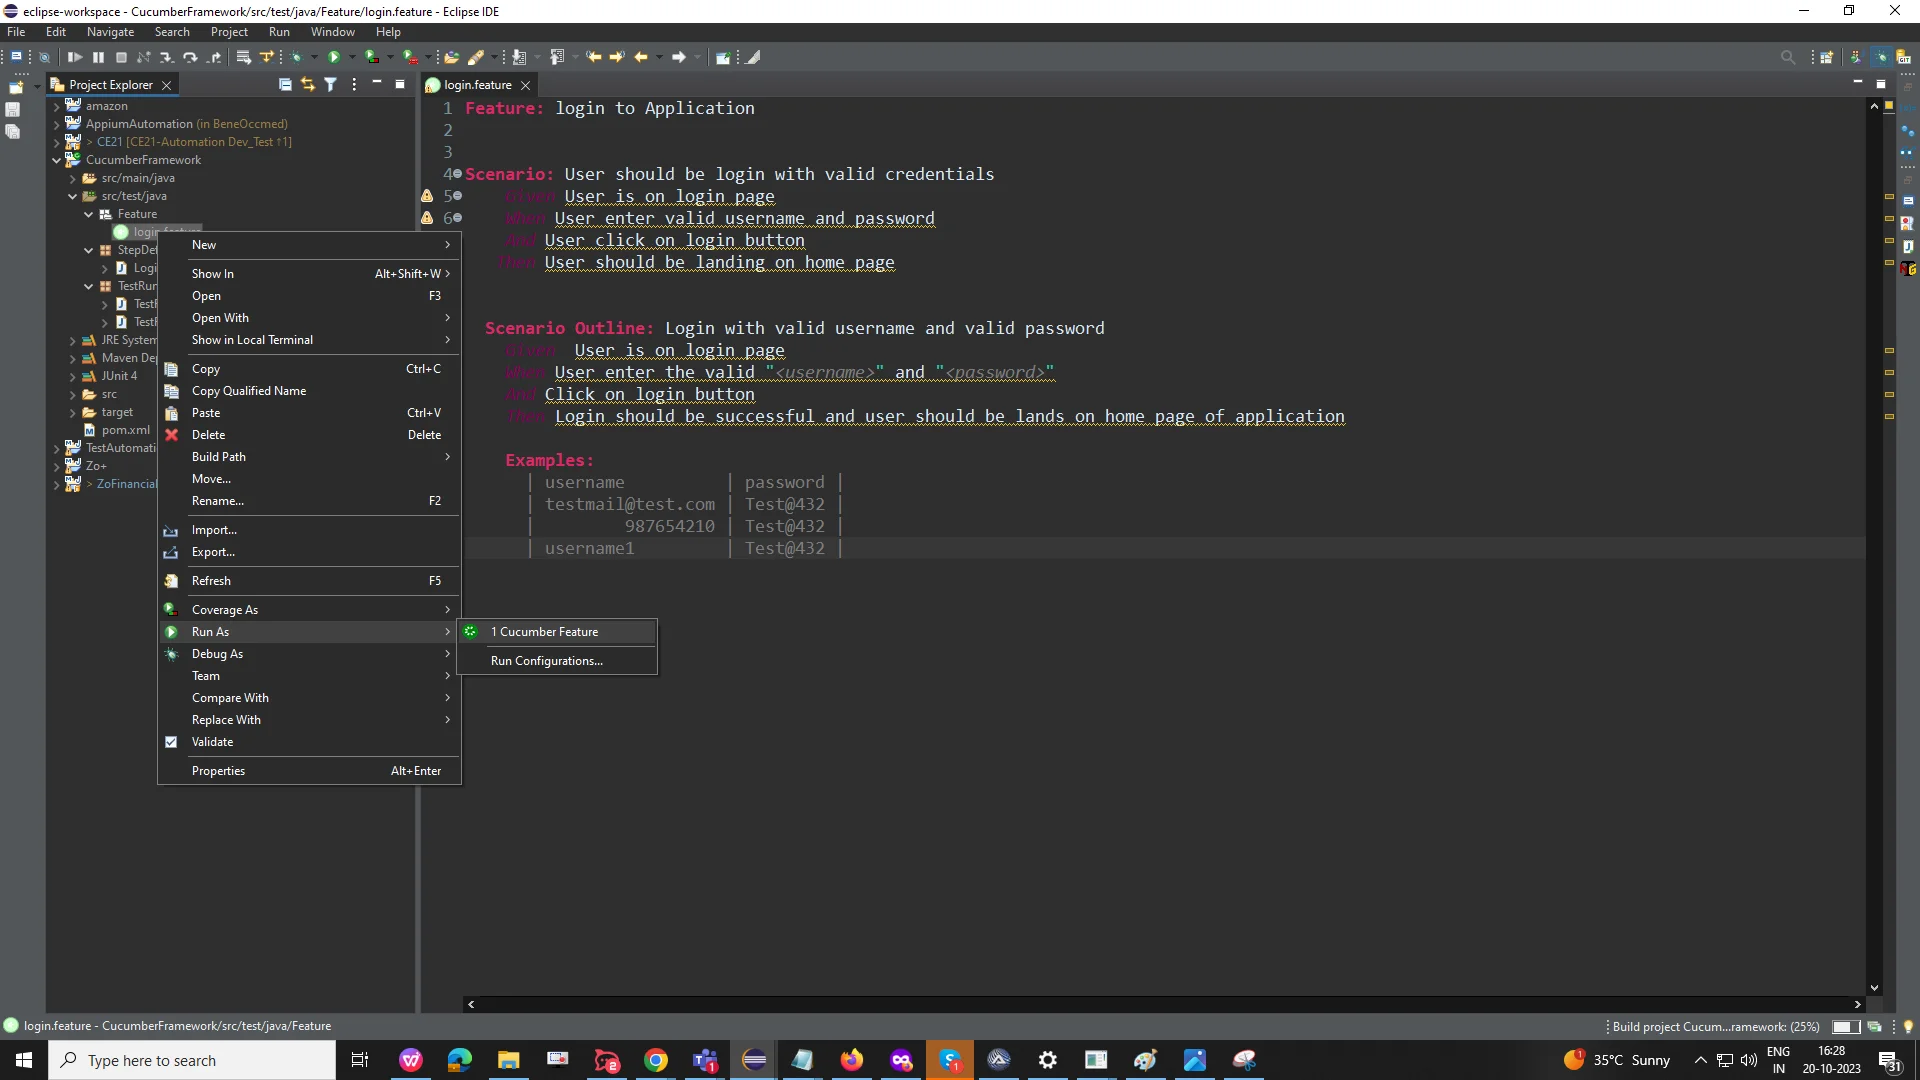
- Click on the Cucumber feature > New configuration > Browse project from local > copy the feature file path > Run
- Cucumber will create a step definition file for unimplemented steps in the feature file.
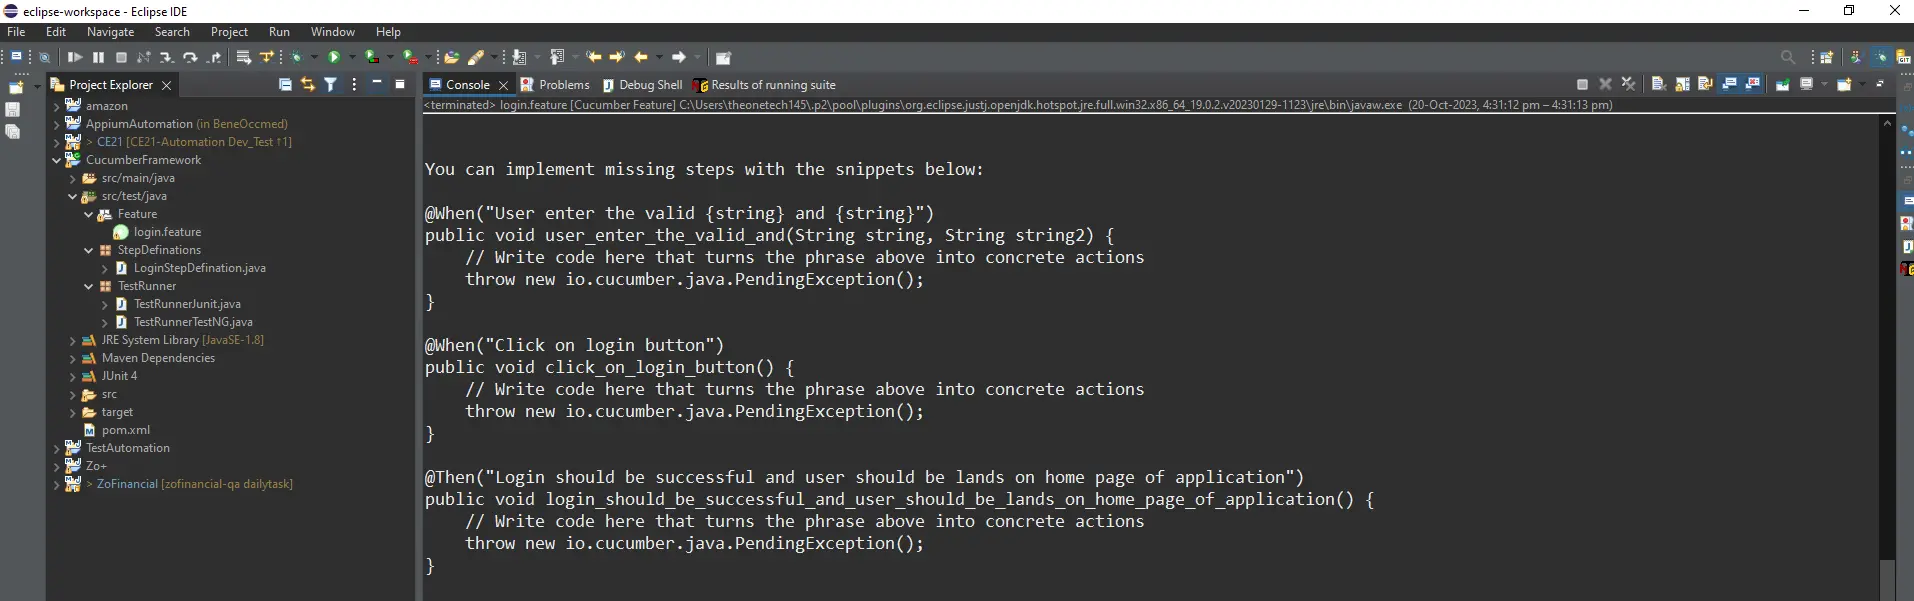
- Copy the unimplemented missing steps from the console and add them to the step definition file.

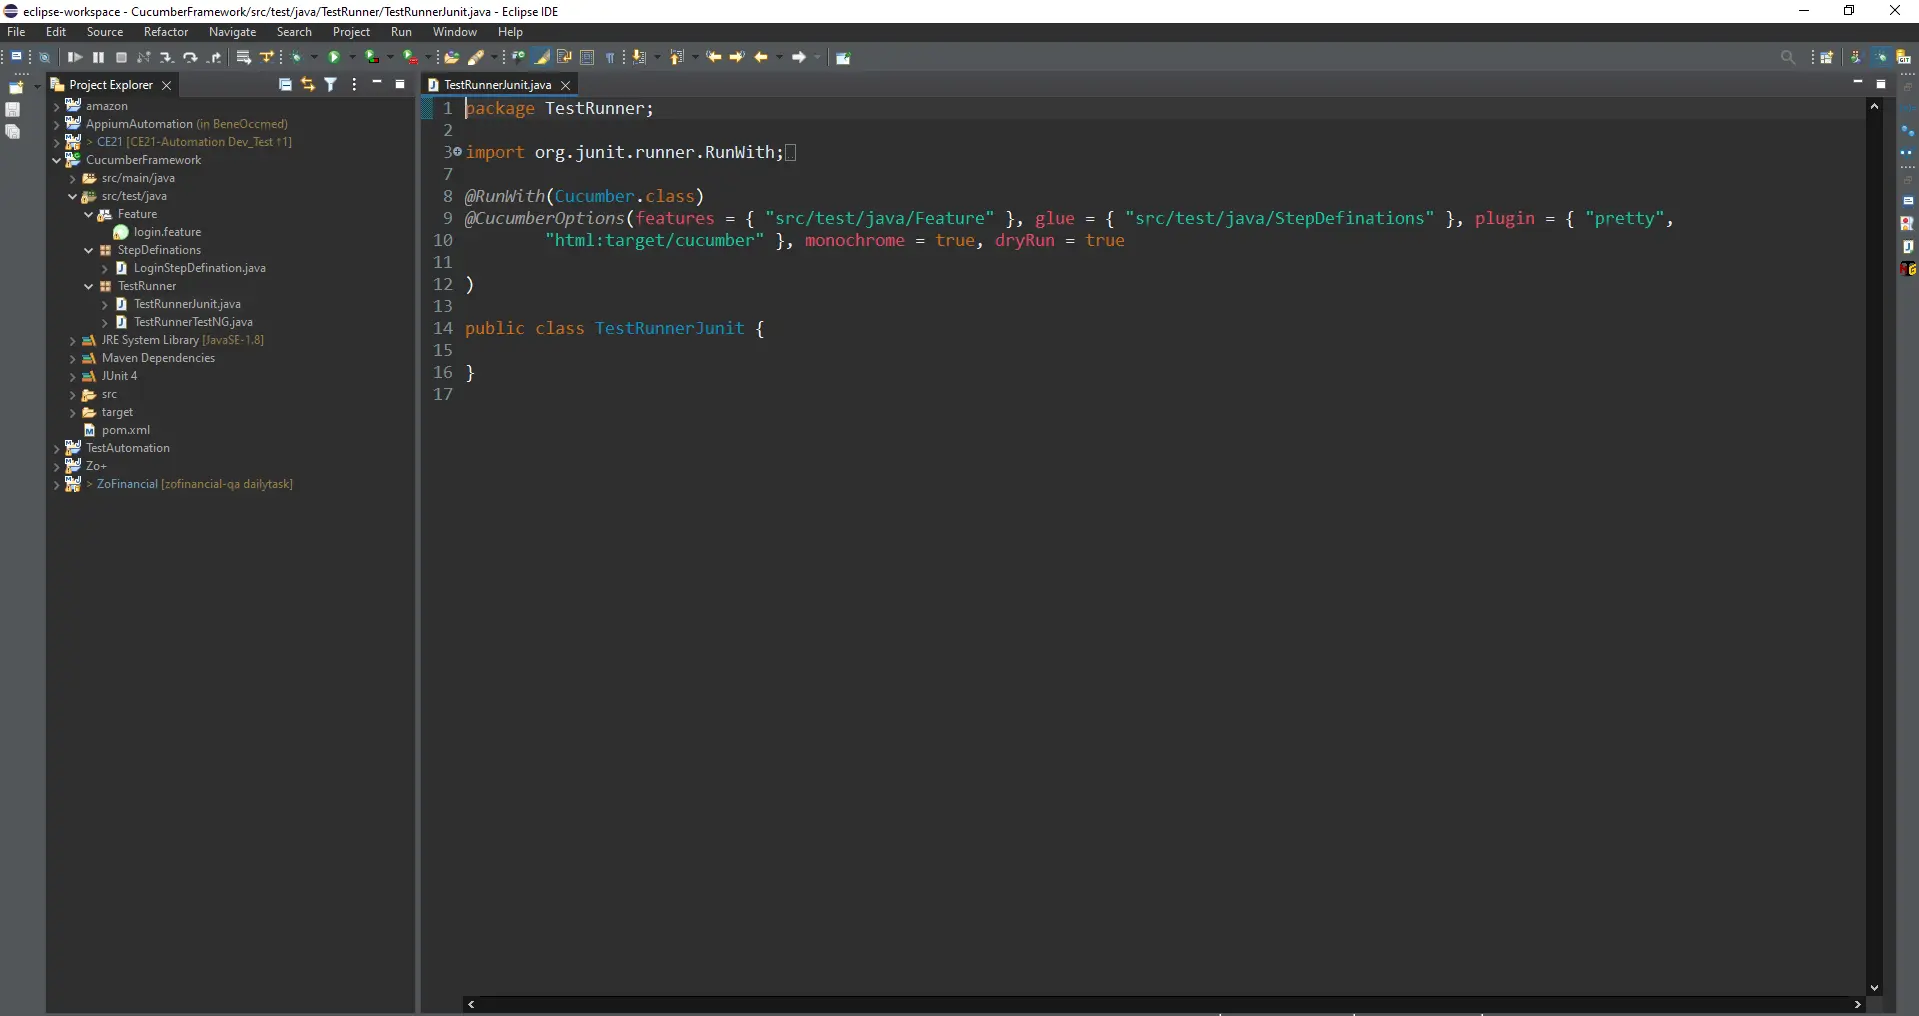
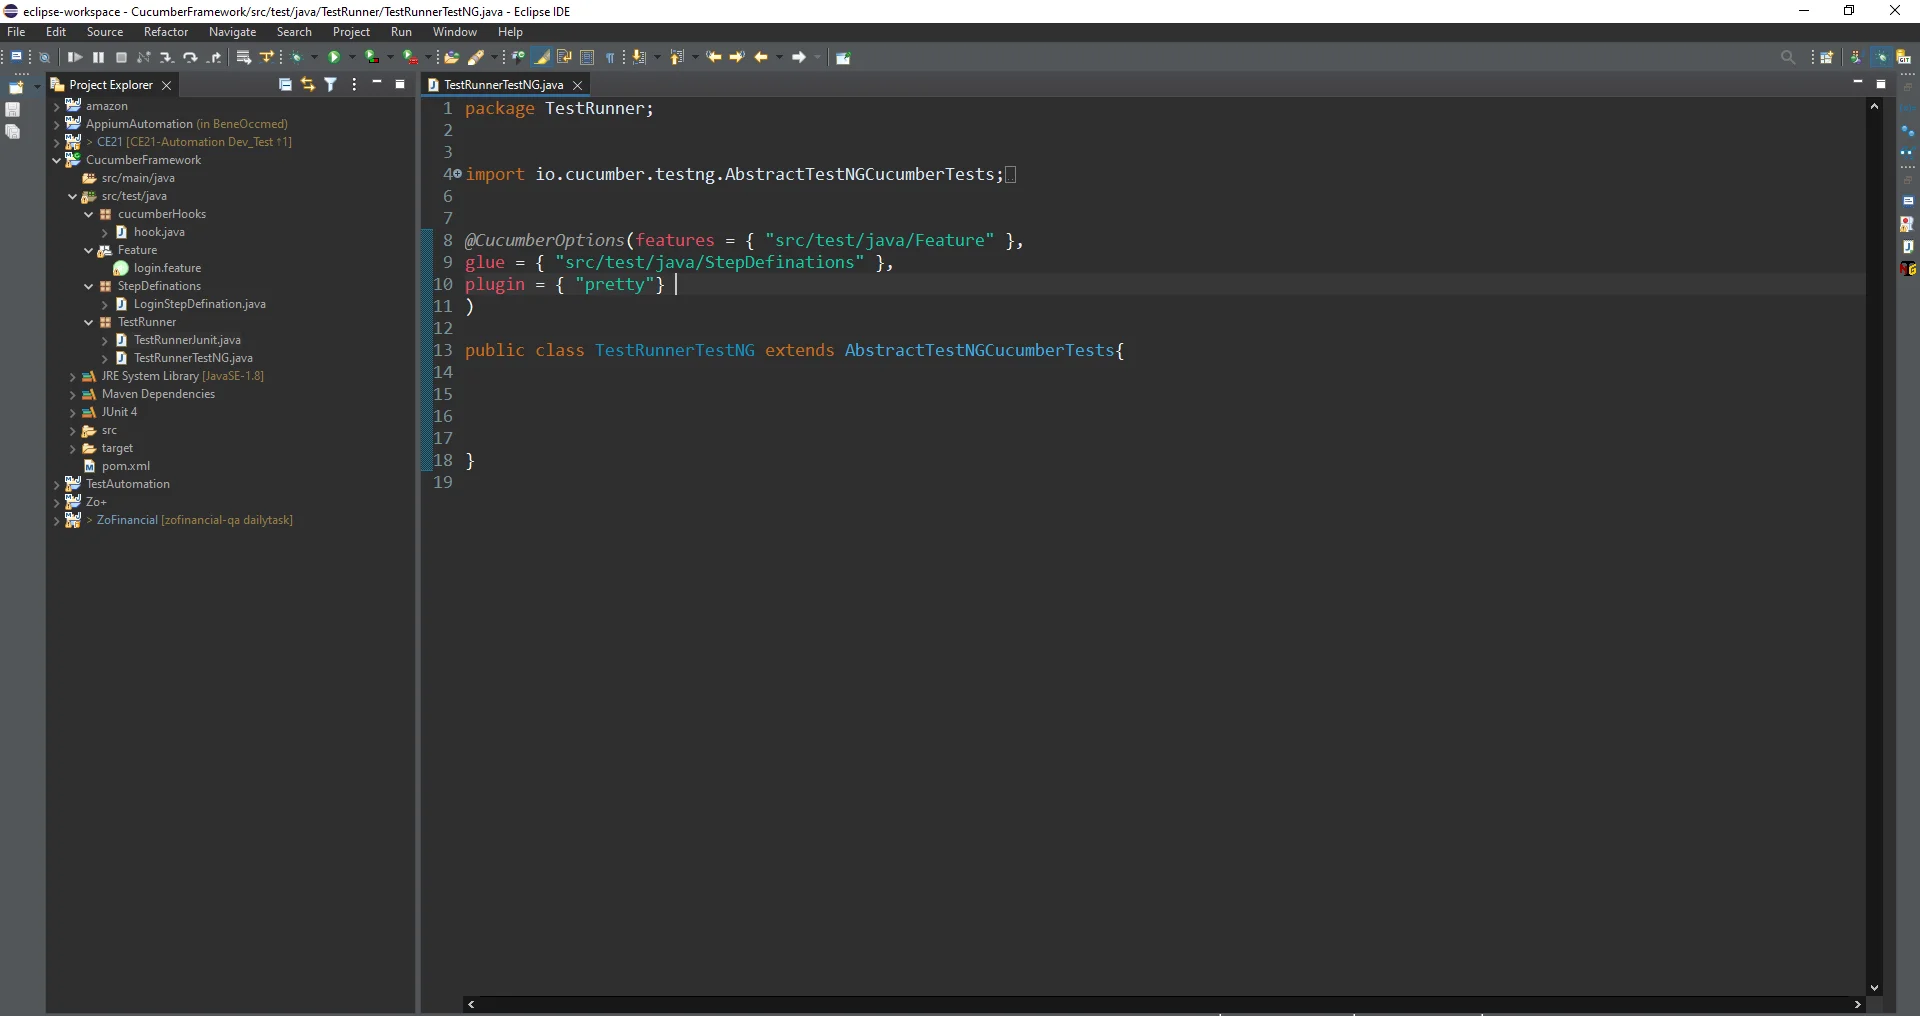
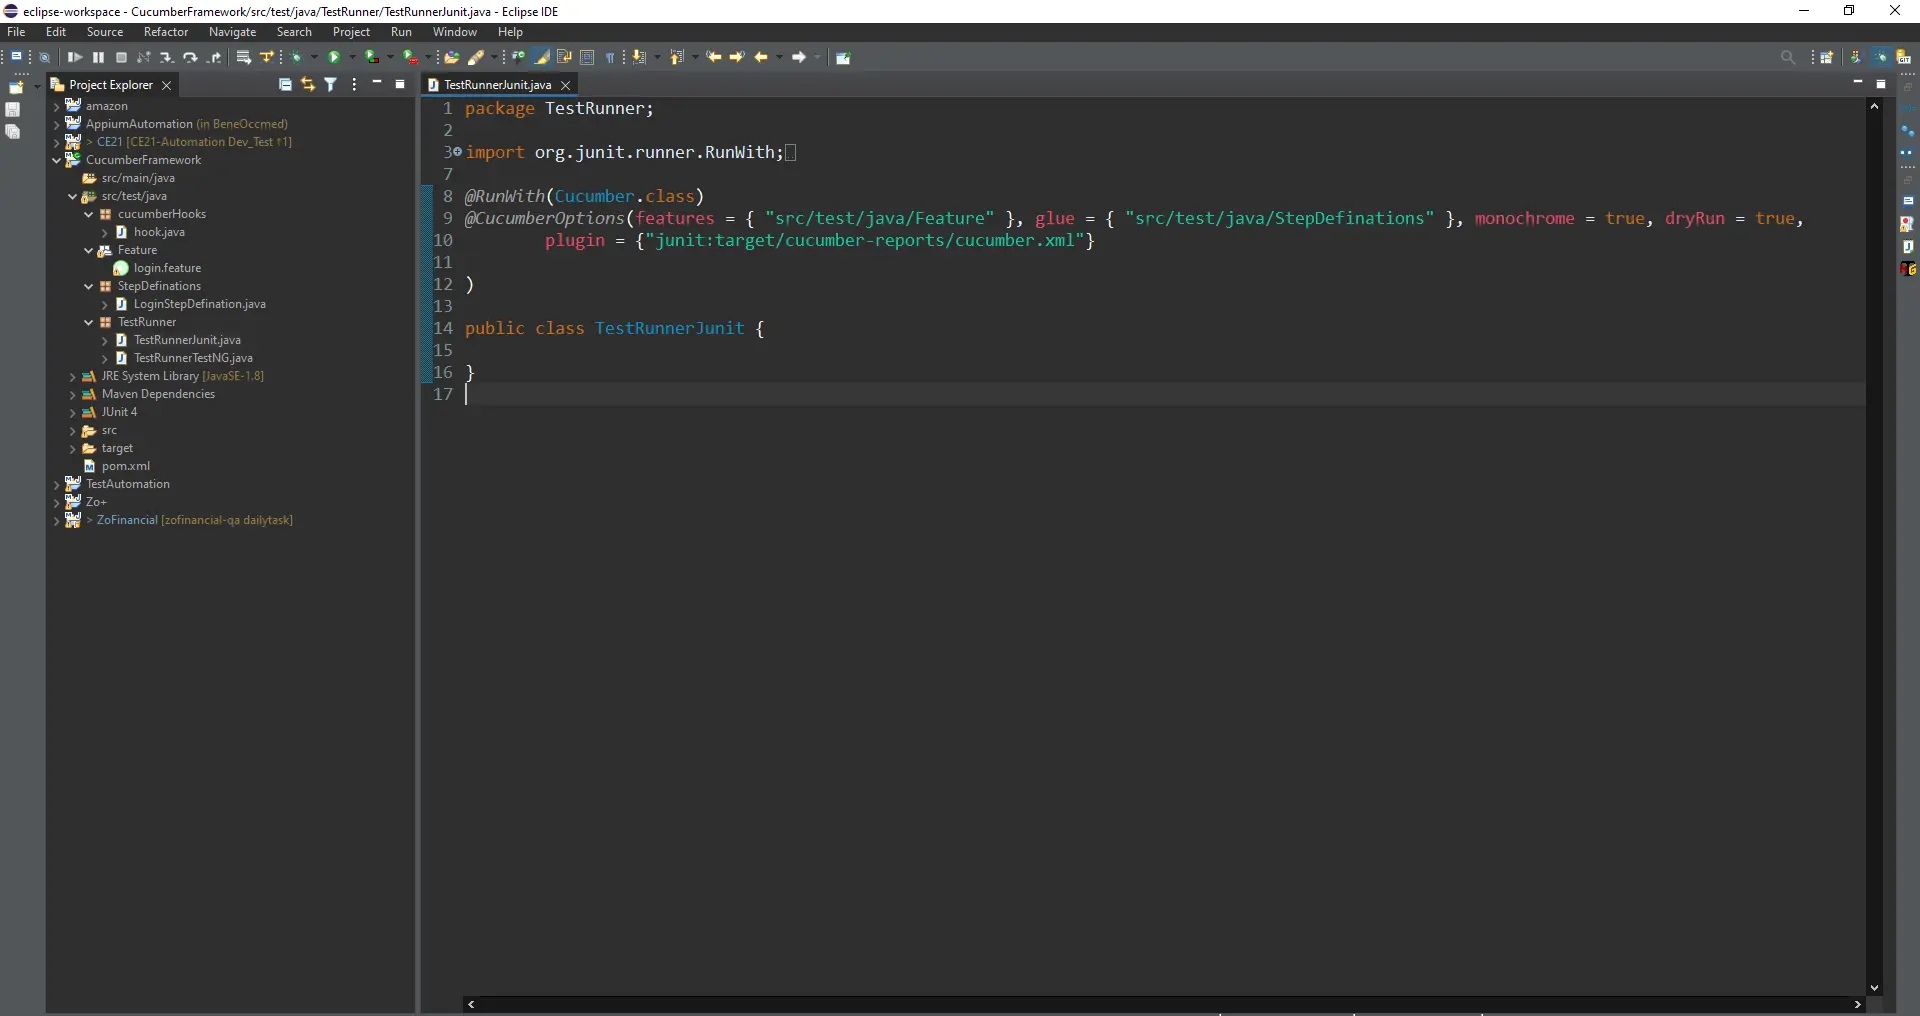
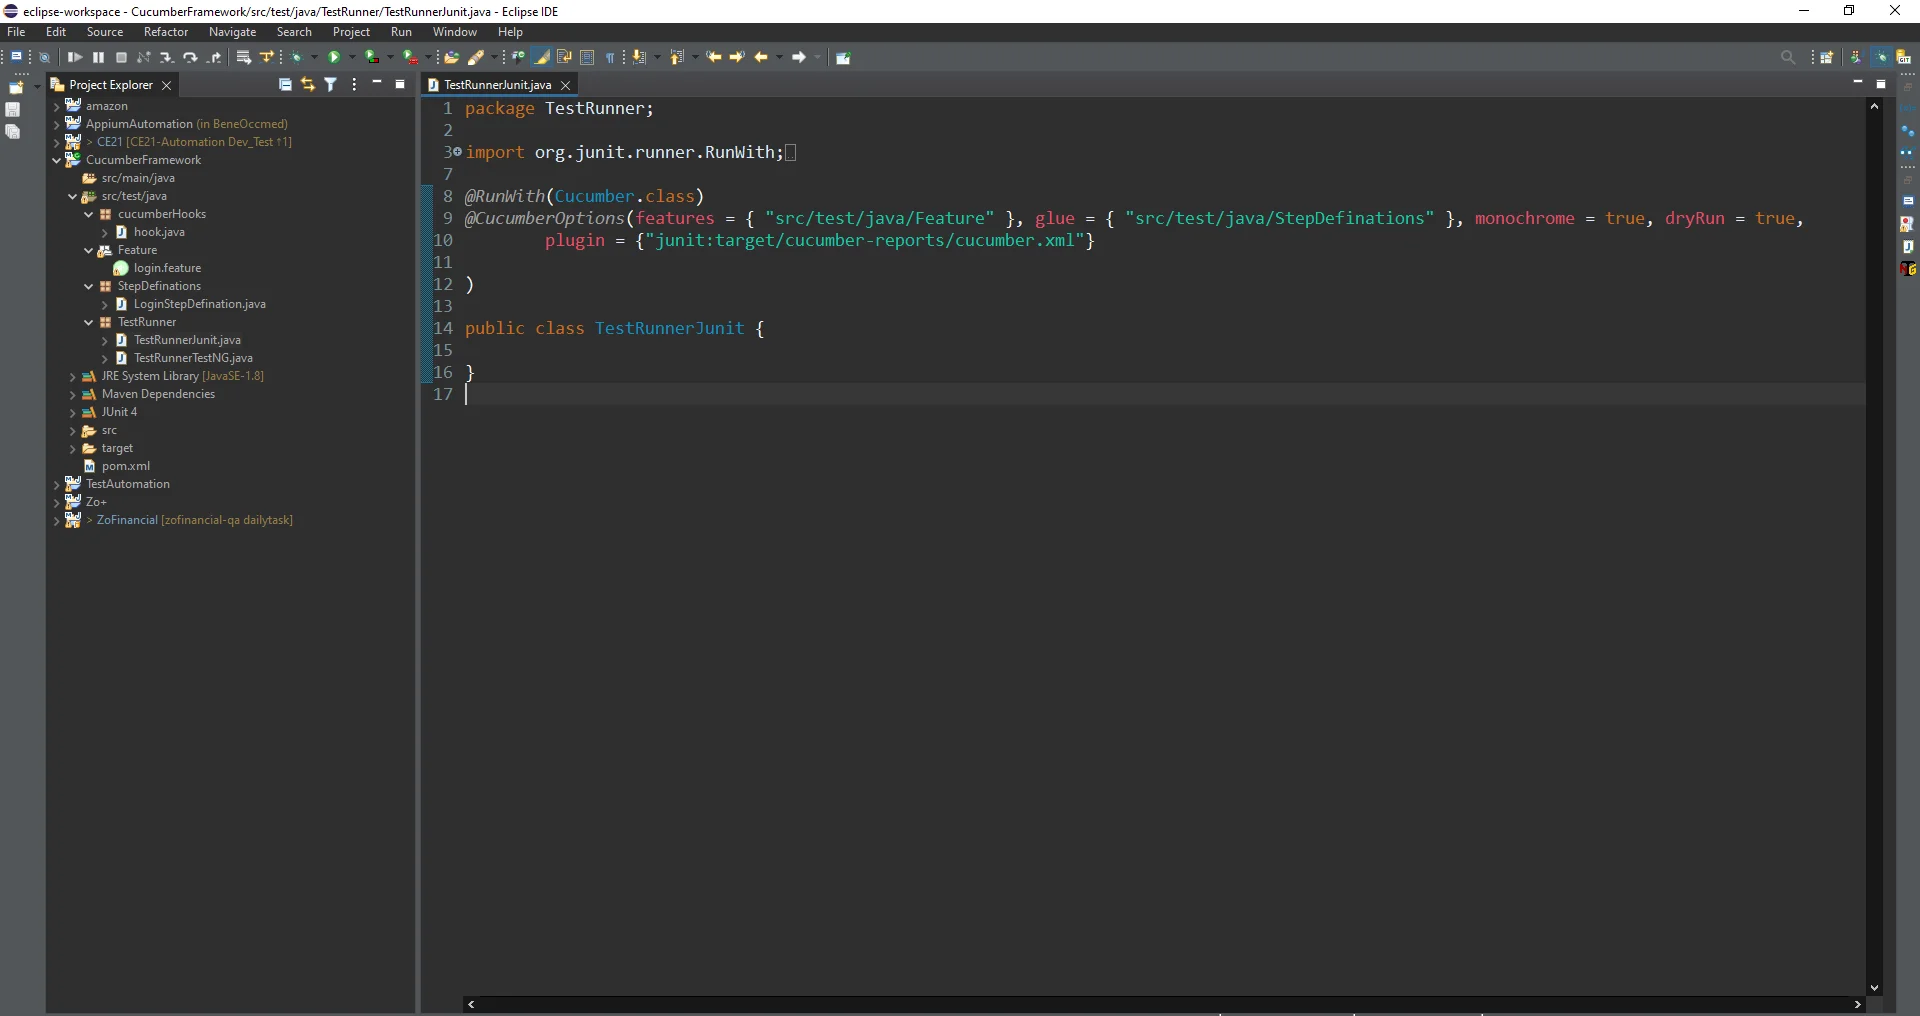
TestRunner file using Junit
- TestRunner class provides the link between the feature file and the step definition file.
- The RunWith annotation commands run the specified class instead of the created JUnit class.
- The CucumberOptions annotation specifies different options for the Cucumber test.
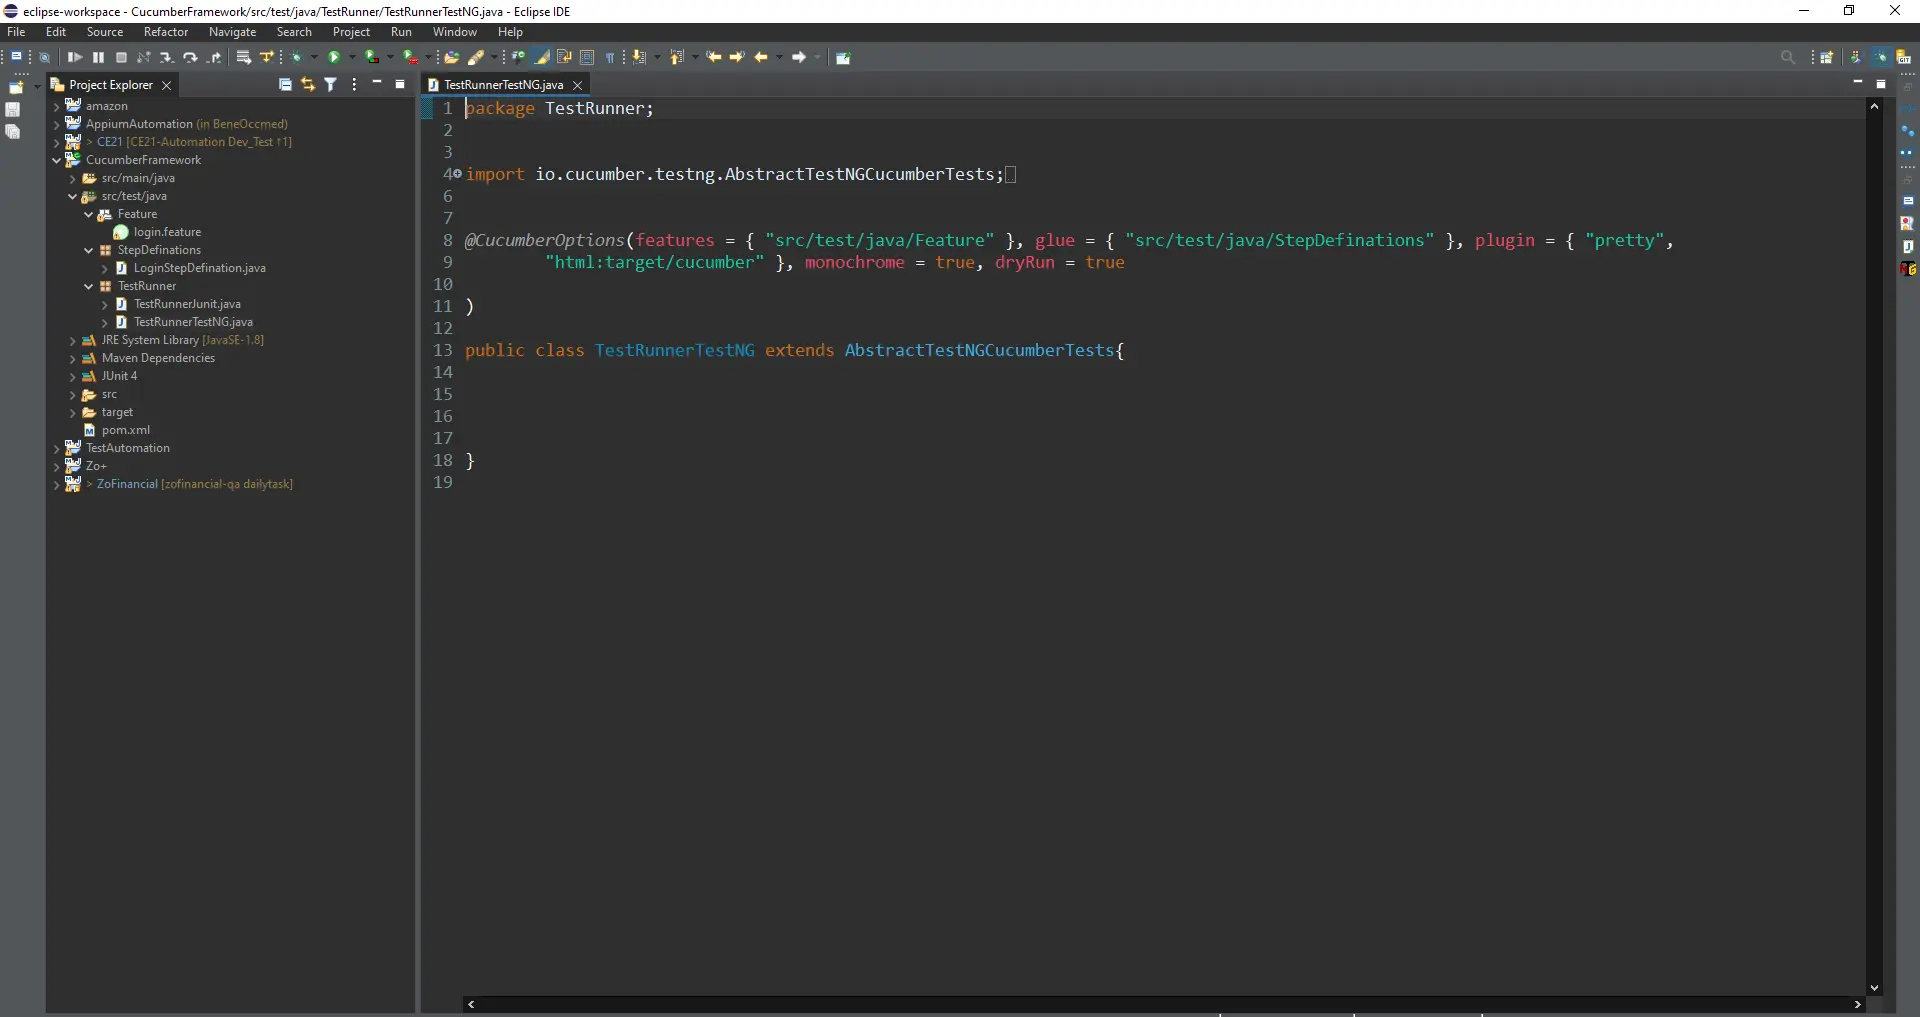
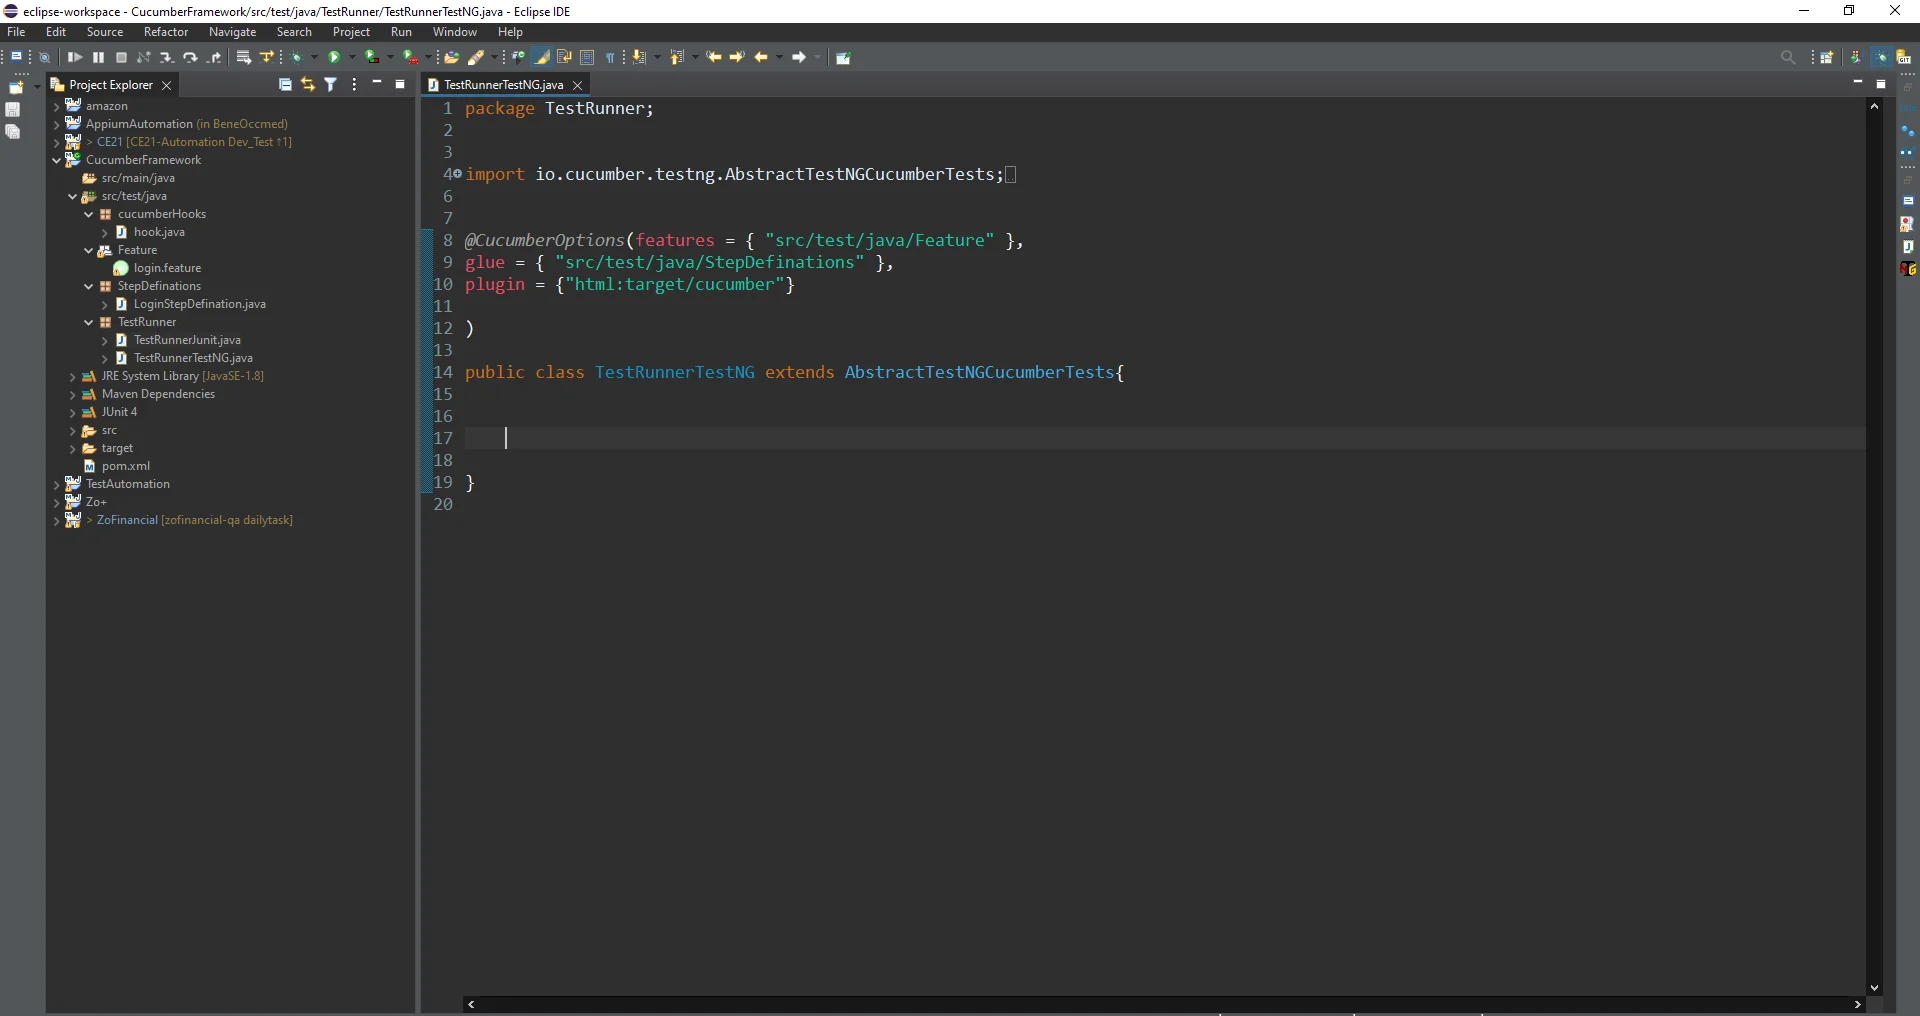
Test Runner file using TestNG
- In the TestNG test runner class, we have to extend the runner class with AbstractTestNGCucumberTests
- For the TestNG runner class, we are not including @RunWith(Cucumber.class)
Cucumber Scenarios
Cucumber scenarios represent individual test cases written in Gherkin syntax, a human-readable format. They outline specific behaviors or functionalities to be tested within an application. Each scenario consists of a series of steps, including Given, When, and Then, which describe the initial context, the action being performed, and the expected outcome, respectively.
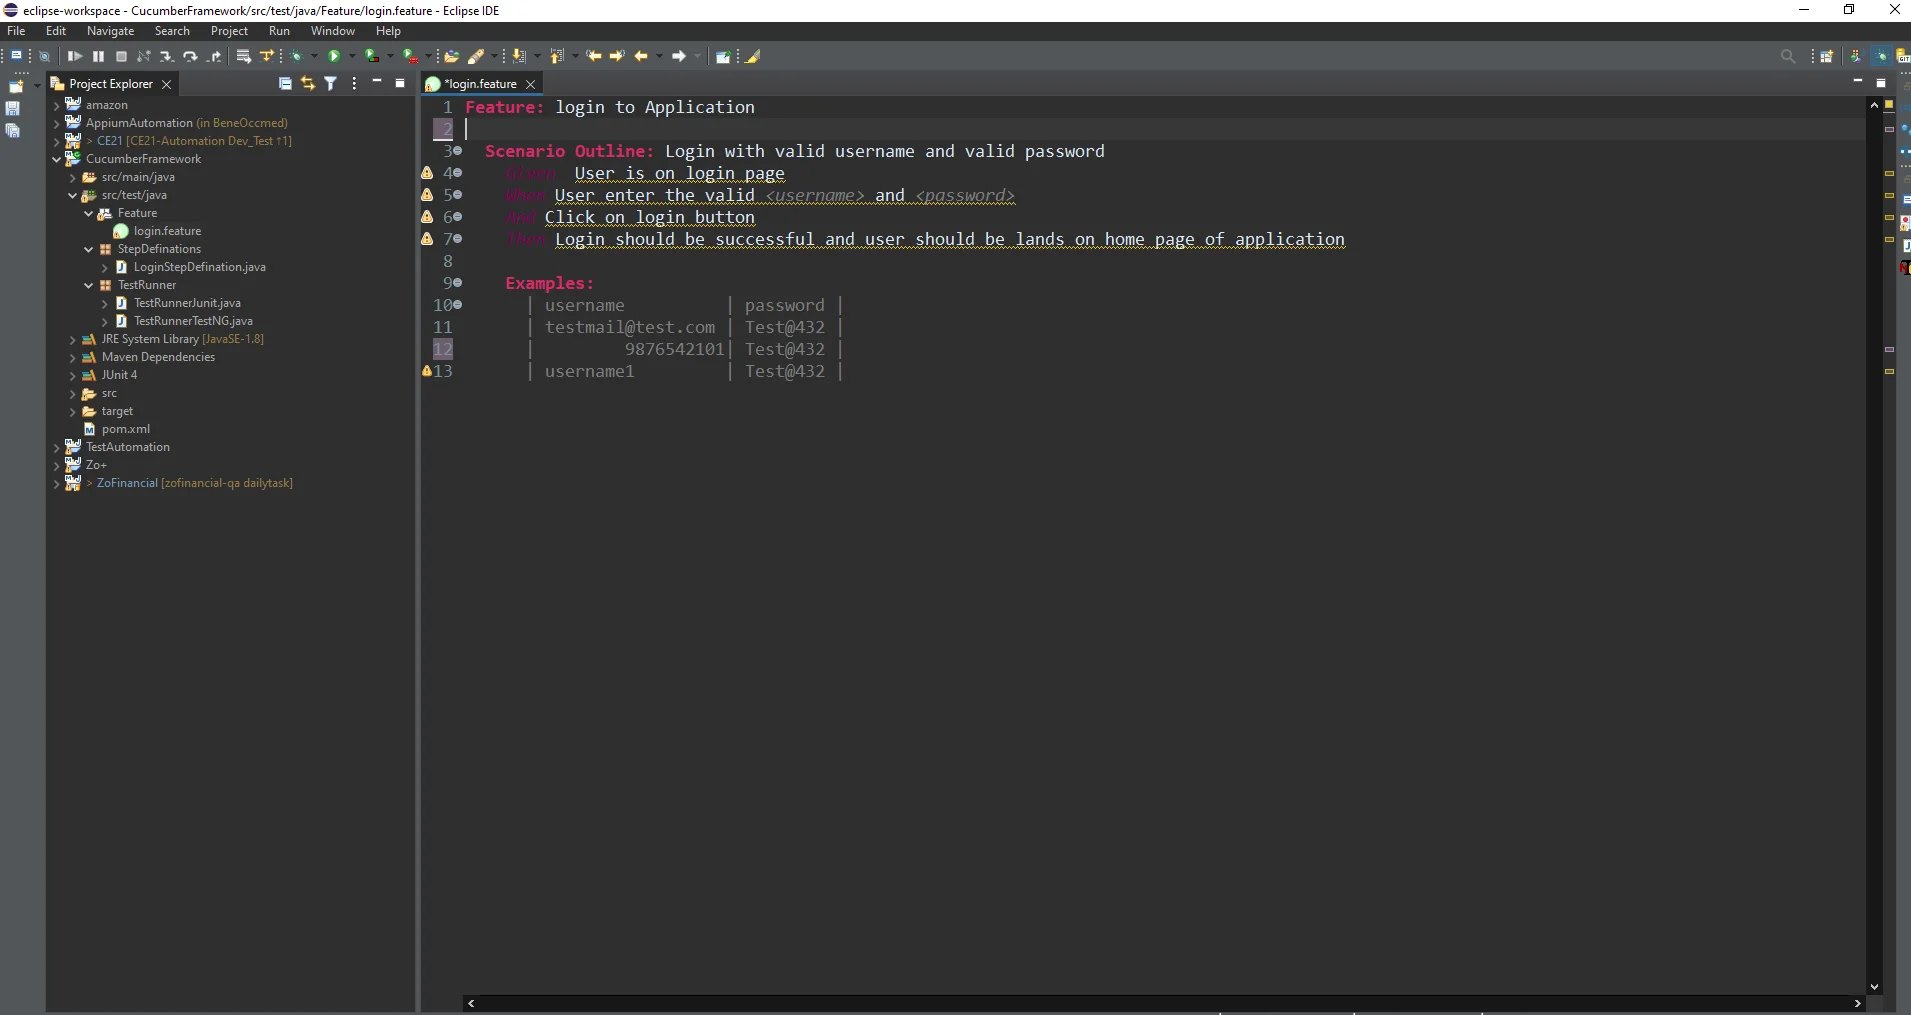
Scenario Outline and Parameterization
A scenario outline is used for parameterization. It allows you to run the same scenario multiple times with different test data sets. Let us understand with the example below.
Example:
Feature: Verify the login functionality
Scenario Outline: Login with Username and password.
Given I open the Chrome browser
And I navigate to the login page.
When I click on the login button.
And I provide username as <Username> and password as <Password>
And I click on the login button.
Then Login success window should be displayed.
Examples:
| Username | Password |
| test@gmail.com | ***** |
| test@mailinator.com | ***** |
| test@outlook.com | ***** |
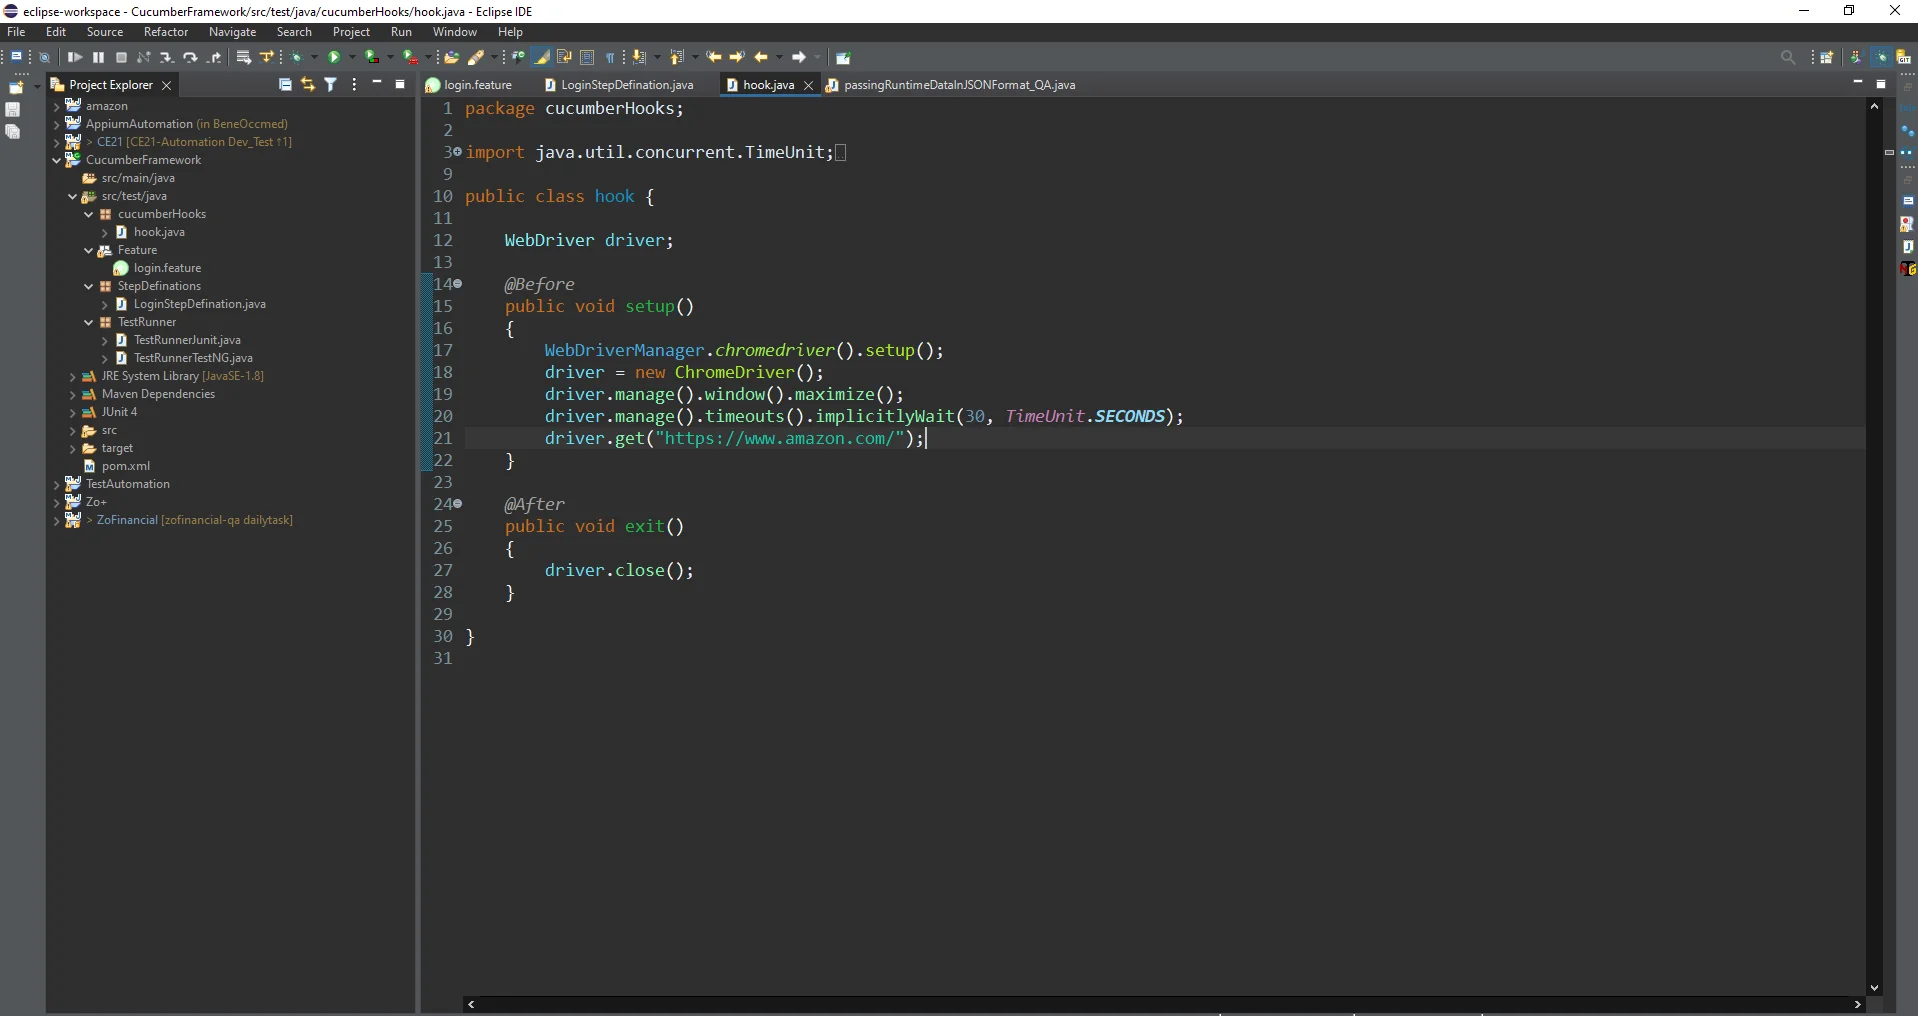
Cucumber hooks
Code segments known as "cucumber hooks" are made to execute either before or after particular actions or scenarios. They carry out standard automated testing operations, such as initializing variables and setting up or cleaning up test environments. Below are examples illustrating the utilization of Cucumber hooks:
- Before Hook: This hook runs in a feature file before each Scenario.
- After Hook: This hook runs in a feature file after each Scenario.
Cucumber plugins
Cucumber allows you to extend its functionality by using plugins. These plugins provide additional features and reporting options to enhance your test automation.
- Pretty Plugin: This plugin prints the feature files in a human-readable format to the console.
- HTML Plugin: It generates an HTML report with the results of your Cucumber tests.
- JUnit Plugin: This plugin generates JUnit XML reports, which can be integrated with CI/CD tools.
Cucumber Reports
Cucumber Reports offer thorough documentation and information on how Cucumber tests are carried out. Clear summaries of test outcomes, including passed, failed, and pending situations, are provided in these reports.
1.HTML Reports:
Cucumber's built-in HTML formatter generates easy-to-read HTML reports. You can use the --plugin html:target/cucumber-reports option to specify the output directory for HTML reports. The generated HTML report will include information about passed and failed scenarios, step definitions, and more.
2.JSON Reports:
Cucumber can generate JSON reports that provide structured data about the test results. Use the --plugin json:target/cucumber-reports/cucumber.json optionto generate a JSON report. JSON reports can be useful for custom reporting or integration with other tools.
3.JUnit XML Reports:
Cucumber can produce JUnit XML reports, which are commonly used in Continuous Integration (CI) pipelines. Usethe --plugin junit:target/cucumber-reports/cucumber.xml option to generate JUnit XML reports. CI tools like Jenkins can parse JUnit XML reports to display test results.
4. Custom Reports:
Extend the ‘cucumber.api.formatter.Formatter’ class and implement the required methods to define your custom reporting format. Use the --plugin option to specify your custom formatter.
Cucumber parallel execution
Cucumber parallel execution enables the simultaneous running of Cucumber scenarios, substantially reducing the overall test execution time. This capability proves particularly beneficial for extensive test suites, where sequential execution can be notably time-intensive. To implement parallel execution with Cucumber, you can proceed with the following general steps:
1. Configure Your Testing Environment:
Because many threads may access your testing environment concurrently during parallel execution, make sure it is thread-safe (e.g., Selenium Web Driver, database connections, etc.).
2. Split Your Features:
Divide your feature files into multiple sets to be executed in parallel. You can organize them into directories or use tags to group features that can run concurrently.
3. Create Multiple Test Runners:
Make several test runner classes, each of which is in charge of executing a different subset of your features. You can manage parallel execution using libraries or frameworks such as TestNG (Java) or others, depending on your programming language.
4. Configure Parallel Execution:
Indicate how many parallel threads or processes you wish to have running at once. Set up your test runners to run concurrently. Depending on the testing as cucumber framework selenium you're using, the precise setup might change.
*Here's an example of how to achieve parallel execution with Cucumber in Java using JUnit and Maven:
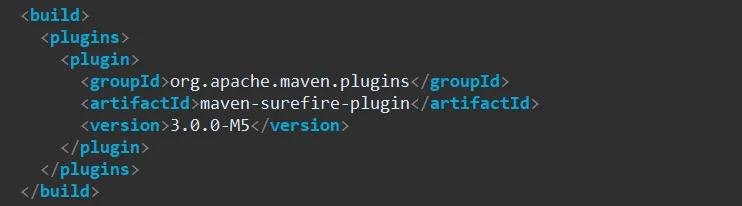
Maven Configuration:
In your Maven pom.xml file, you can use the maven-surefire-plugin to configure parallel execution and specify the test runners.
Create a Test Runner for Parallel Execution
Create multiple test runner classes, each annotated with @RunWith(Cucumber.class) specifying the features and glue paths and add tag = @parallel.
Conclusion
Cucumber is an effective behavior-driven development tool that facilitates collaboration between business and technical teams. Its formal Gherkin language makes it simple to write concise and executable specifications. Cucumber can run tests in parallel, speeding up test suite execution and saving time. Testers can make test setup and maintenance simpler with Cucumber hooks and step definitions. Cucumber helps teams write strong, readable, and efficient automated tests, improving software quality and speeding up development cycles.
About Author

Divya Panchal is an ISTQB-certified QA Tester at PixelQA a Software Testing Company with expertise in both manual and automation testing. She has evolved from a trainee to a key contributor across multiple projects, consistently ensuring software quality and reliability. With a strong focus on continuous professional development, Divya is dedicated to expanding her knowledge in automation and API testing, underscoring her commitment to delivering high-quality software solutions..